Fire Station+ User Guide
Fire Station+ is a collection of online software that extends the functionality of Fire Station.
- Getting Started
- Department Hub
- Manage Your FSSID
- Update Department Information
- Manage Personnel
- Install Fire Station Desktop
- Configure Fire Station Settings
- Apparatus Checks
- Getting Started
- Create a New Apparatus
- View and Edit an Apparatus
- Manage Apparatus Inventory
- Manage an Apparatus Checklist
- View Check History
- Check an Apparatus
- Configure Notifications
- Configure Department Options
- Incident Reports
- Fire Station & NERIS
- Appendix
Getting Started
Create Your FSSID
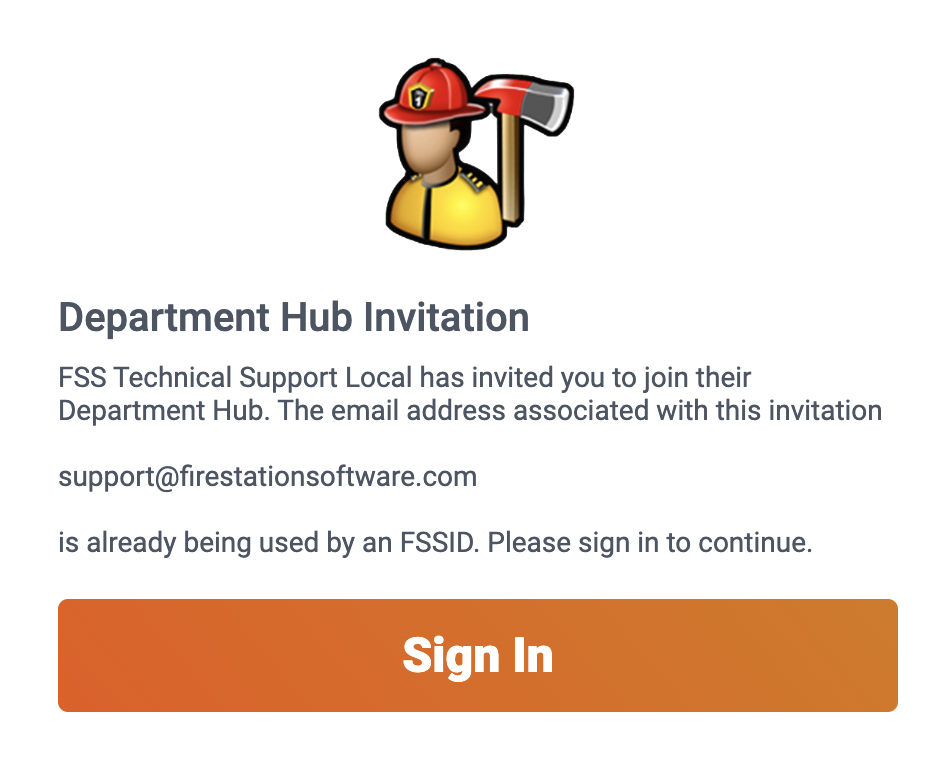
In order to use Fire Station+, you need a Fire Station Software ID (FSSID). If you do not have one, please ask your department administrator to send you an invitation or reach out to us at support@firestationsoftware.com.
If you are a new department, the onboarding team will send the initial invitation to your department's administrator.
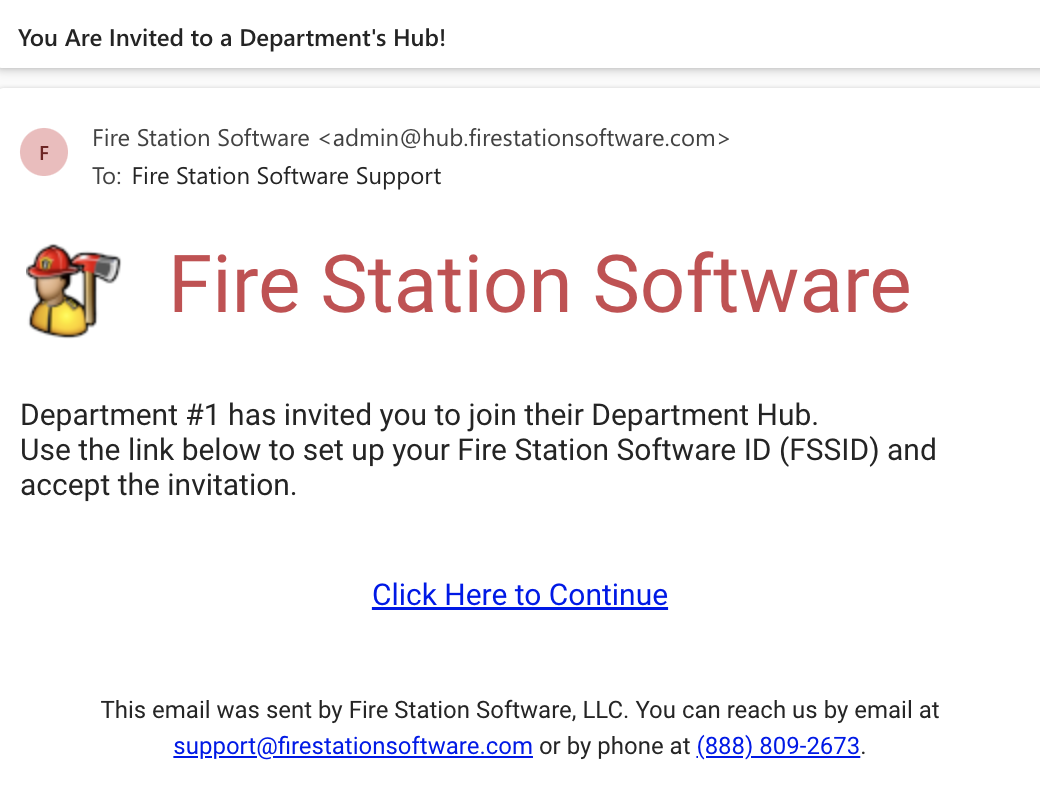
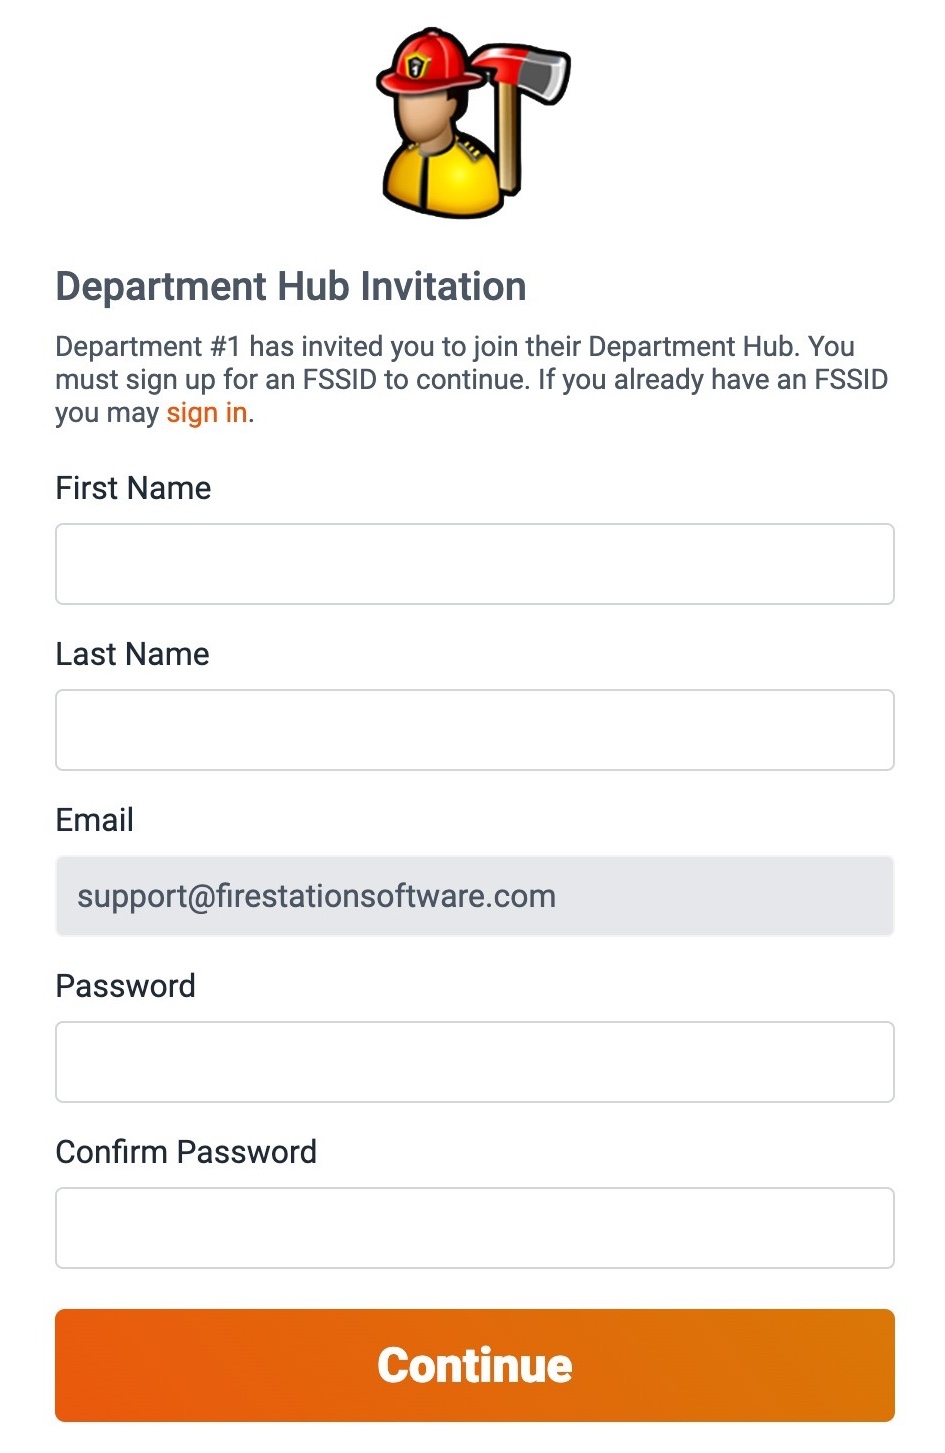
In your inbox, look for an email titled You Are Invited to a Department's Hub! and look for the invitation link labelled "Click Here to Continue". To create your FSSID, follow the link and fill out your information in the registration form.
That's it! You are now ready to use Fire Station+.
Fire Station+ Apps
Department Hub
The Department Hub app is where you manage your FSSID and your department. It also is a central location for opening other apps.
Access the Department Hub at https://hub.firestationsoftware.com.
Apparatus Checks
The Apparatus Checks web app is an extension of the Apparatus Checks module in Fire Station. You can manage your apparatus, equipment and check forms, and conduct checks with mobile or tablet devices.
Access the Apparatus Checks app at https://apparatus-checks.platform.firestationsoftware.com.
Incident Reports
There are two components to incident reporting in Fire Station+ :
The Incident Reports app is an extension of the Incident Reporting module in Fire Station. You can use the web app to fill out NFIRS reports quickly and accurately– save your progress at any time!
Access the Incident Reports app at https://field-reports.firestationsoftware.com.
You can use the Field Reports app to collect incident information in the scene and upload it to the Incident Reports app later on.
Download the Android app from the Department Hub at https://hub.firestationsoftware.com/fire-station-plus/settings.
Support Portal
Communicate directly with us and monitor your support tickets.
Access the support portal at https://portal.firestationsoftware.com.
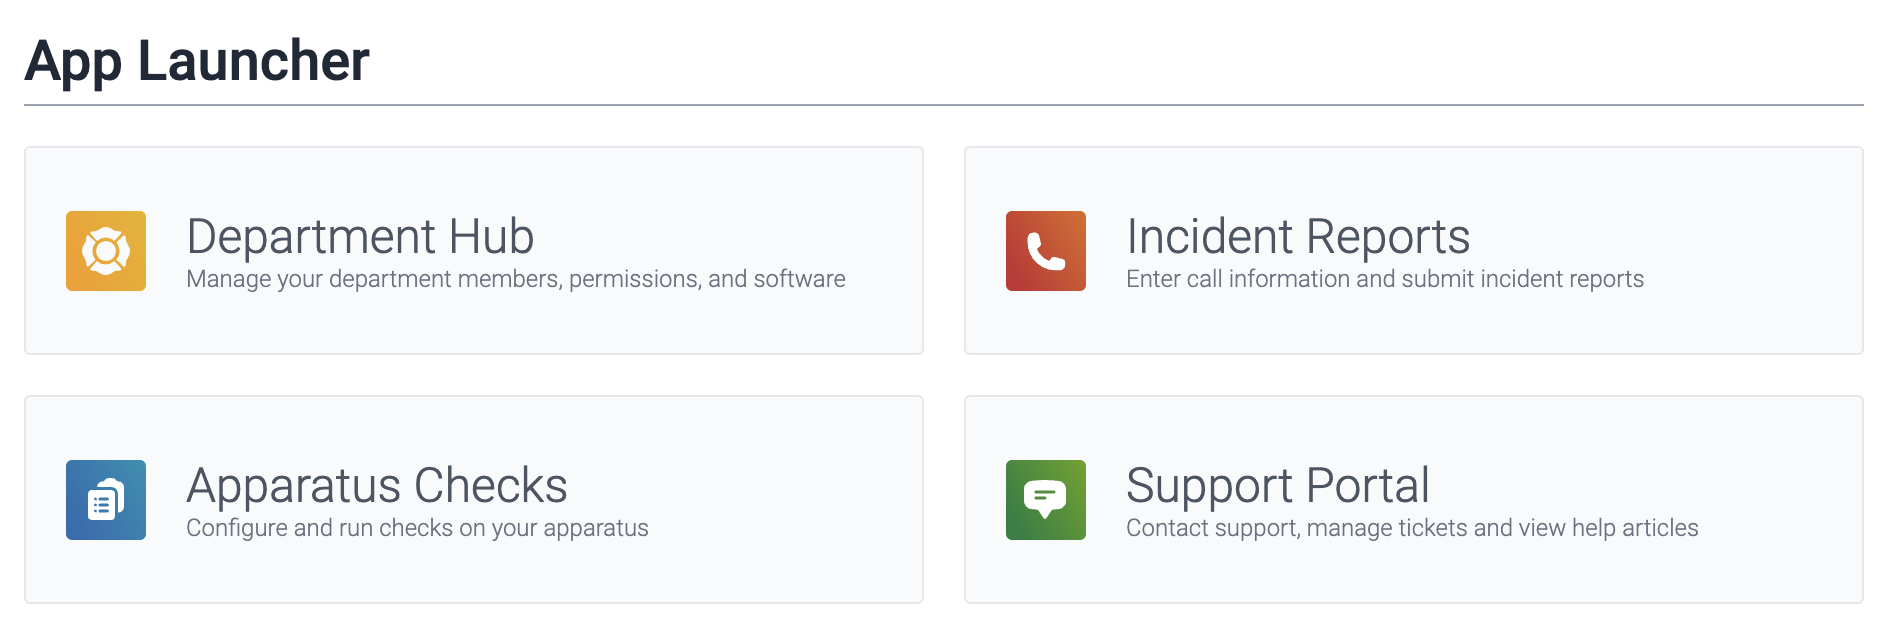
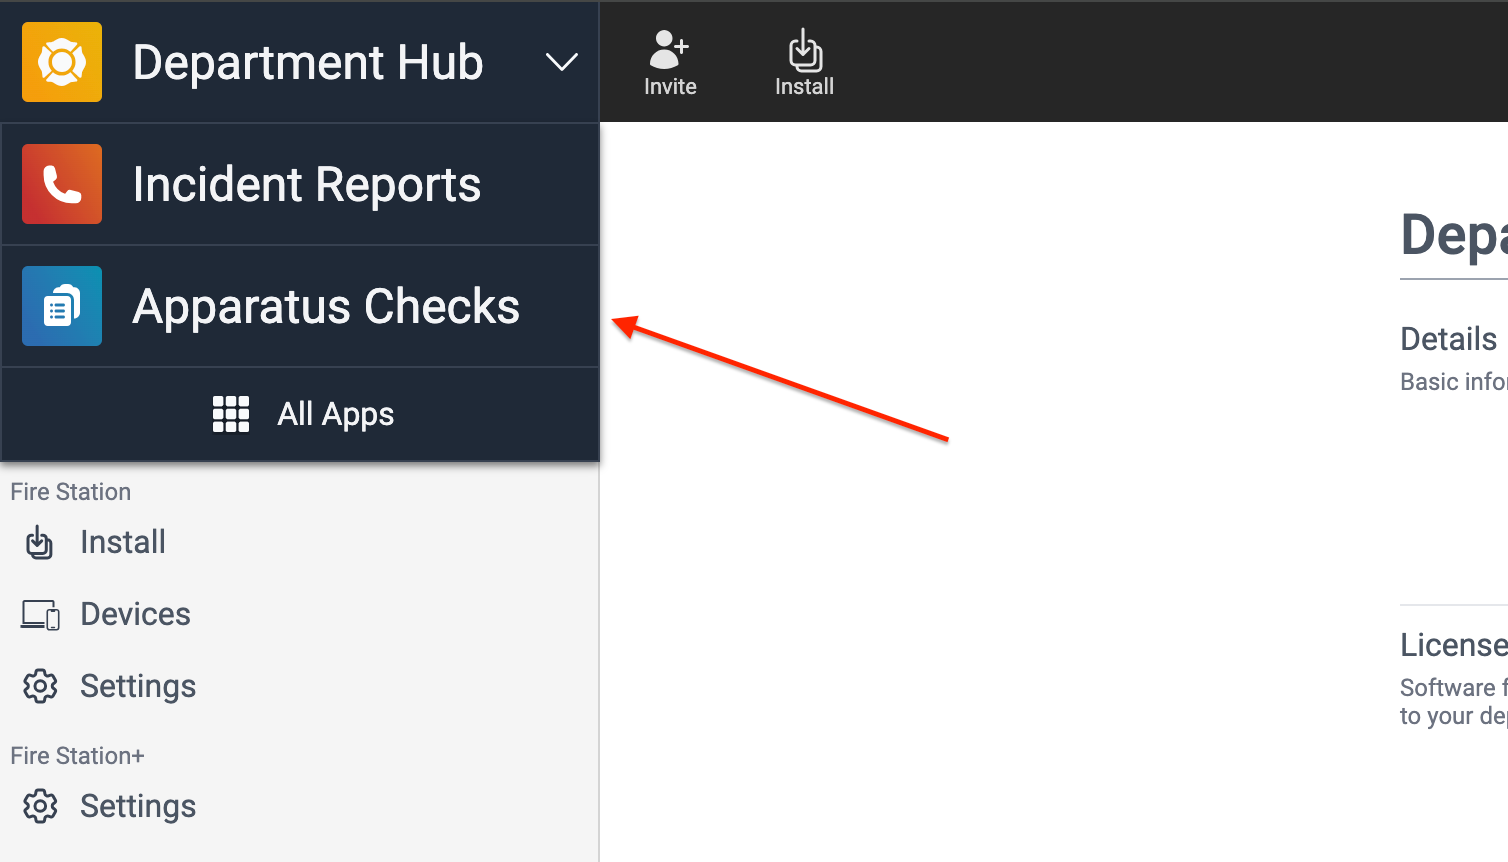
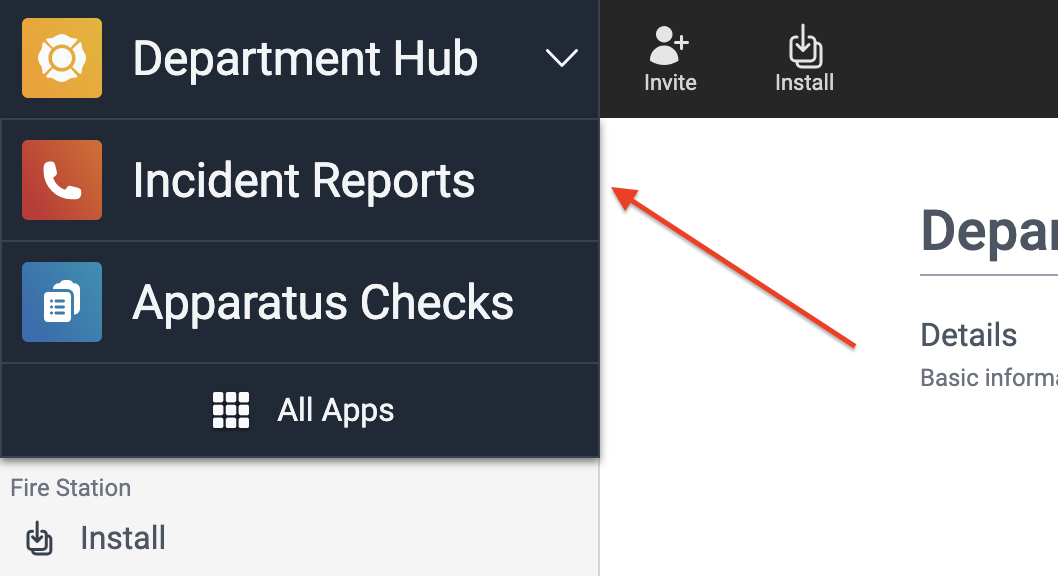
Open Apps With the App Launcher
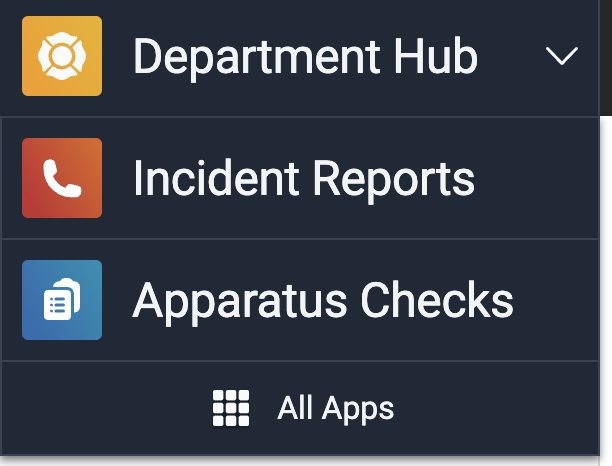
- When using a Fire Station+ app, click the name of the app in the top left to open the app shortcuts.
- Select the app you want to use.
- If the app is not listed, select "All Apps" to open the App Launcher and select an app.
Choose Your Department
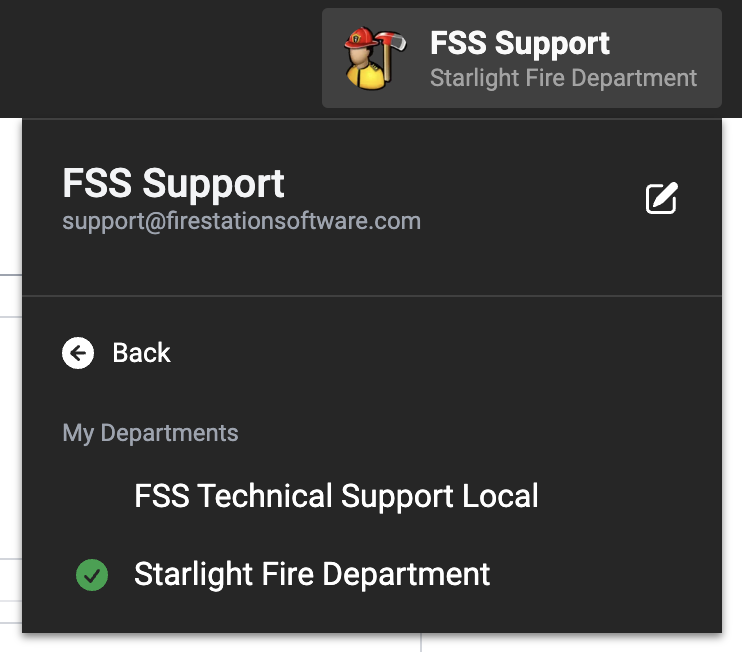
When you sign in to a Fire Station+ app using your FSSID, you use the app in the context of the original department you were invited to join. However, you can link your FSSID to more than one department. All you need to do is accept invitation from an additional department.
If your FSSID is linked to multiple departments, you will be prompted to select one when you sign in. You can also switch between them at any time.
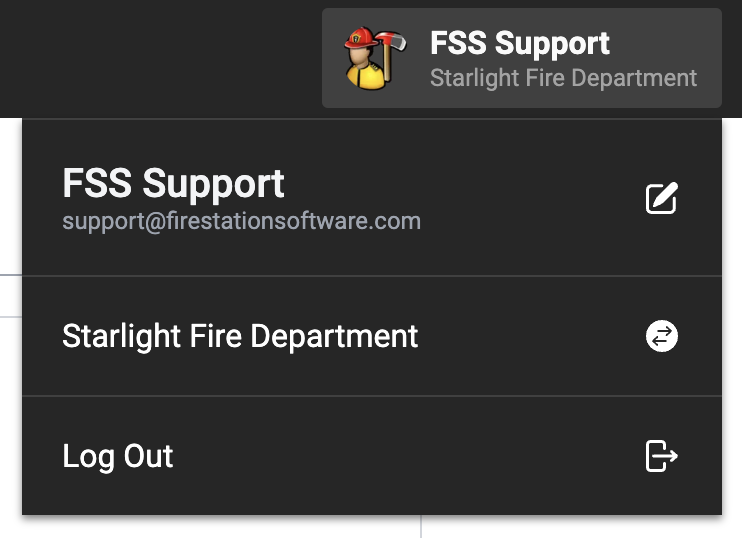
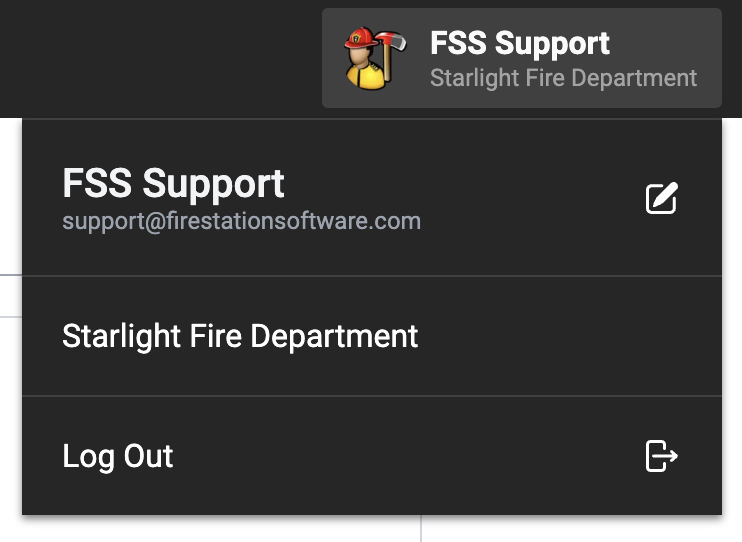
- While using a Fire Station+ app, click your name/department name in the top right bar to open the menu.
- Click the name of your department in the menu to view a list of your departments.
- Select the name of the department you want to use
Department Hub
The Department Hub app is where you manage your FSSID, your department, and your department's software. It also is a central location for opening other apps.
Manage Your FSSID
Reset Your Password
You can reset your password from the sign in screen.
- On a browser, go to https://hub.firestationsoftware.com.
- Click "Sign In".
- At the bottom of the page, click the link next to the text Forgot Your Password?
- Enter the email address used for your FSSID and click "Reset Password"
- Look for an email with the subject Reset your Fire Station Software ID (FSSID) password and click the reset link in the email.
- Enter a new password, confirm it, and click "Reset Password" to finalize the change.
If you are a department manager, you can also reset passwords for any member of your department.
- On a browser, go to https://hub.firestationsoftware.com.
- Sign in with your FSSID.
- In the left menu, select Members in the Personnel section.
- Select a person from the list and click "Send Password Reset".
- Look for an email with the subject Reset your Fire Station Software ID (FSSID) password and click the reset link in the email.
- Enter a new password, confirm it, and click "Reset Password" to finalize the change.
Update Your Personal Information
You can change your personal information from the Department Hub.
- On a browser, go to https://hub.firestationsoftware.com. You may need to sign in with your FSSID.
- At the top right, click your name/department name to open the menu.
- Click your name/email to open the FSSID edit form.
- Make any changes to your FSSID.
- Click "Save".

If you would like to change your email associated with your FSSID, please contact us at support@firestation.com
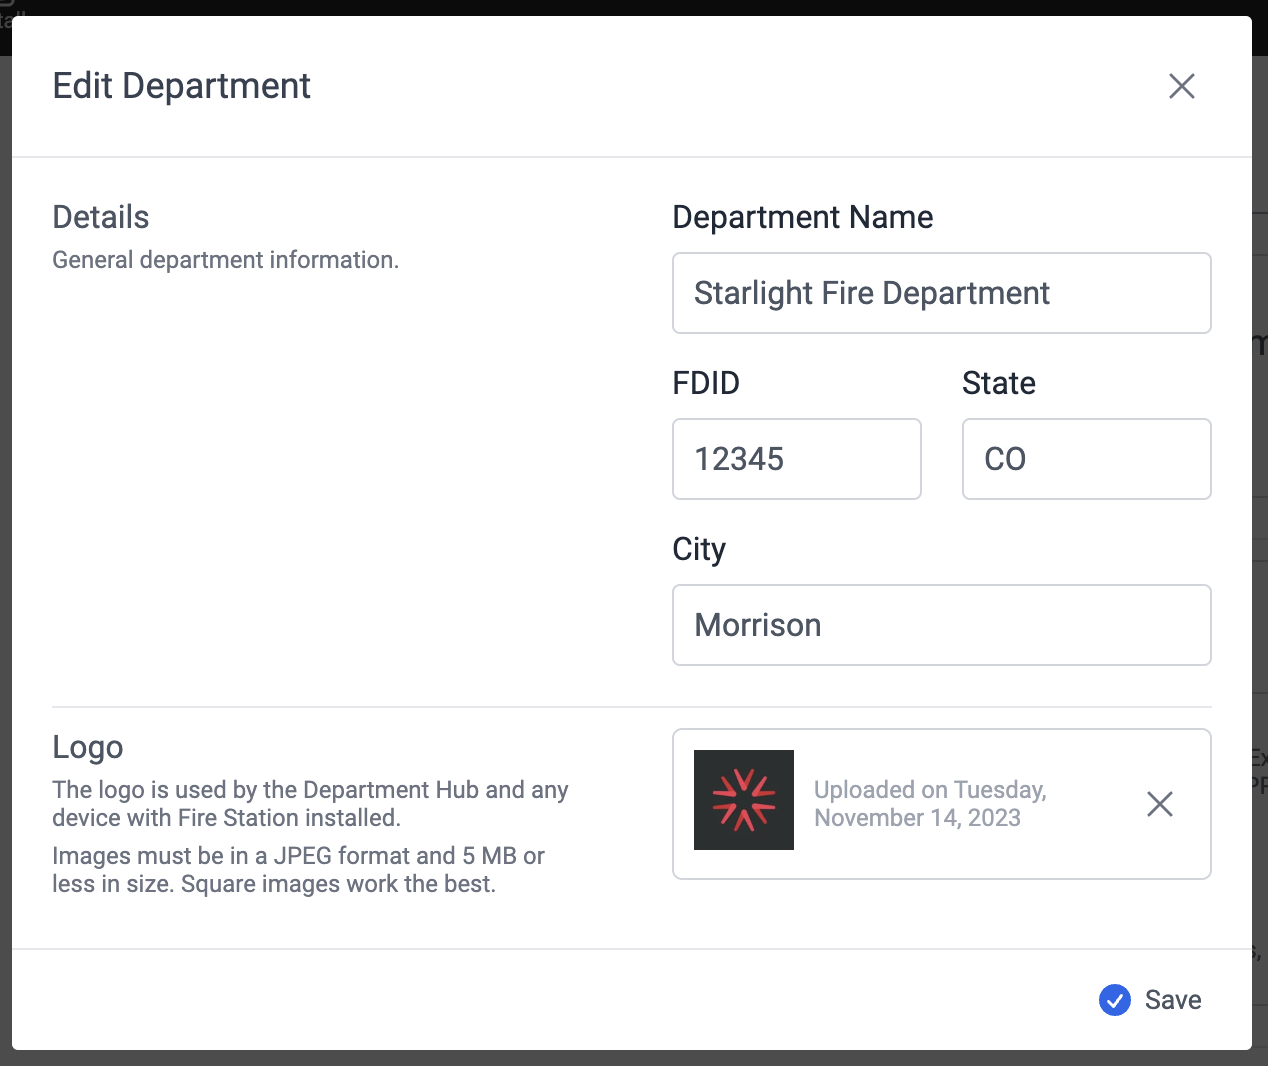
Update Department Information
You need Department Manager permissions to make these changes
- On a browser, go to https://hub.firestationsoftware.com and sign in.
- In the Details section of the home page, click the "Edit" button.
- Change your department's information and click "Save"
Manage Personnel
Invitations
You need Department Manager permissions to make these changes
Invite People to Your Department
You can invite new members to your department by sending an invitation.
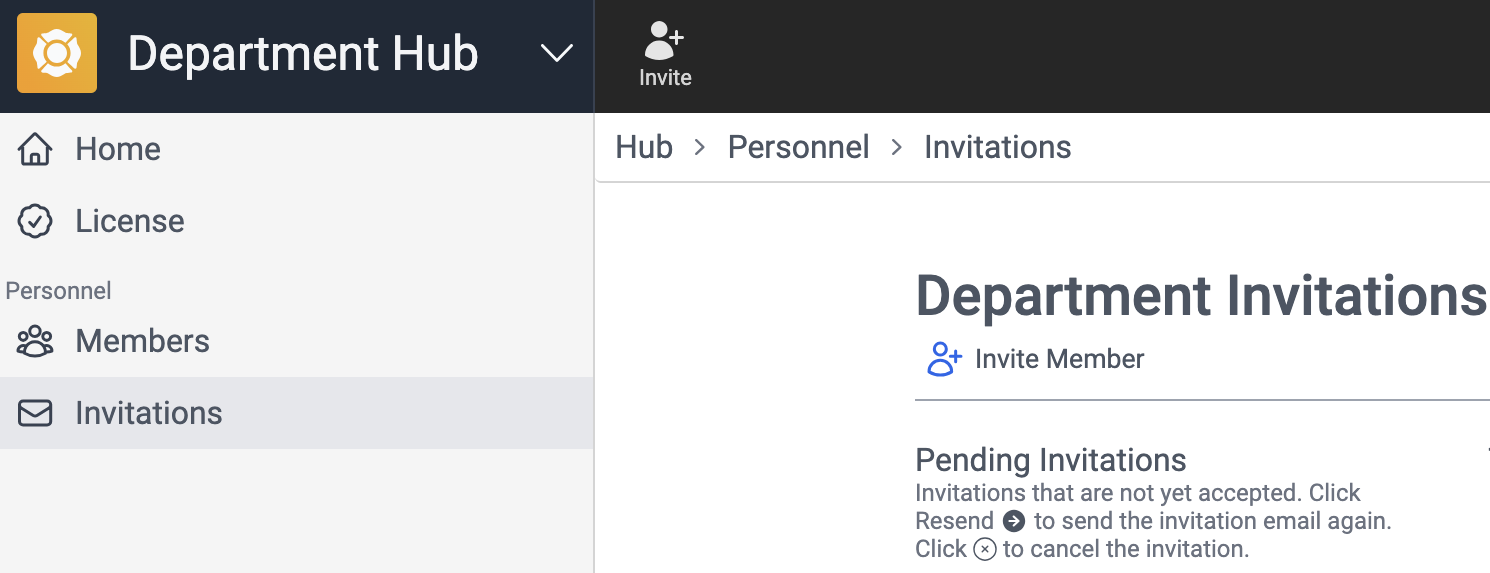
- On a browser, go to https://hub.firestationsoftware.com. You may need to sign in.
- In the left menu click Invitations in the Personnel section.
- Click "Invite Member"
- Alternatively, click the "Invite" shortcut in the top bar.
- Enter one or more email addresses, check off the permissions you want to assign, and click "Send Invitation".
Invitation links last for 7 days. Invitations can be resent, even if they have expired, and the expiration will be extended to 7 days from the update.
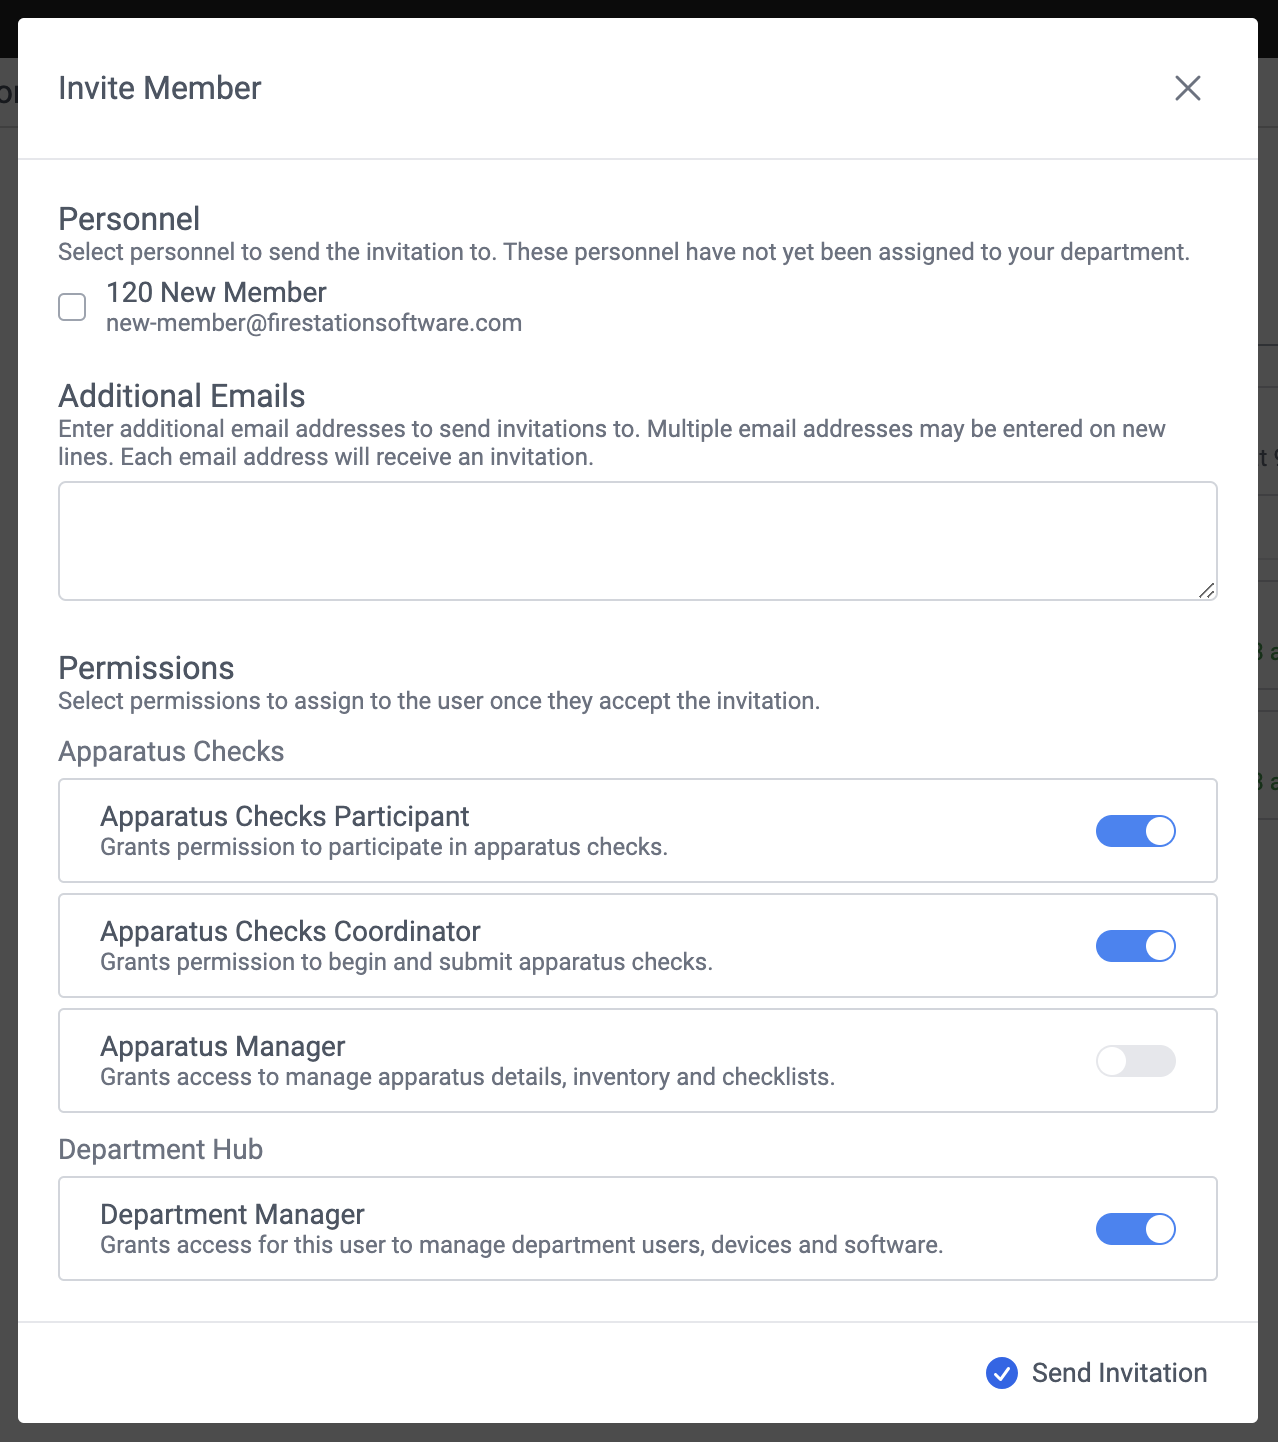
If you have Cloud Data Hosting, you can send invitations by selecting a Fire Station firefighter. The firefighter must be active, have an email, and not be linked to an FSSID.
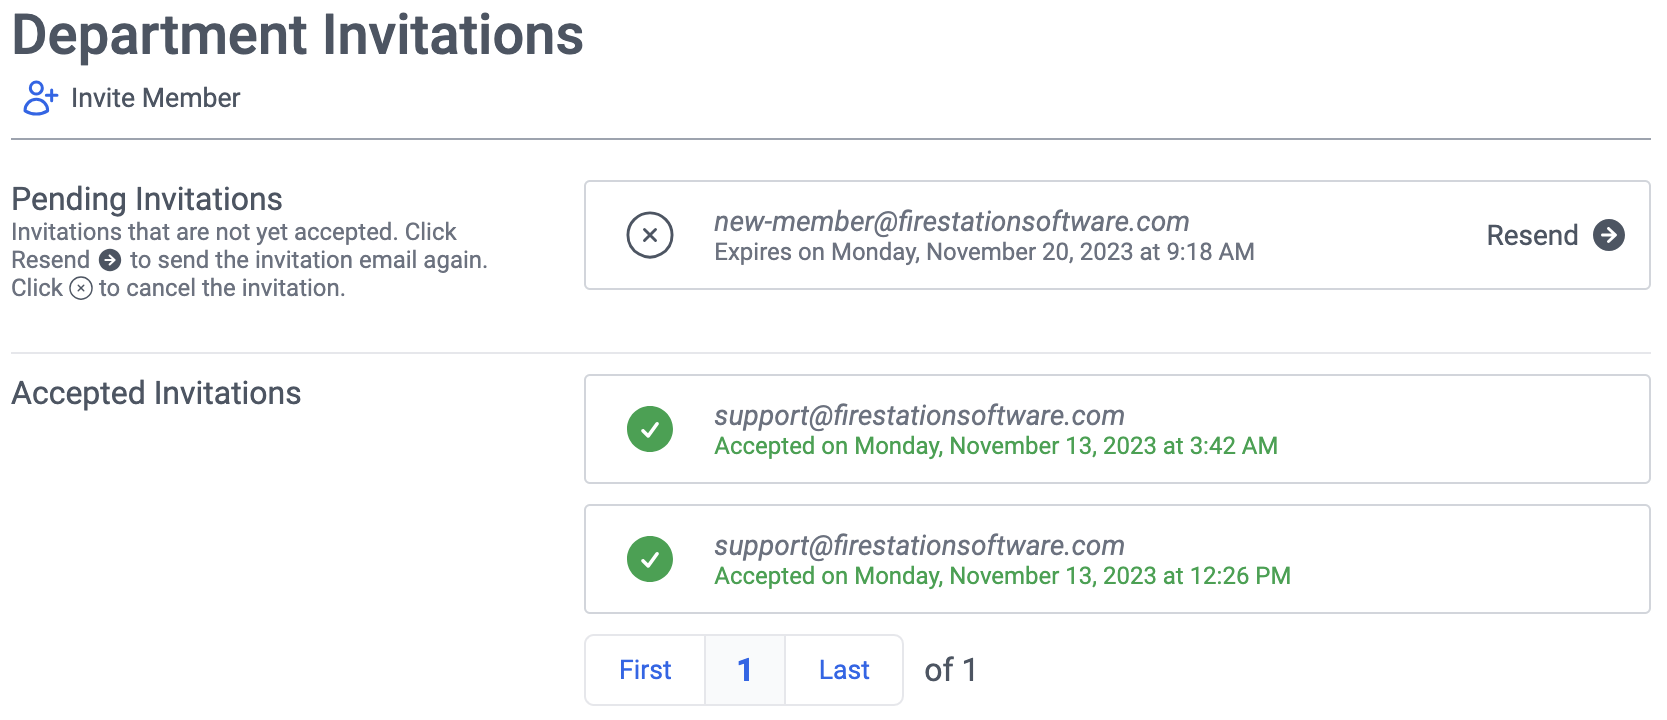
Resend or Delete Invitations
Unaccepted invitations are listed in the Pending Invitations. To resend an invitation, click the "Resend" button on the right, and to delete an invitation, click the "X" circle icon on the left.
Department Members
You need Department Manager permissions to make these changes
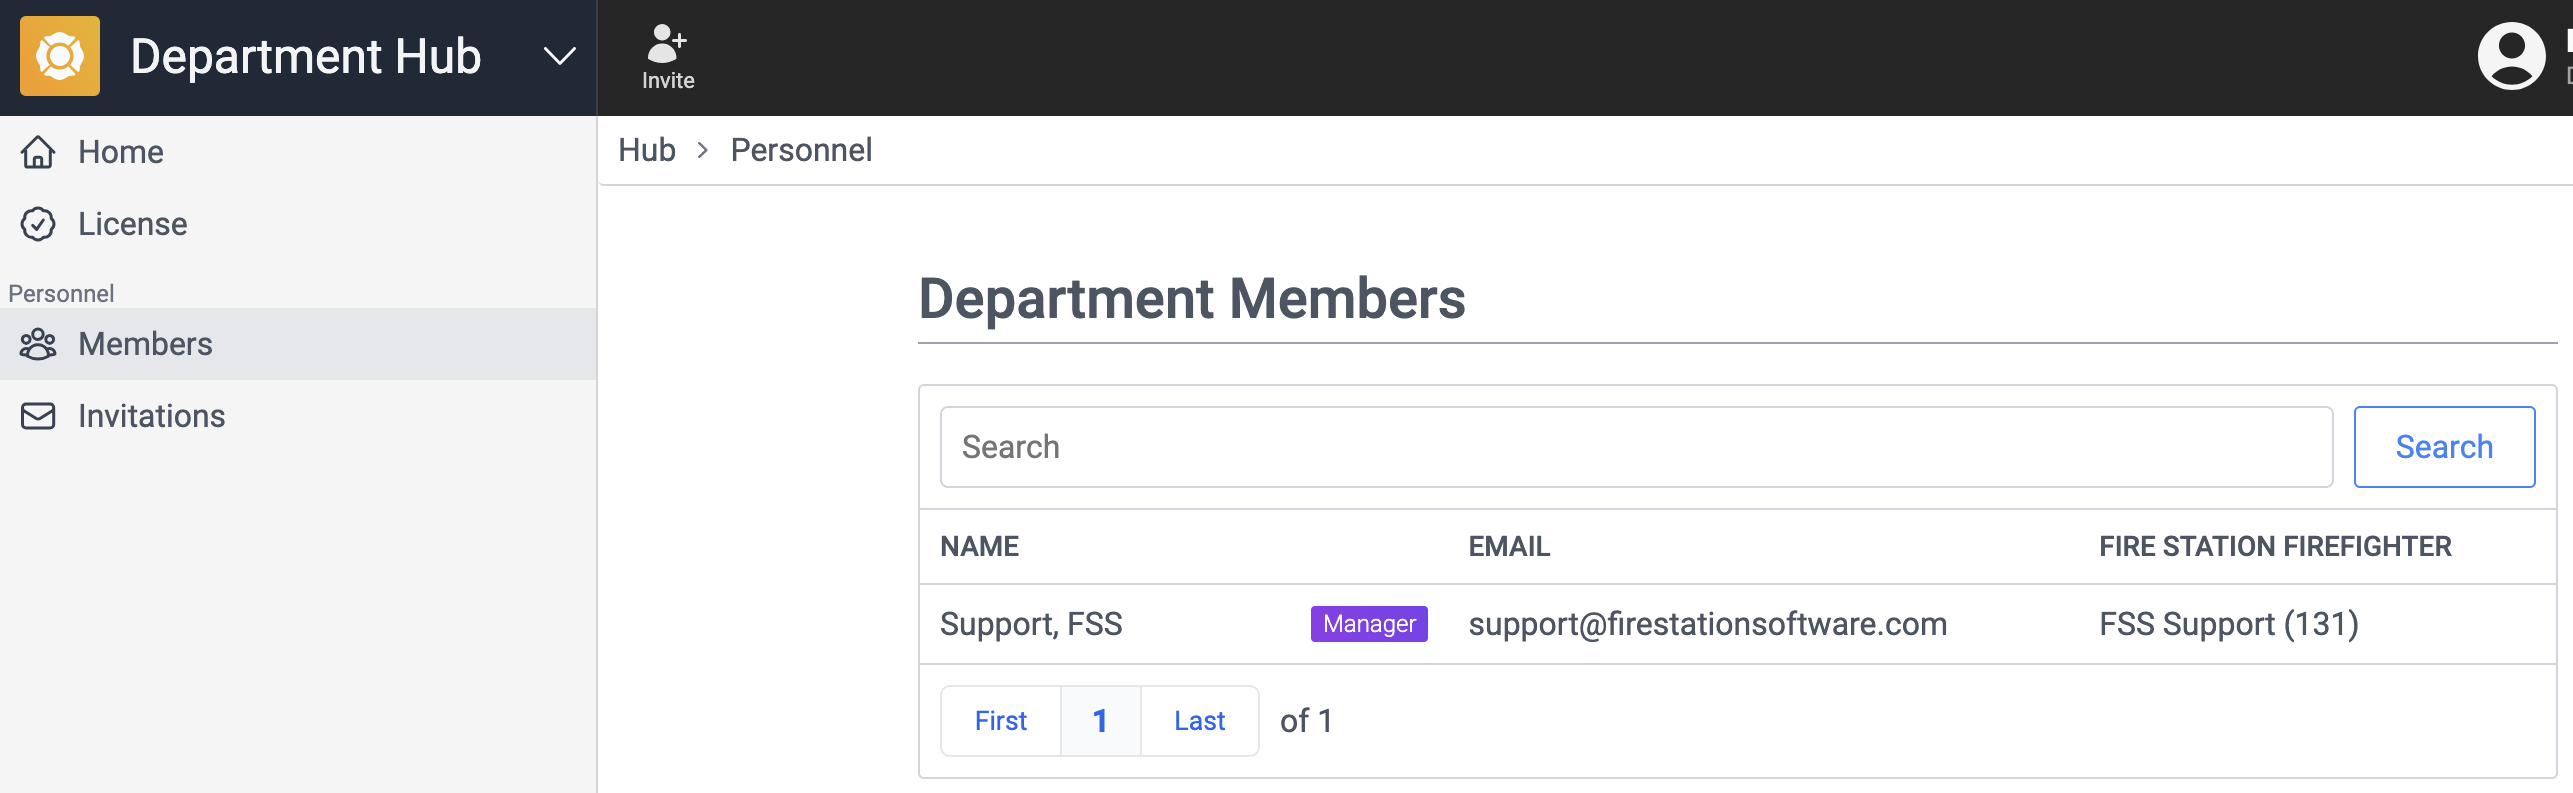
Managers can browse the list of members and search for them by name or email. To manage a member, click one of the rows in the search results.
View a Member
- On a browser, go to https://hub.firestationsoftware.com. You may need to sign in.
- In the left menu click Members in the Personnel section.
- Use the search box to filter by name or email.
- When you have found the person you are looking for, click in their row to view their detailed information.
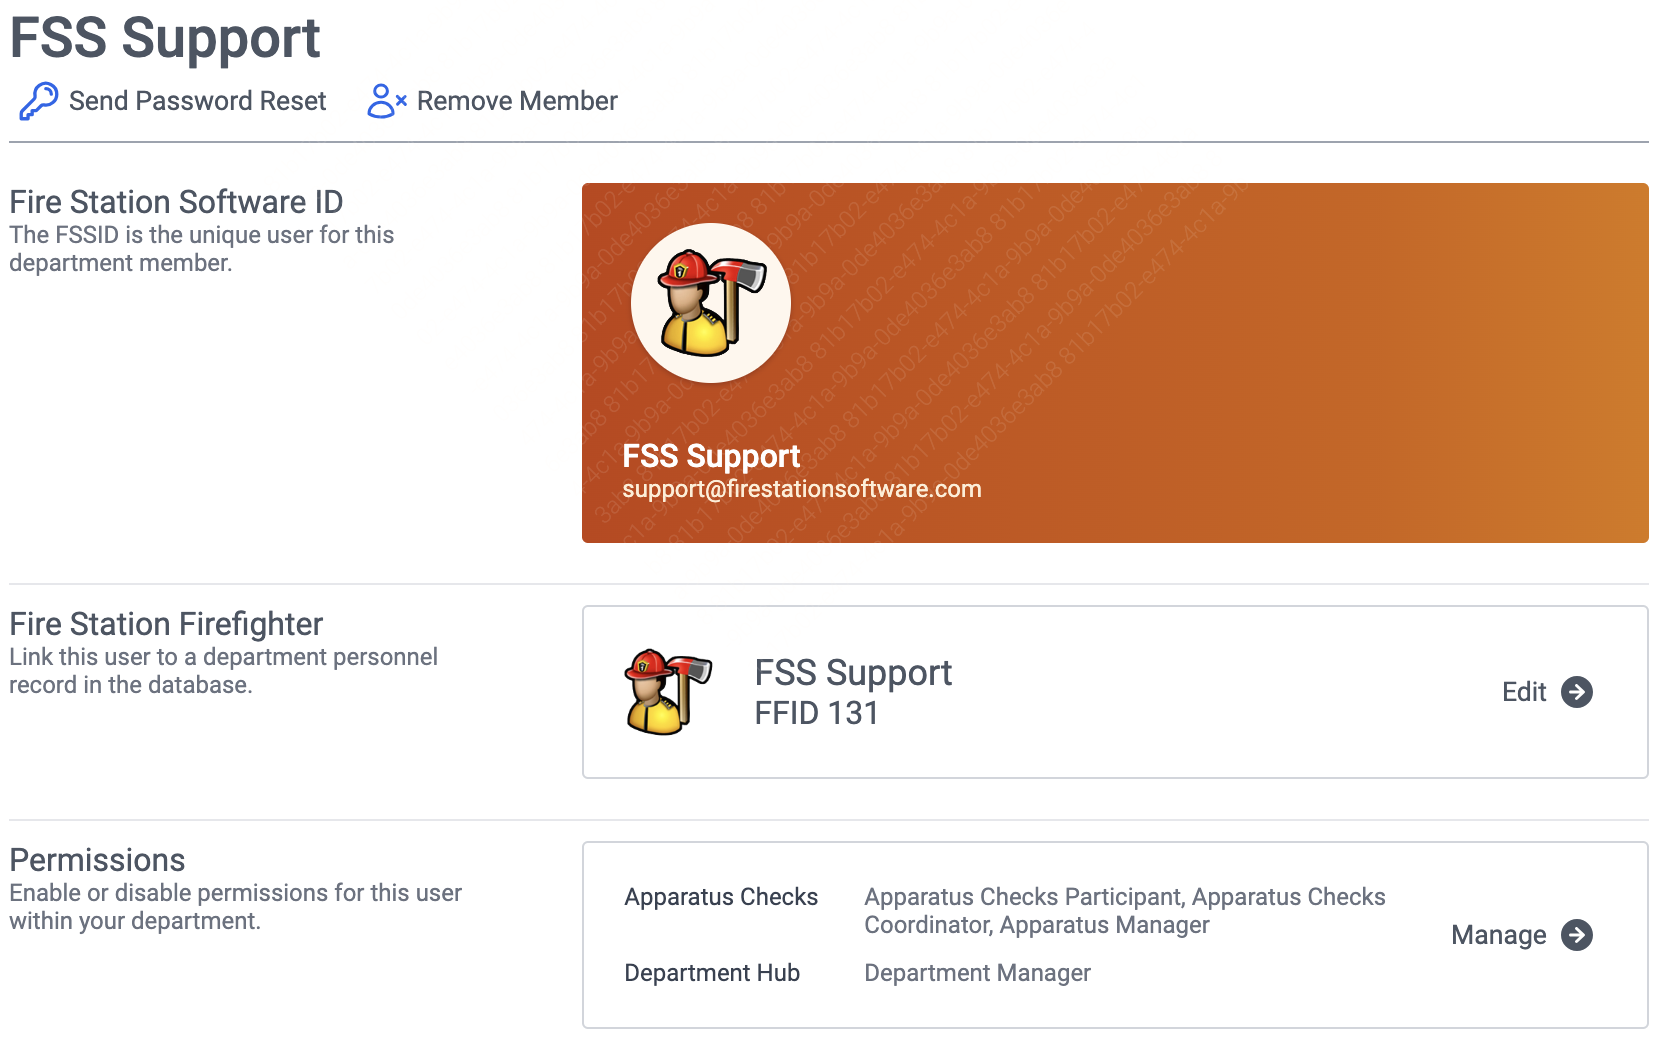
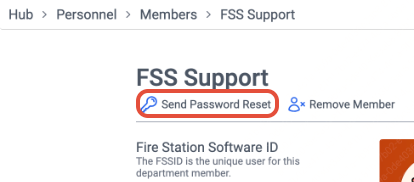
Reset a Member Password
- Follow the steps above to view a member.
- Click "Send Password Reset" under the name of the member.
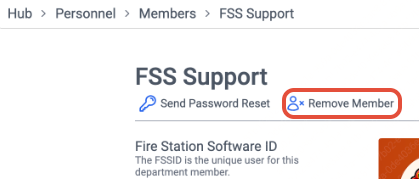
Remove a Member
- Follow the steps above to view a member.
- Click "Remove Member" under the name of the member.
When a member is removed, they will still have their FSSID, but they will not be able to access your department the next time they sign in. If they are currently signed in, they will still be able to access your department until they sign out, or their session expires.
Link a Firefighter
In Fire Station desktop, personnel information is saved in firefighter records. You must link a firefighter to a member in order to use the Apparatus Checks and Incident Reports apps.
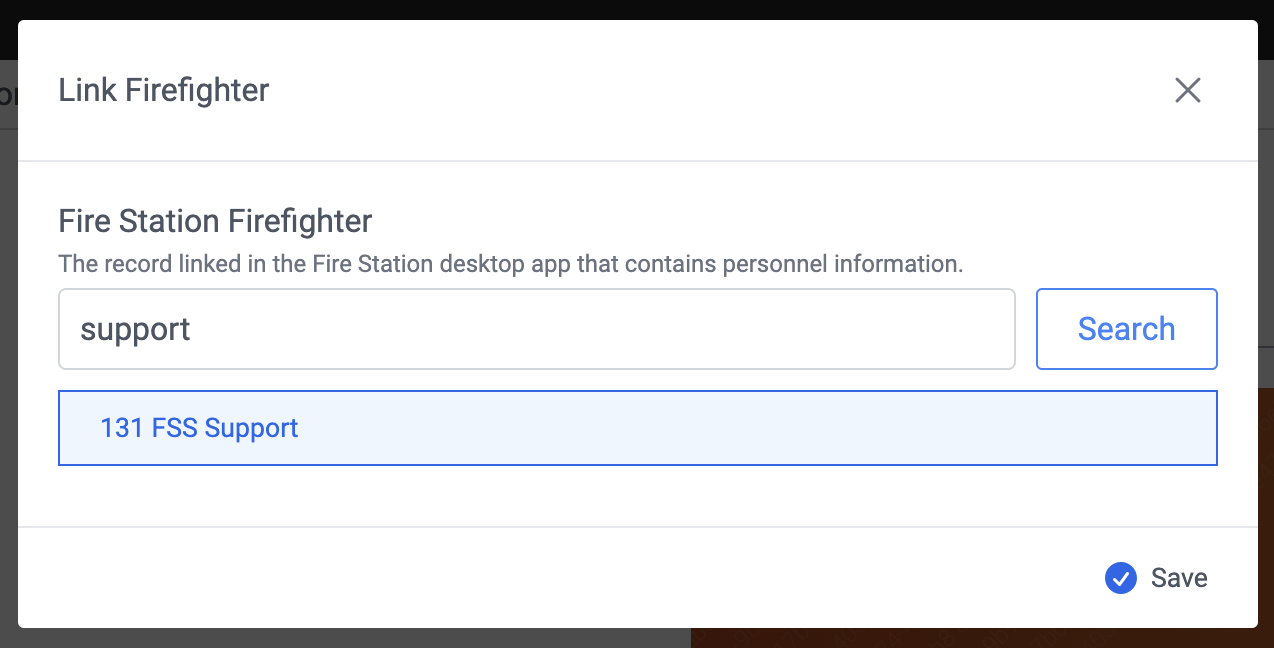
If you use a self-hosted, Microsoft Access database for Fire Station, the Department Hub cannot be used to link a firefighter to a member. Instead, you must link to a department member from menus in Fire Station Desktop.
Manage Member Permissions
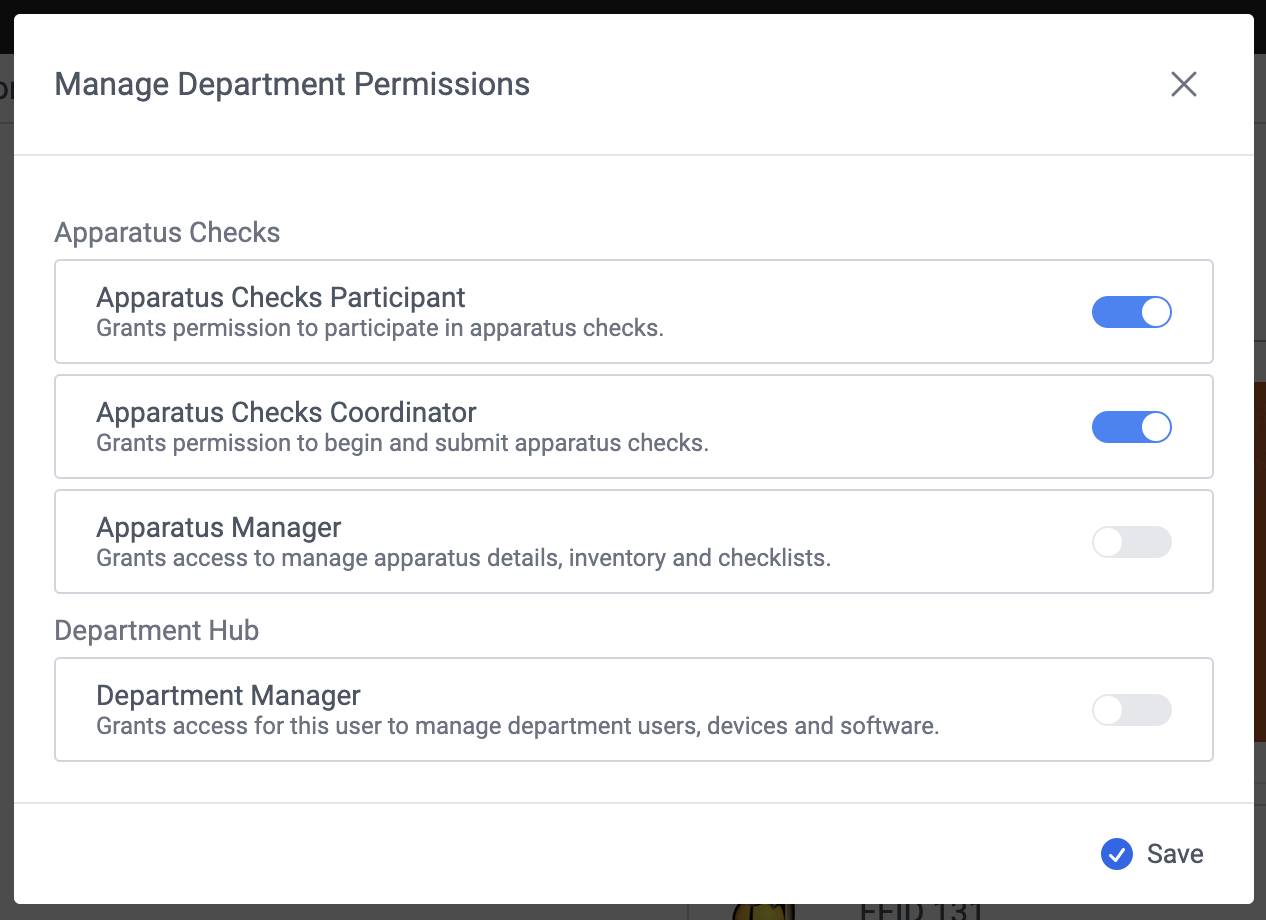
The permissions you see in the list depend on the software features that are licensed to your department
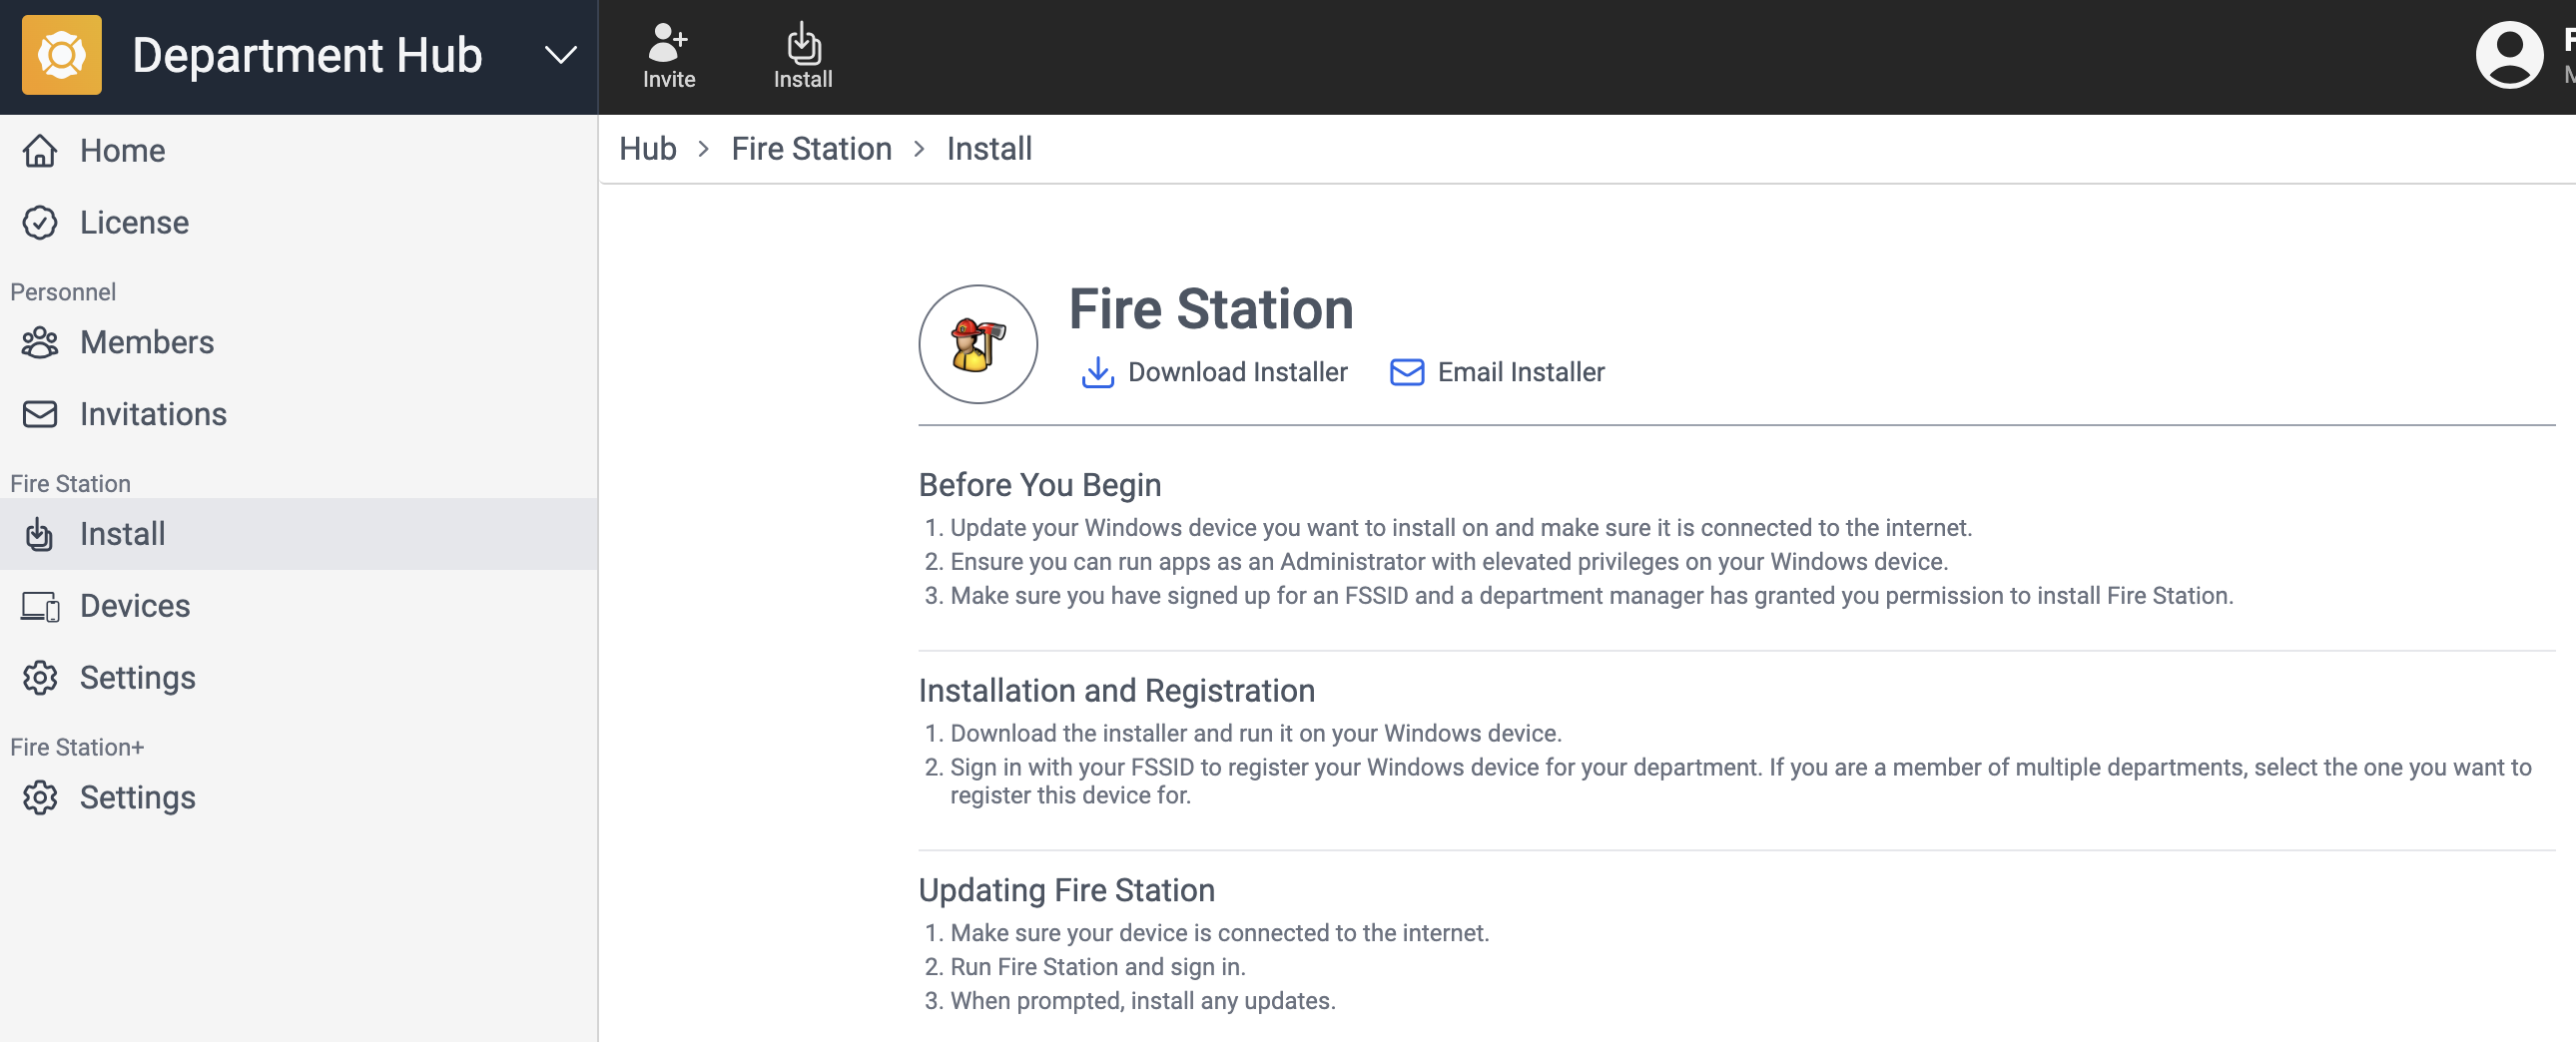
Install Fire Station Desktop
Download the Installer
You need Department Manager or Install Fire Station permissions to install Fire Station Desktop.
The first time you install Fire Station Desktop, you need to download the installer from the Department Hub.
- On a browser, go to https://hub.firestationsoftware.com and sign in.
- In the left menu click Install in the Fire Station section.
- Alternatively, click the "Install" shortcut button in the top bar.
- Click the "Download Installer" button to download the Fire Station Setup installer.
- Double click the downloaded file to run the Fire Station Setup installer and install Fire Station Desktop.
- Sign in with your FSSID to register your device and complete the installation.
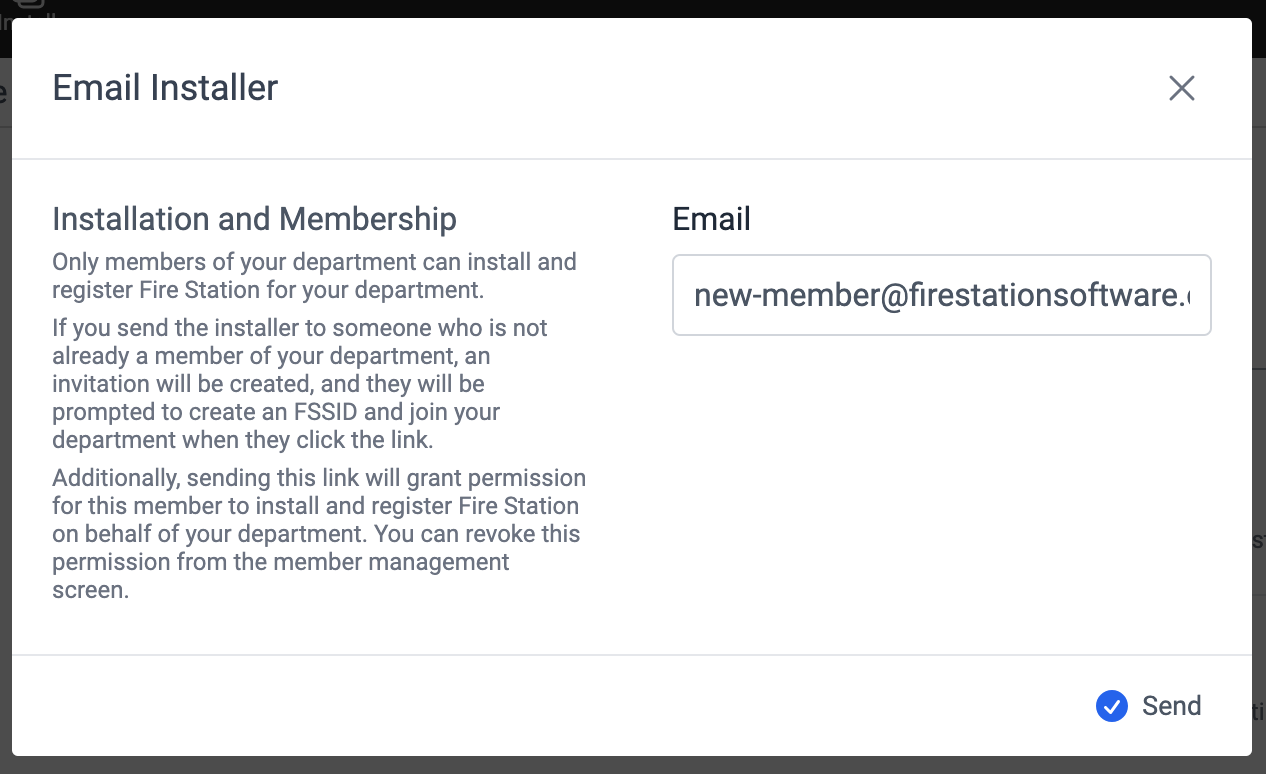
Email a Link to the Installer
You need Department Manager permissions to send installation links.
You can send an email with a link to the installation page in the Department Hub.
- On a browser, go to https://hub.firestationsoftware.com and sign in.
- In the left menu click Install in the Fire Station section.
- Alternatively, click the "Install" shortcut button in the top bar.
- Click the "Email Installer" button.
- Enter the email address of the person you want to send the installer to.
- Click the "Send" button.
If the installation link is sent to an email address that is not associated a member of your department, then the link will double as an invitation to join your department. After the recipient accepts the invitation, they will be redirected to the installation page.
Configure Fire Station Settings
You need Department Manager permissions to make these changes
Configure Software Updates
You can choose the version of Fire Station Desktop that you want your department members to install, or you can choose to let them install the latest version as soon as it is available.
- On a browser, go to https://hub.firestationsoftware.com and sign in.
- In the left menu click Settings in the Fire Station section.
- In the Software Updates section, click the "Configure" button on the right.
- Choose one of the two options:
- If you want your department members to install the latest updates as soon as they are available, then toggle "Enable Automatic Updates" on.
- If you want to keep department members on a specific version, then toggle "Enable Automatic Updates" off, and select the version you want to install.
- Click "Save".
Making changes to the settings will push a configuration update to all registered devices.

Configure Policies
You can configure policies that control the settings for your department when they install or sign in to Fire Station Desktop.
Sign In Policy
- FSSID Sign In Optional - allow department members to sign in with their FSSIDs or using their database user. This option is not allowed if you use Cloud Data Hosting (CDH).
- Require FSSID Sign In - require department members to sign in with their FSSIDs only. If selected, this option cannot be undone. Members will have 30 days to create FSSIDs for sign in.
Offline Installation Policy
- Offline Installations Not Allowed - requires an internet connection to install Fire Station on a device.
- Offline Installations Allowed - allows department members to download installation files and transfer them to a device and install them without connecting to the internet. This option is only available to customers that have been grandfathered in to legacy systems.
To change policies:
- On a browser, go to https://hub.firestationsoftware.com and sign in.
- In the left menu click Settings in the Fire Station section.
- In the Policies section, click one of the "Configure" buttons on the right.
- Adjust the policies and click "Save".

Apparatus Checks
The Apparatus Checks web app is an extension of the Apparatus Checks module in Fire Station. You can manage your apparatus, equipment and check forms, and conduct checks with mobile or tablet devices.
Getting Started
Summary
Apparatus Checks for Fire Station+ is a web-based application optimized for tablet and mobile devices. It provides a streamlined interface so you can quickly walk around and complete a check with a portable device and submit the results to Fire Station Desktop after the check is complete.
Requirements
In order to use the app, you must have:
- A computer, tablet or mobile device with a modern web browser and connection to the internet
- An active license for Apparatus Checks and CDH
- An FSSID linked to your personnel record from the Fire Station Desktop
Additionally, you need one of the following permissions on your FSSID:
- Apparatus Manager
This permission allows you to view and edit the apparatus configuration (details, checklist, inventory, etc.) - Apparatus Checks Coordinator
This permission allows you to view the apparatus configuration, start checks, delete checks, manage check assignments, participate in checks, submit checks, and view check reports - Apparatus Checks Participant
This permission lets you view the apparatus configuration, participate in checks, submit checks and view check reports
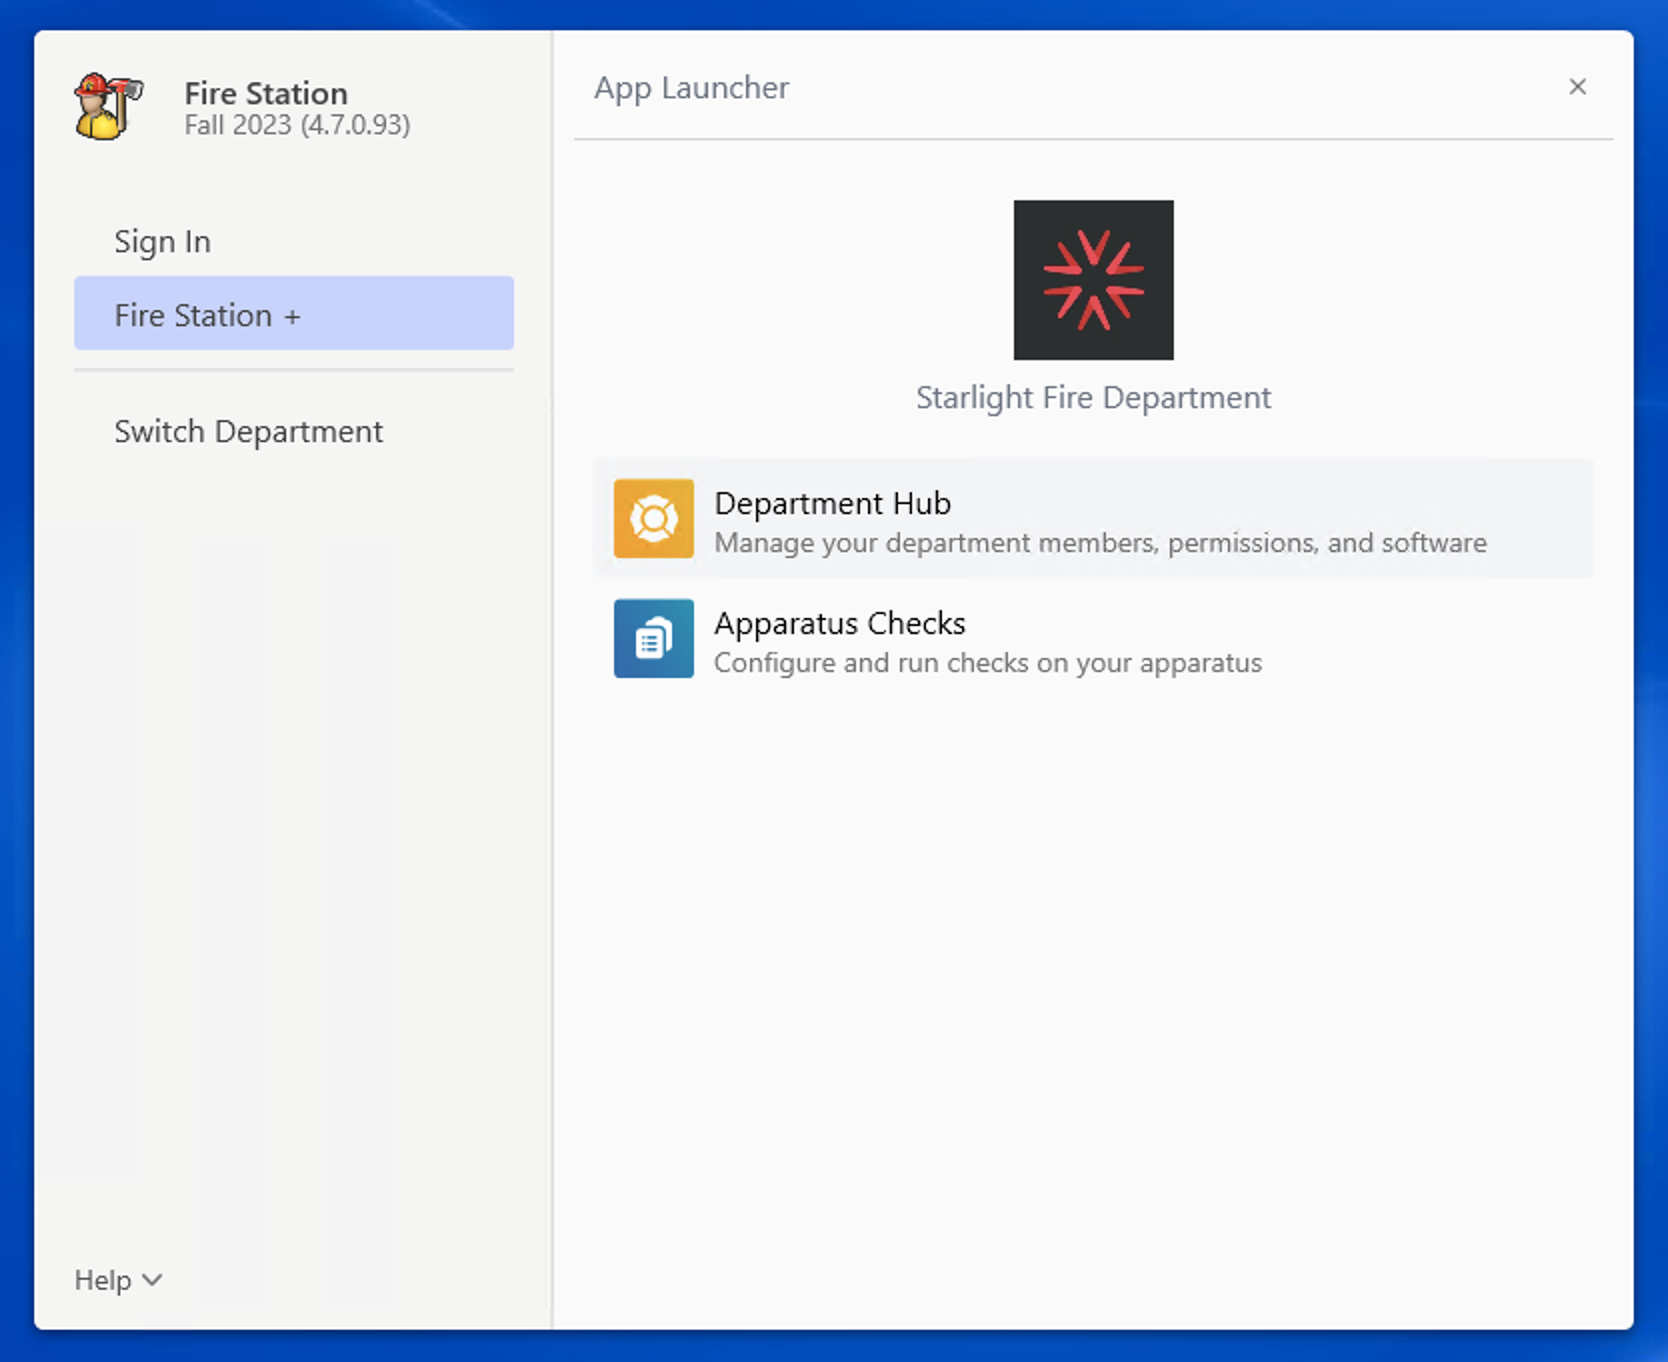
Open the Application
There are three ways to access the Apparatus Checks application:
- Go to the application directly
- On a browser, go to https://apparatus-checks.platform.firestationsoftware.com.
- Launch the application from the Department Hub
- On a browser, go to https://hub.firestationsoftware.com.
- In the top left, click the Department Hub app name to open the app shortcut menu.
- Select Apparatus Checks from the menu, or click "All Apps" and select Apparatus Checks from the App Launcher.

- Launch the application from Fire Station Desktop
- On your Windows machine, start the Fire Station program
- In the left menu, select Fire Station+
- Click Apparatus Checks in the list.

Configure an Apparatus
Before you conduct a check, configure the apparatus details, checklist, and inventory.
- Selecting and Creating an Apparatus
This screen allows you to select an existing apparatus or create a new one. - Viewing an Apparatus
This screen summarizes the apparatus configuration and current check status and allows you to explore the apparatus inventory. - Managing Apparatus Inventory
This screen allows you to edit and organize inventory equipment into compartments. - Managing the Apparatus Checklist
This screen allows you to edit and organize a checklist of questions to fill out during a check. - Viewing Check History
This screen allows you to view all checks conducted from Fire Station+ and run a PDF report of the check.
Conduct a Check
Once you have configured your apparatus, you can run a check. Read the following information on how to use the check screens:
Running an Apparatus Check
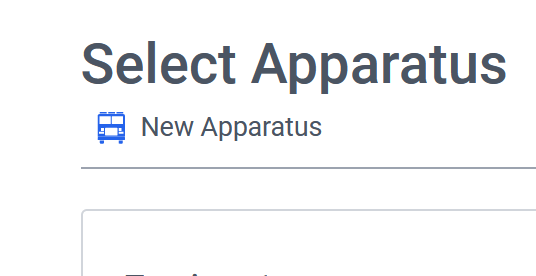
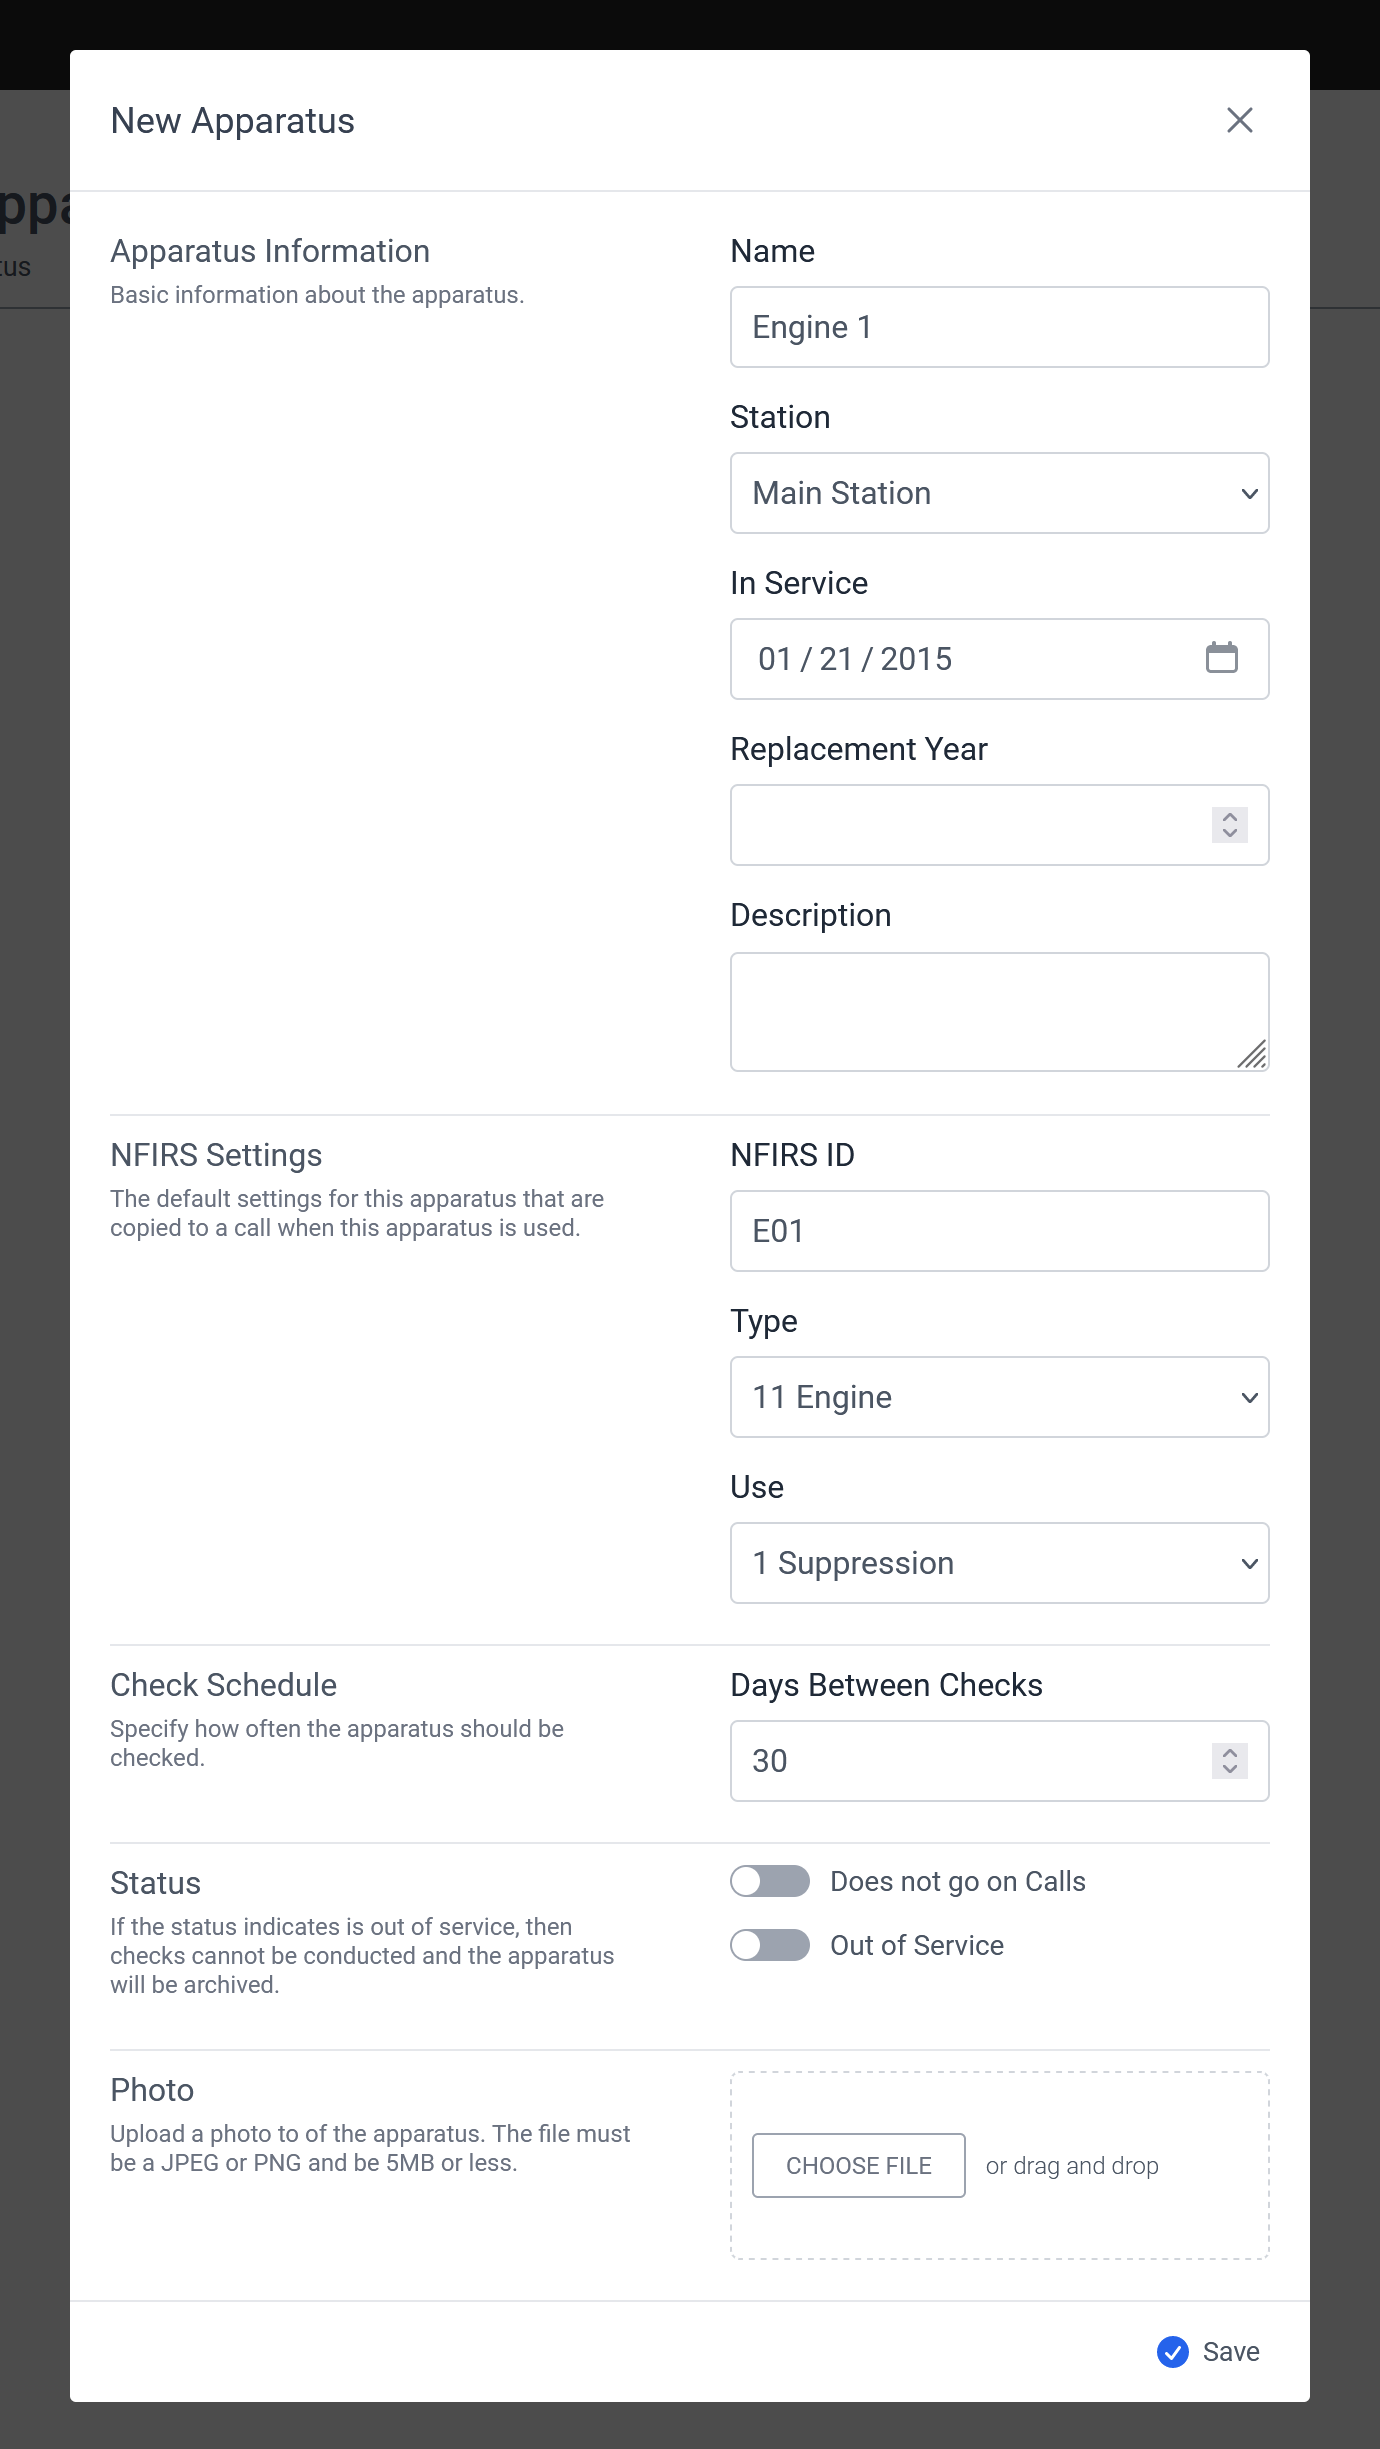
Create a New Apparatus
You need Apparatus Manager permissions to make these changes
- On a browser, go to https://apparatus-checks.platform.firestationsoftware.com/select-apparatus. You may need to sign in.
- Click the "New Apparatus" button.
- Fill out the form and click the "Save" button.
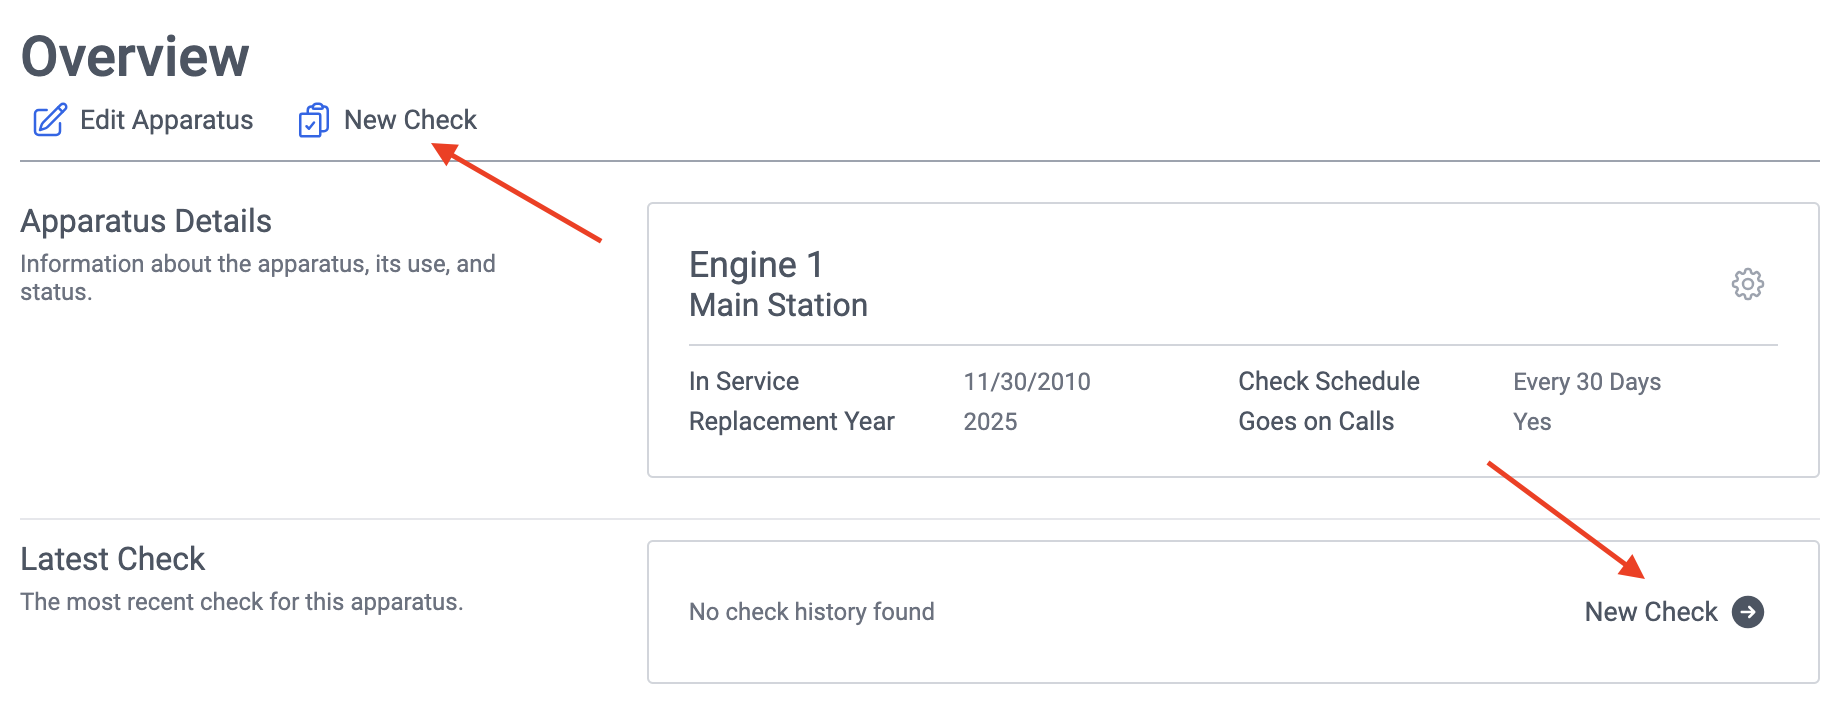
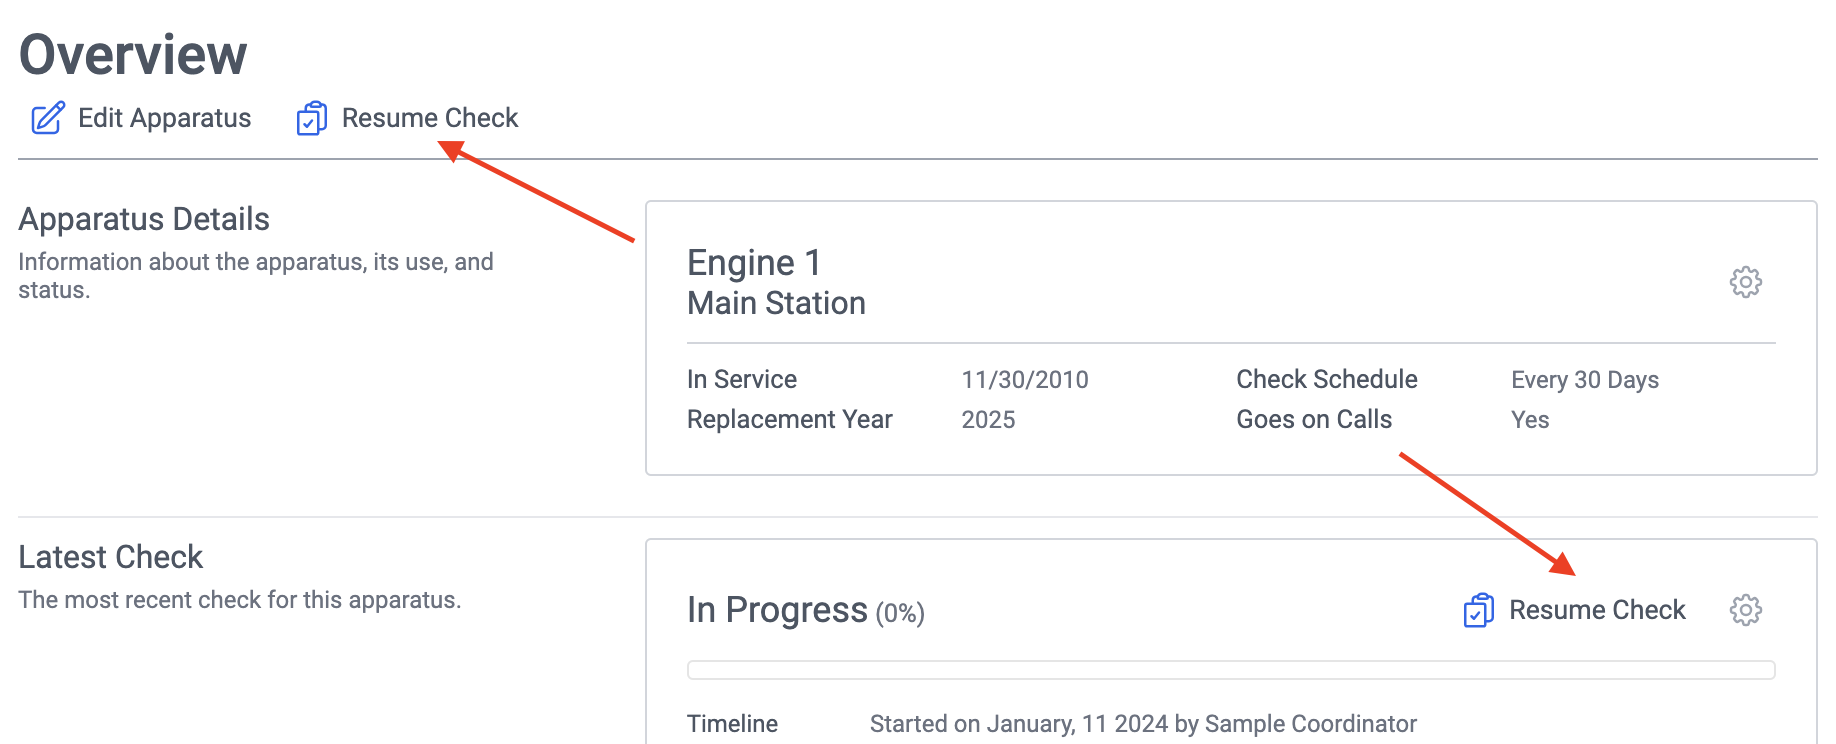
View and Edit an Apparatus
View an Apparatus
You need Apparatus Manager, Apparatus Checks Coordinator, or Apparatus Checks Participant permissions to view an apparatus.
- On a browser, go to https://apparatus-checks.platform.firestationsoftware.com/select-apparatus. You may need to sign in.
- Select the apparatus you want to view.
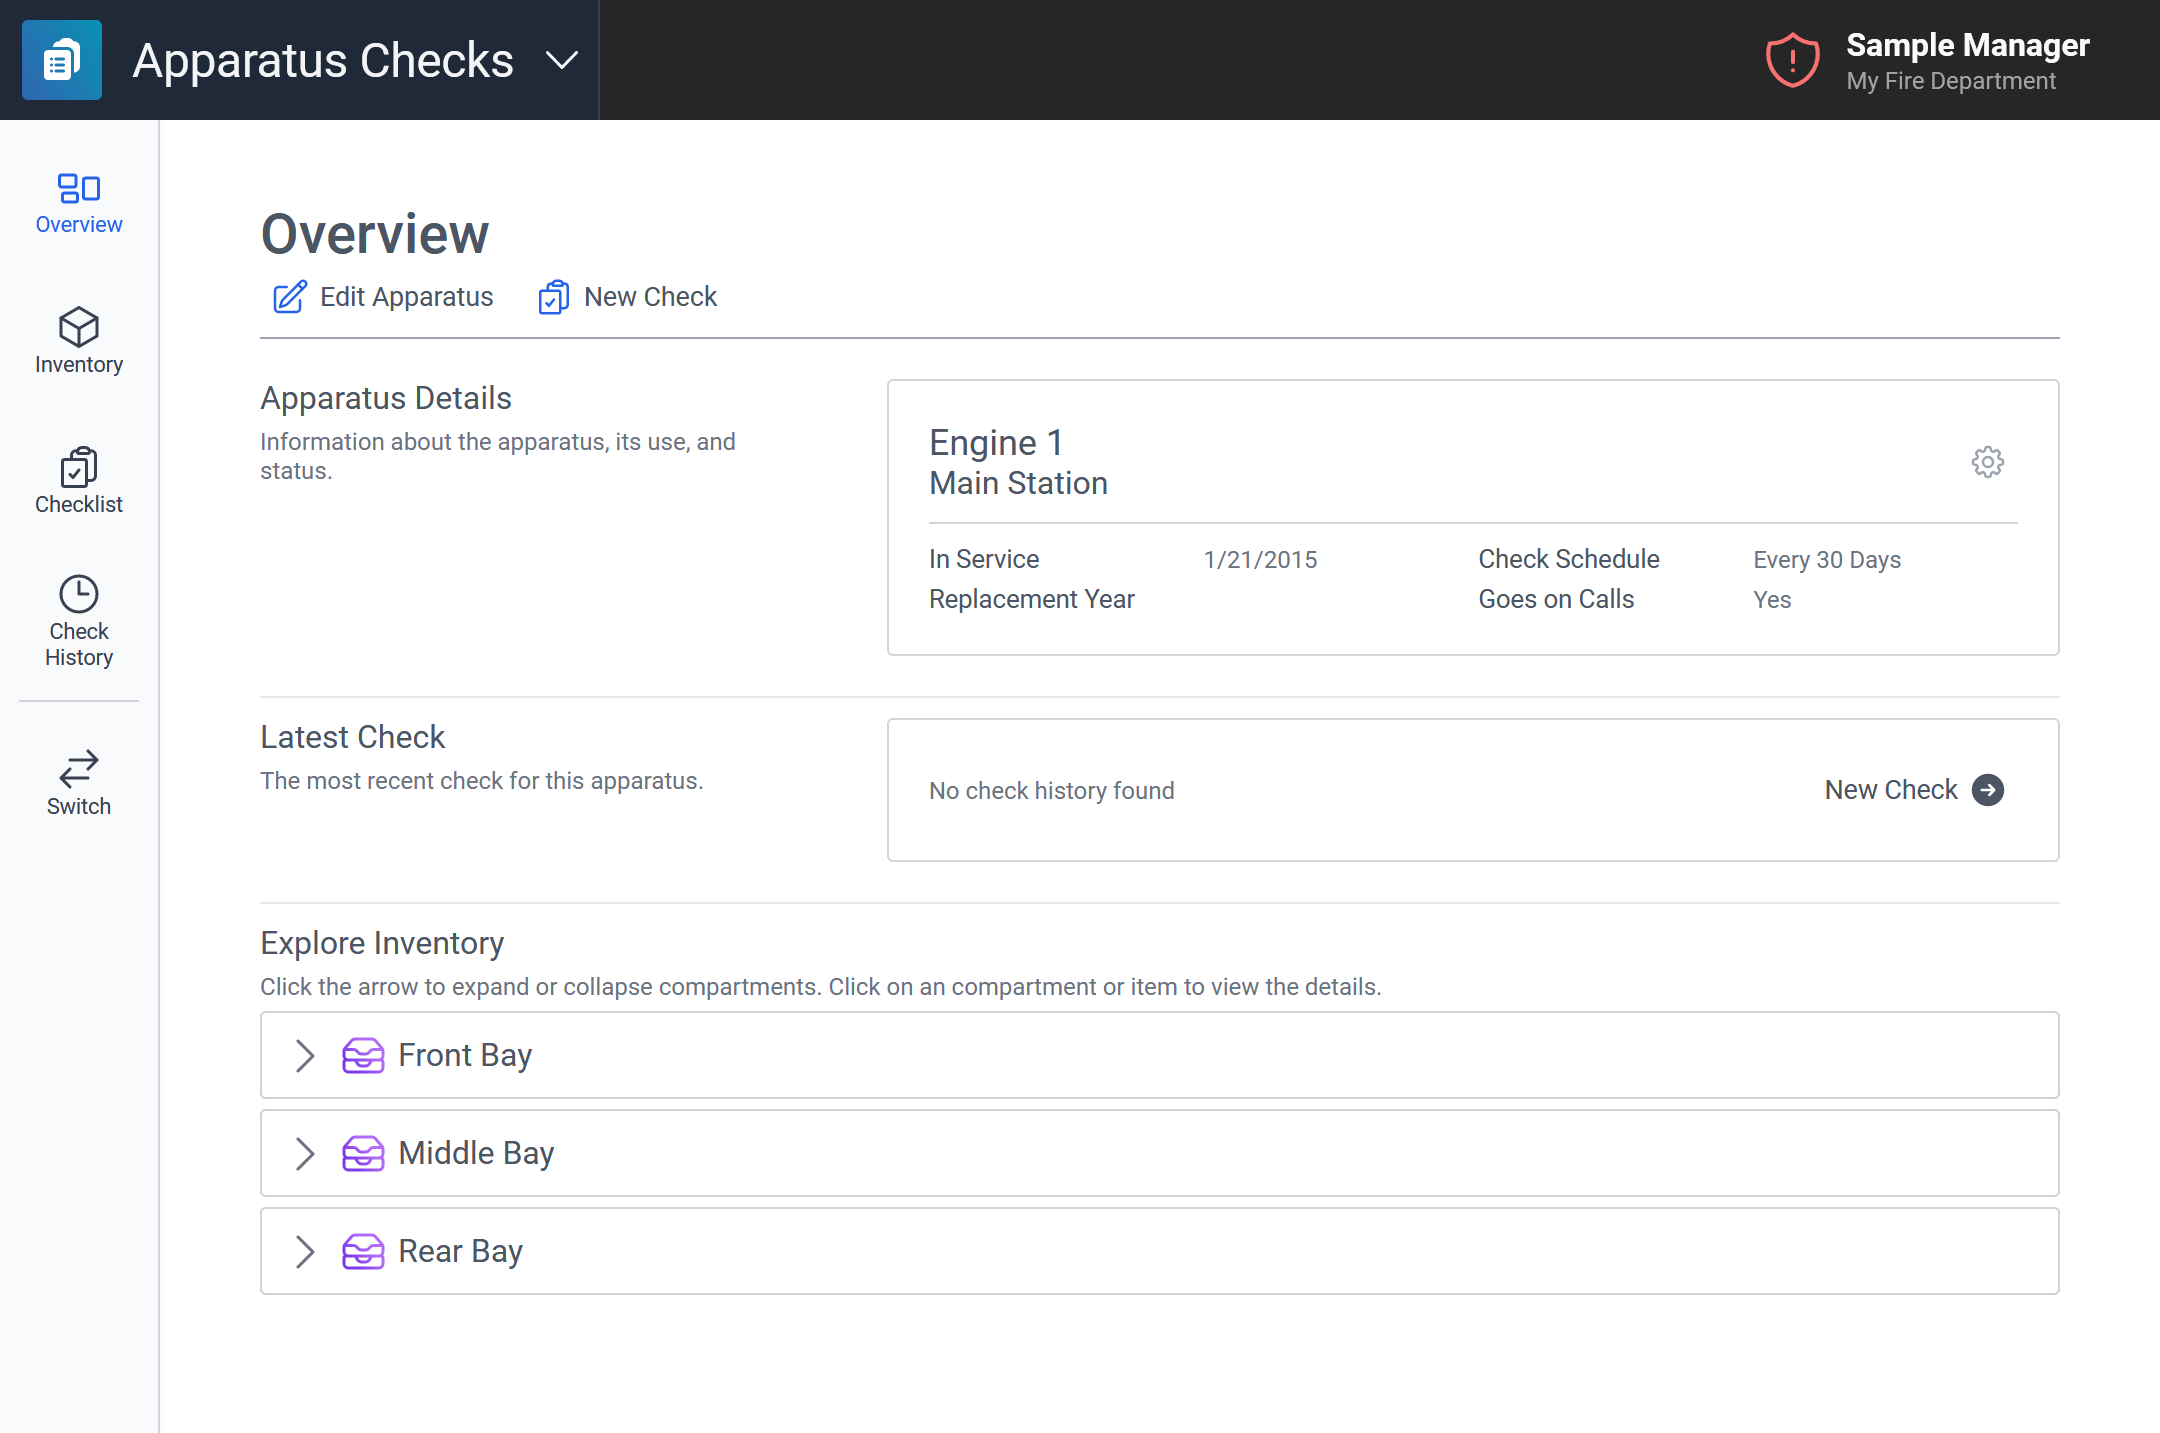
The apparatus overview displays apparatus details, the most recent apparatus check, and the current inventory list for the apparatus.

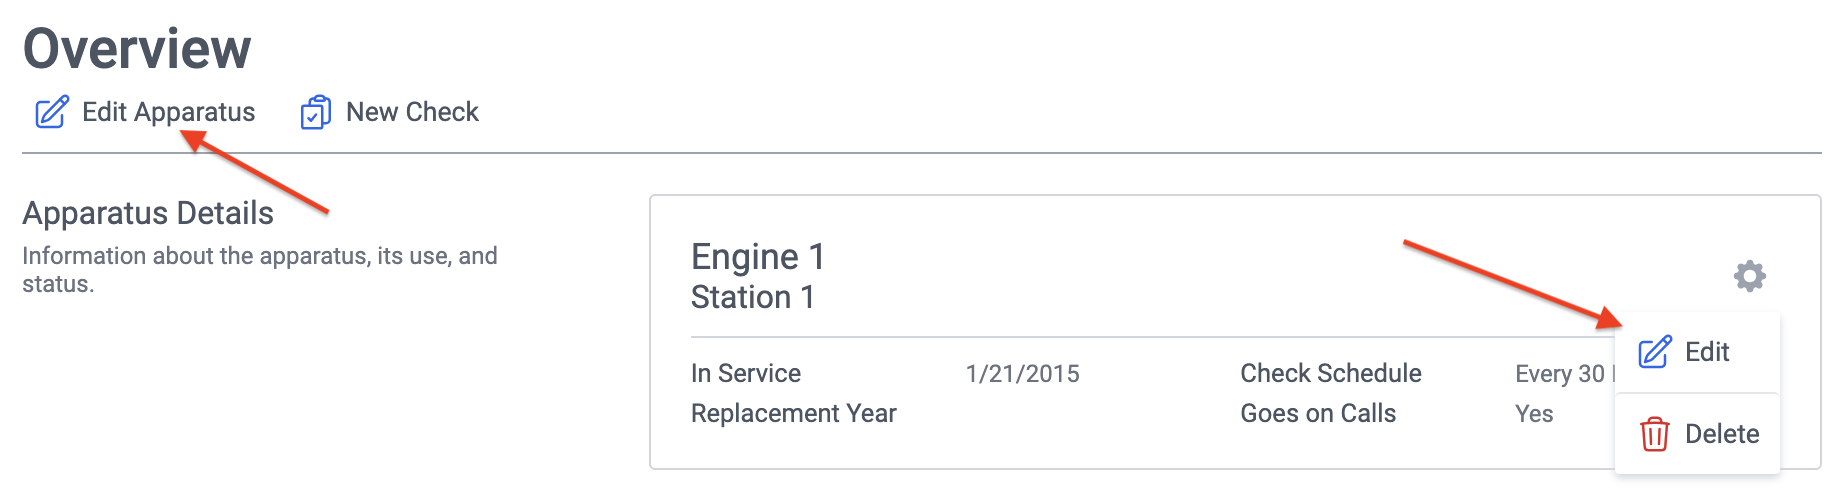
Edit an Apparatus
You need Apparatus Manager permissions to make these changes.
- Follow the View Apparatus steps above to select an apparatus.
- Click the Edit Apparatus button at the top of the page under the page title, or in the Apparatus Details section, click the gear icon button to open the menu and select Edit.
- In the modal form, enter apparatus details and click Save.

Manage Apparatus Inventory
Watch this video for an overview of how to manage your apparatus inventory in Fire Station and Fire Station+.
Saving Changes
You need Apparatus Manager permissions to make these changes.
You can set up and configure compartments and items stored on an apparatus. Additionally, you can upload photos of compartments and items for reference when conducting an apparatus check.
- On a browser, go to https://apparatus-checks.platform.firestationsoftware.com/select-apparatus. You may need to sign in.
- Select the apparatus you want to view.
- In the left menu select Inventory.
- Add, update, organize, or delete compartments and items.
- Click "Save Inventory" at the top of the page.
You must click "Save Inventory" to save your changes before leaving the page. If you do not click this button, your changes will be lost.
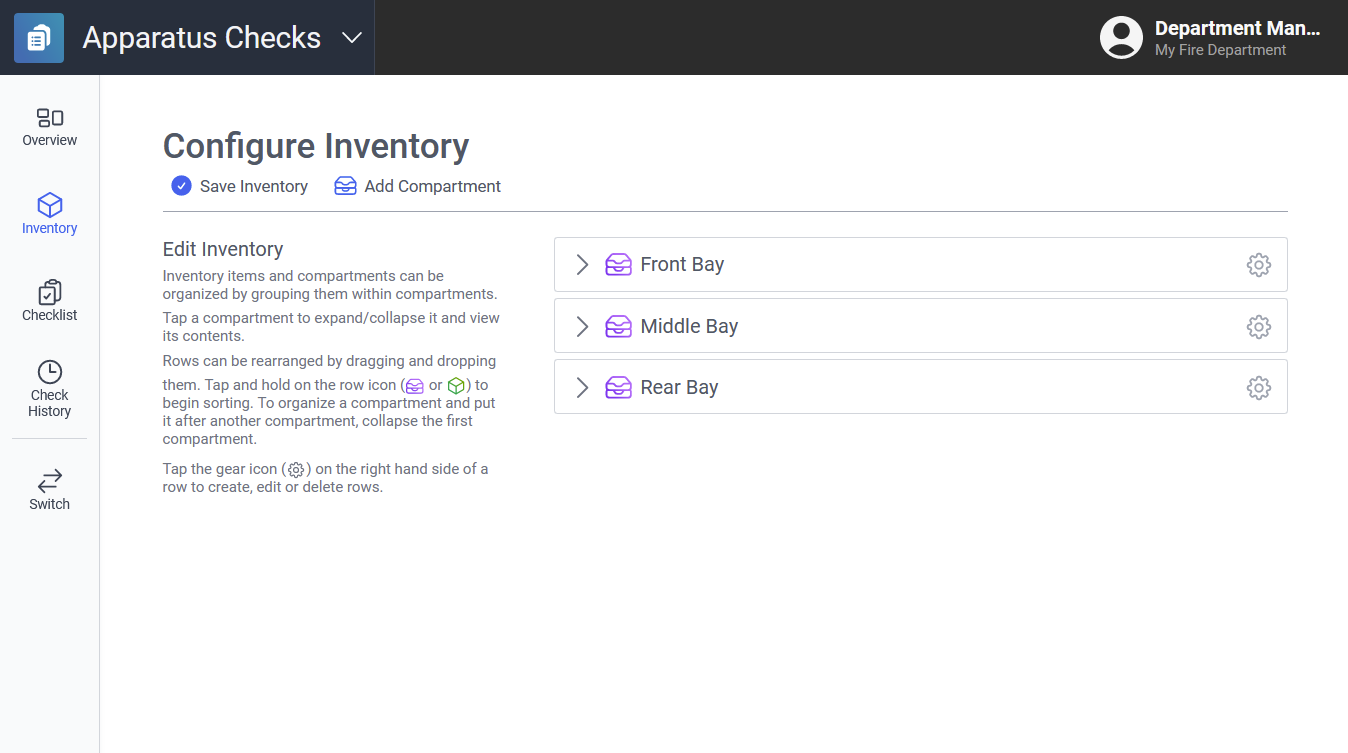
Add Compartments
There are two types of compartments: top-level compartments and sub-compartments. Top-level compartments are listed directly under the apparatus. These compartments show up for assignment when conducting an apparatus check. Sub-compartments go inside other compartments and help you organize complex inventory hierarchies.
Top-Level Compartments
- At the top of the Inventory page, click the "Add Compartment" button.
- Fill out the form details.
- Click "Confirm" at the bottom of the modal dialog.
- Click "Save Inventory" at the top of the page.
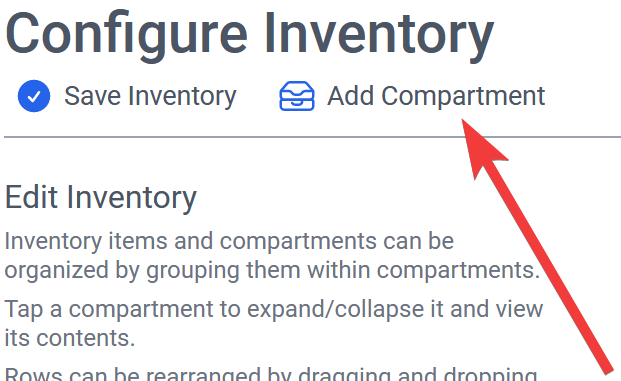
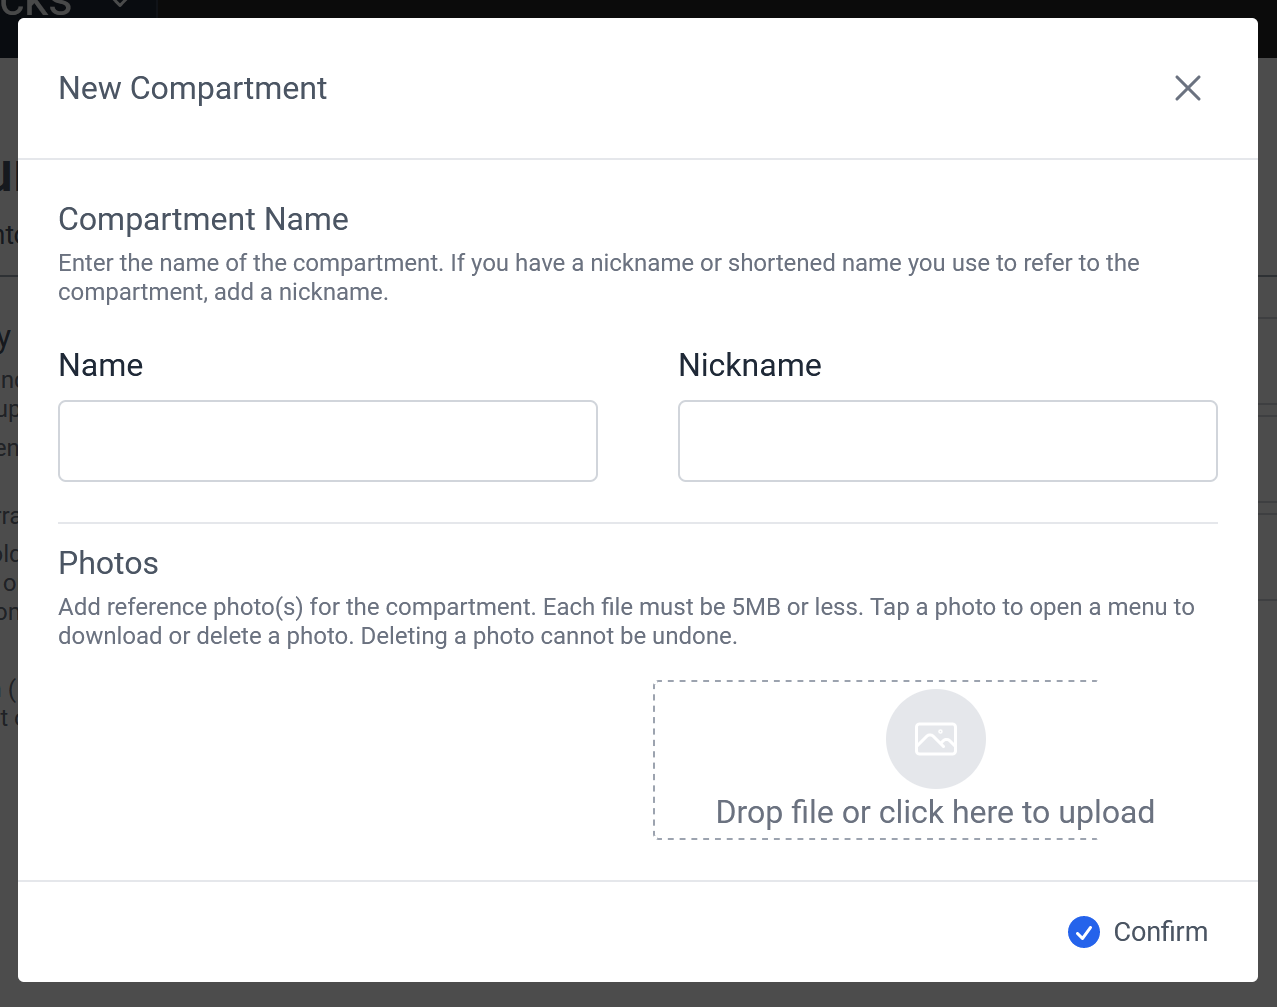
The Name field is required, and we recommend that you enter a fully descriptive name. The Nickname field is not required but we recommend you enter an abbreviated or commonly used name.
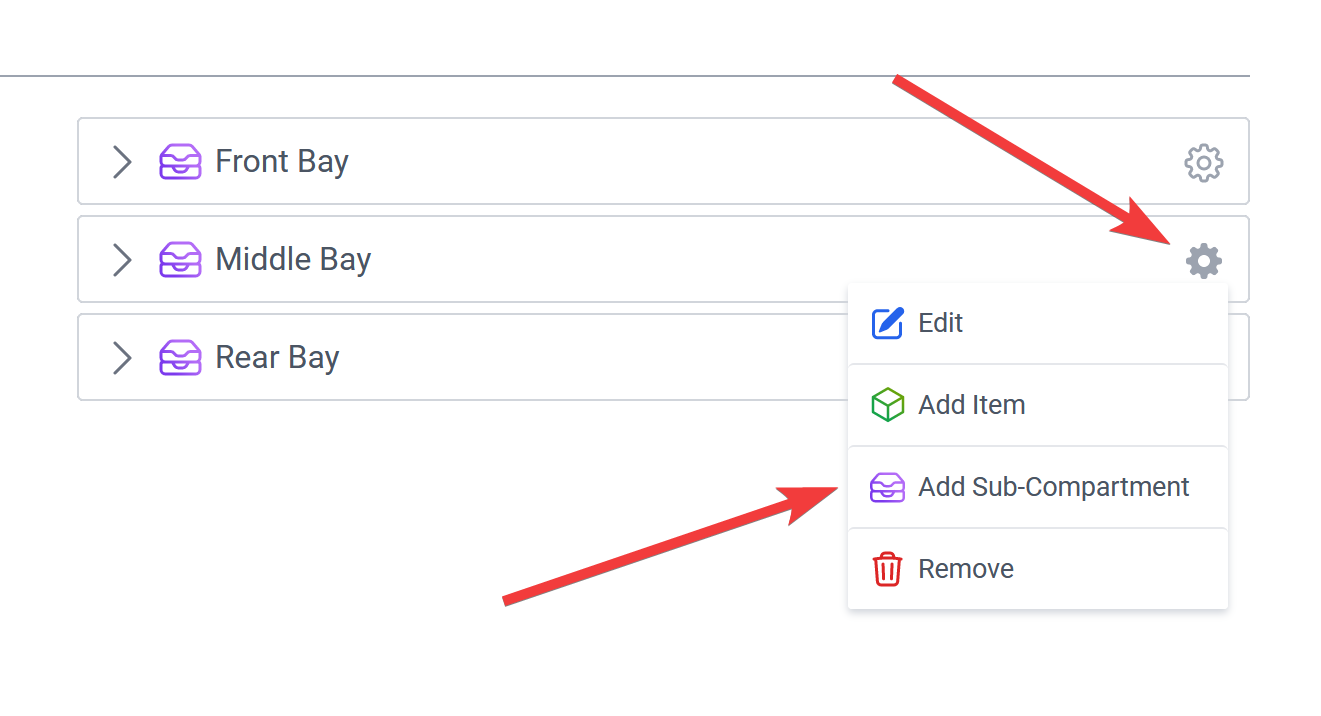
Sub-Compartments
- Follow the steps above to create at least one compartment.
- Click the gear button on the right side of a compartment.
- Select "Add Sub-Compartment"
- Fill out the form details.
- Click "Confirm" at the bottom of the modal dialog.
- Click "Save Inventory" at the top of the page.
Add Items (Equipment)
- Follow the steps above to create at least one compartment.
- Click the gear button on the right side of a compartment.
- Select "Add Item"
- Fill out the form details.
- Click "Confirm" at the bottom of the modal dialog.
- Click "Save Inventory" at the top of the page.
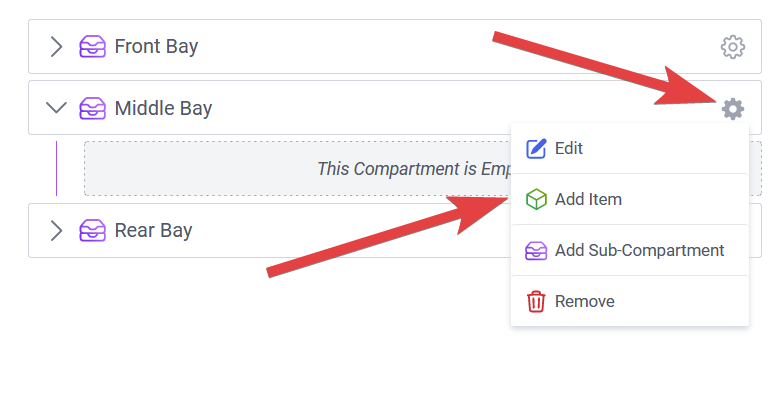
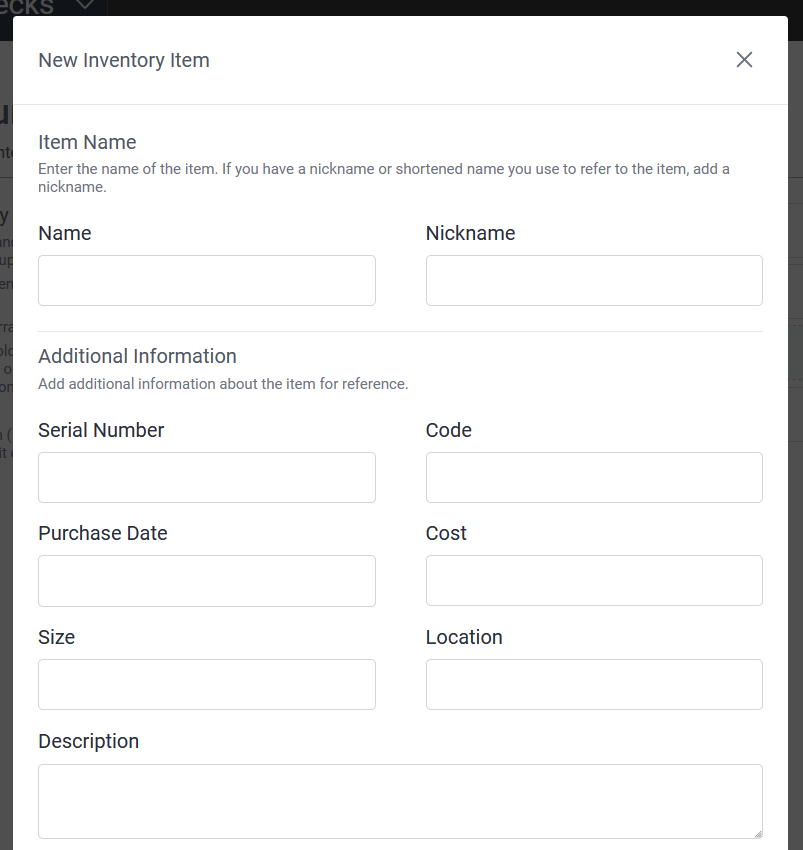
The Name field is required, and we recommend that you enter a fully descriptive name. The Nickname field is not required but we recommend you enter an abbreviated or commonly used name.
Upload Photos
You can upload photos to compartments or items that have been added.
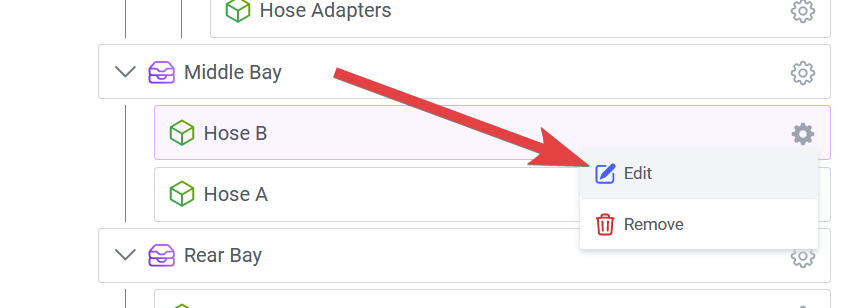
- Click the gear button on the right side of a compartment or item.
- Select "Edit".
- In the Photos section of the form, click the file input to select a photo, or drag and drop a photo onto the input from your file system.
- Click "Confirm" at the bottom of the modal dialog.
- Click "Save Inventory" at the top of the page.

Organize Inventory
You can reorder compartments and items, as well as move them in and out of other compartments:
- Click and hold on the icon or name of the compartment or item row to begin dragging it.
- As you drag the row around, a red line will appear. Release your mouse to drop the row at this location.
- When you are done, click "Save Inventory" at the top of the page.
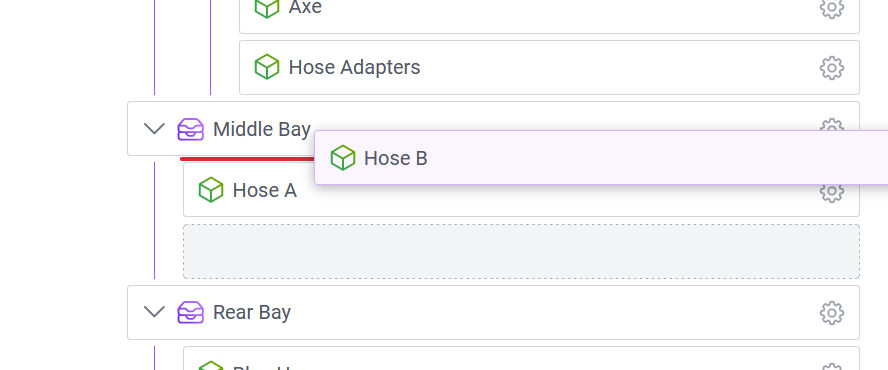
You may need to click the arrow icon on the left of the compartment to expand it and view or organize its contents. You cannot move a compartment or item into another compartment while it is collapsed. If you drop the row below the collapsed compartment, it will place the row after the compartment instead of inside.
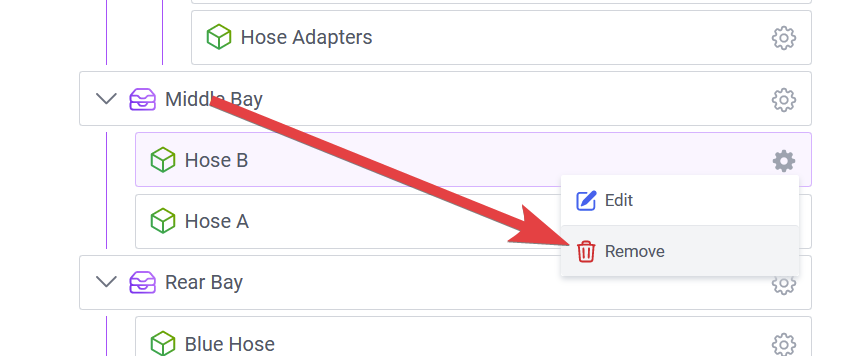
Delete Inventory
- Click the gear button on the right side of a compartment or item.
- Select "Remove".
- Click "Save" at the bottom of the modal dialog to confirm.
- Click "Save Inventory" at the top of the page.
If you delete a compartment, anything it contains will be deleted as well.
Compatibility with Fire Station Desktop
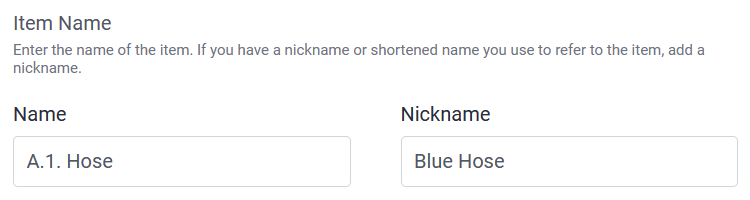
Nicknames
The Name field is used in Fire Station+ and Fire Station Desktop, but the Nickname is only used in Fire Station+ . For example, an item with the name "A.1. Hose" and with the nickname "Hose" will show up as "Hose" in the Fire Station+ but will show up as "A.1. Hose" in Fire Station Desktop.
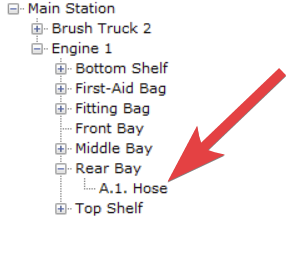
Sub-Compartments
Fire Station Desktop does not support sub-compartments. All compartments and sub-compartments appear top-level compartments in the Fire Station Desktop.
For this reason, we recommend you use a naming pattern for sub-compartments that indicates it is contained in another compartment. You can enter the compartment name as the Nickname in Fire Station+ . This makes it possible to indicate sub-compartment hierarchies in Fire Station Desktop while keeping names simple in Fire Station+ .
Example:
This sub-compartment is nicknamed "First-Aid Bag" and is located inside the "Rear Bay" compartment.
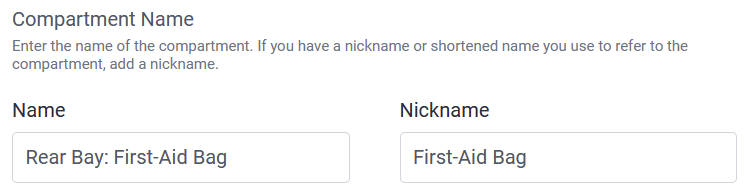
Here is how the compartment appears in Fire Station+ vs Fire Station Desktop:


Manage an Apparatus Checklist
Saving Changes
You need Apparatus Manager permissions to make these changes.
You can pick the questions that appear on the checklist when conducting an apparatus check. You can also add custom items to the checklist.
- On a browser, go to https://apparatus-checks.platform.firestationsoftware.com/select-apparatus. You may need to sign in.
- Select the apparatus you want to view.
- In the left menu select Checklist.
- Toggle, add or remove items.
- Click "Save Items" at the top of the page.
You must click "Save Items" to save your changes before leaving the page. If you do not click this button, your changes will be lost.
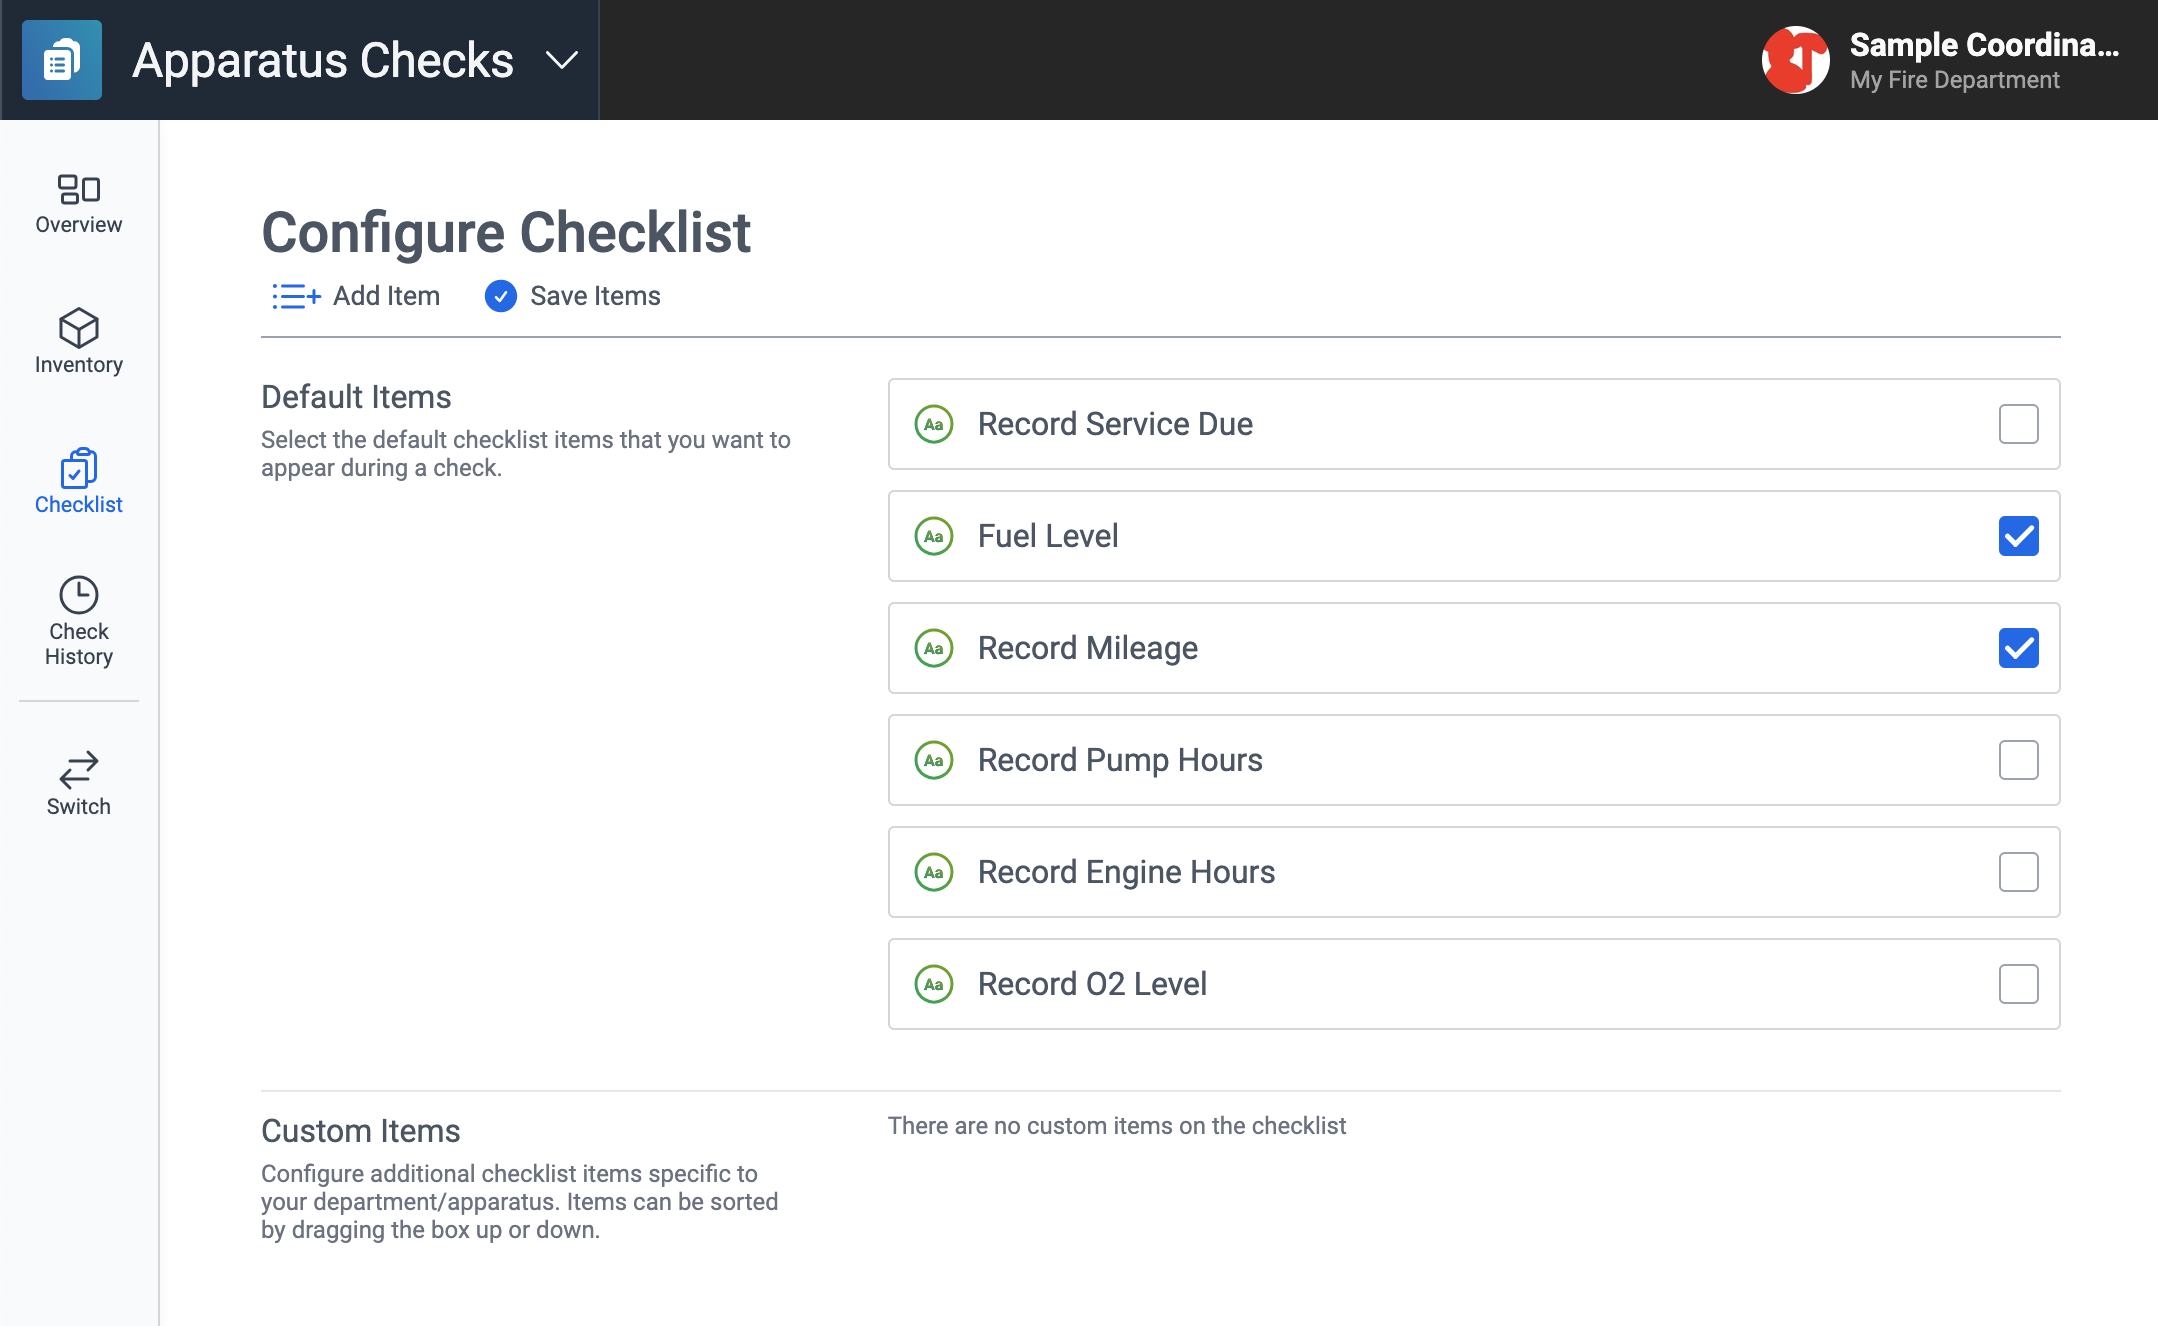
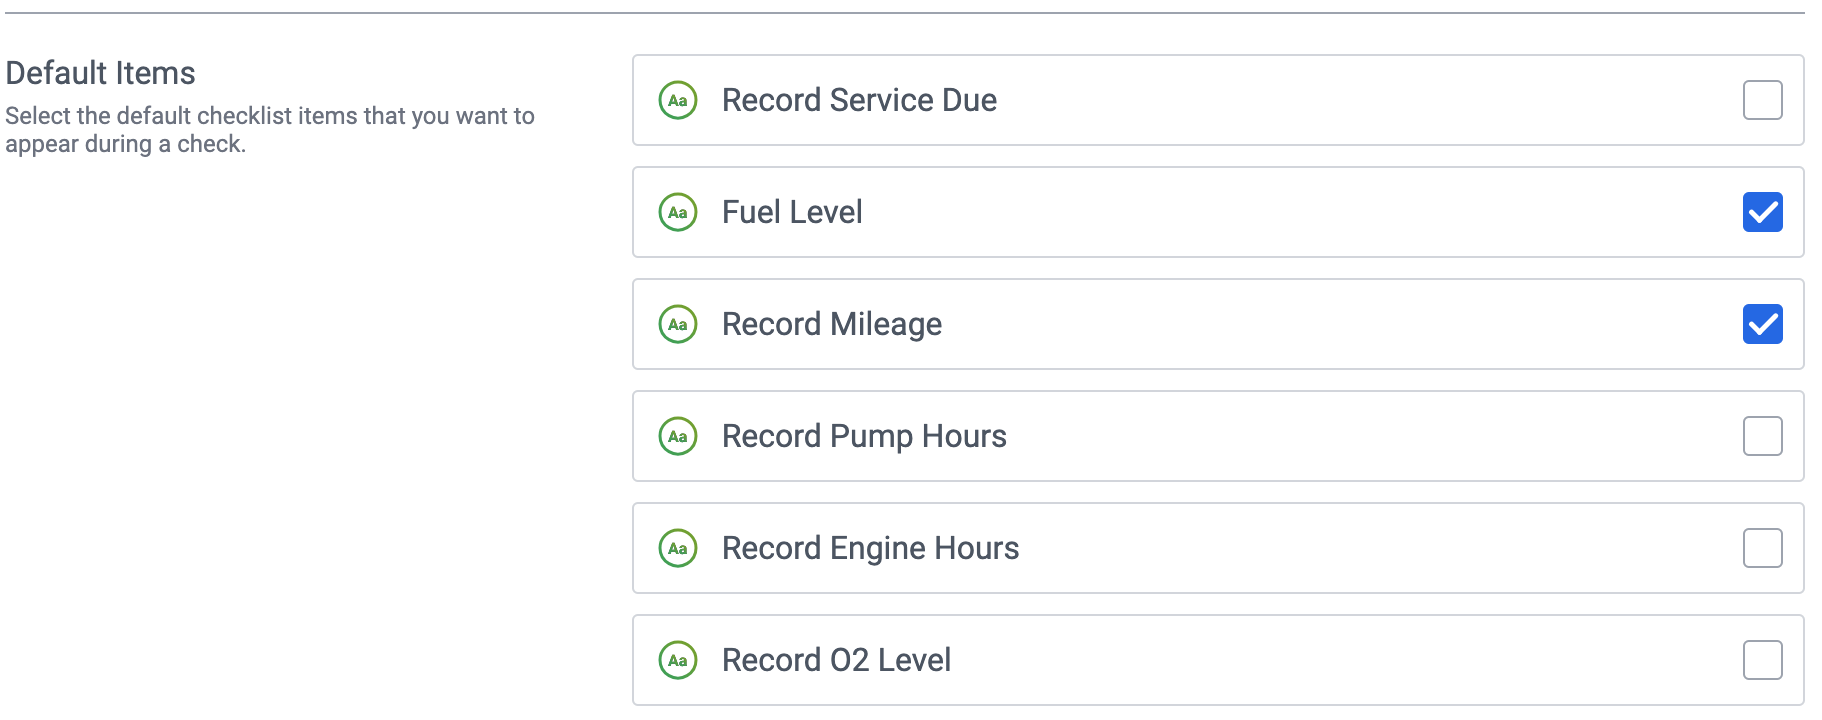
Select Default Items
There are six preconfigured items for an apparatus checklist. You cannot modify these items, but you can enable or disable them.
- Record Service Due
- Fuel Level
- Record Mileage
- Record Pump Hours
- Record Engine Hours
- Record O2 Level
To do this:
- Check or uncheck the checkbox on the right side of a default item.
- Click "Save Items" at the top of the page.
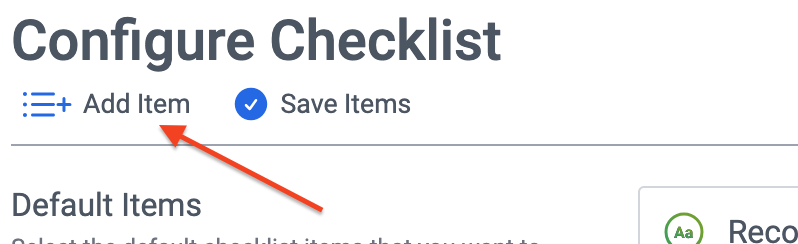
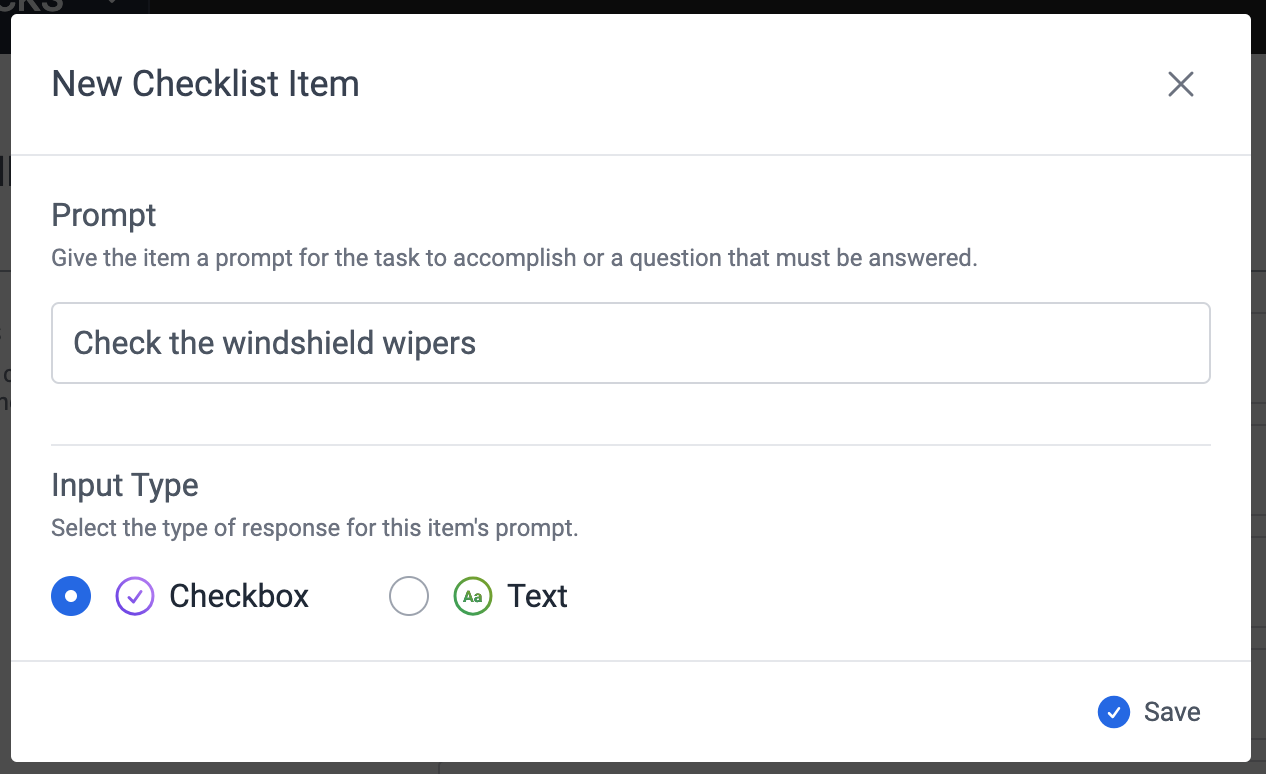
Add Custom Items
You can add custom items to the checklist:
- At the top of the Checklist page, click the "Add Item" button.
- Fill out the form details.
- Click "Save" at the bottom of the modal dialog.
- Click "Save Items" at the top of the page.
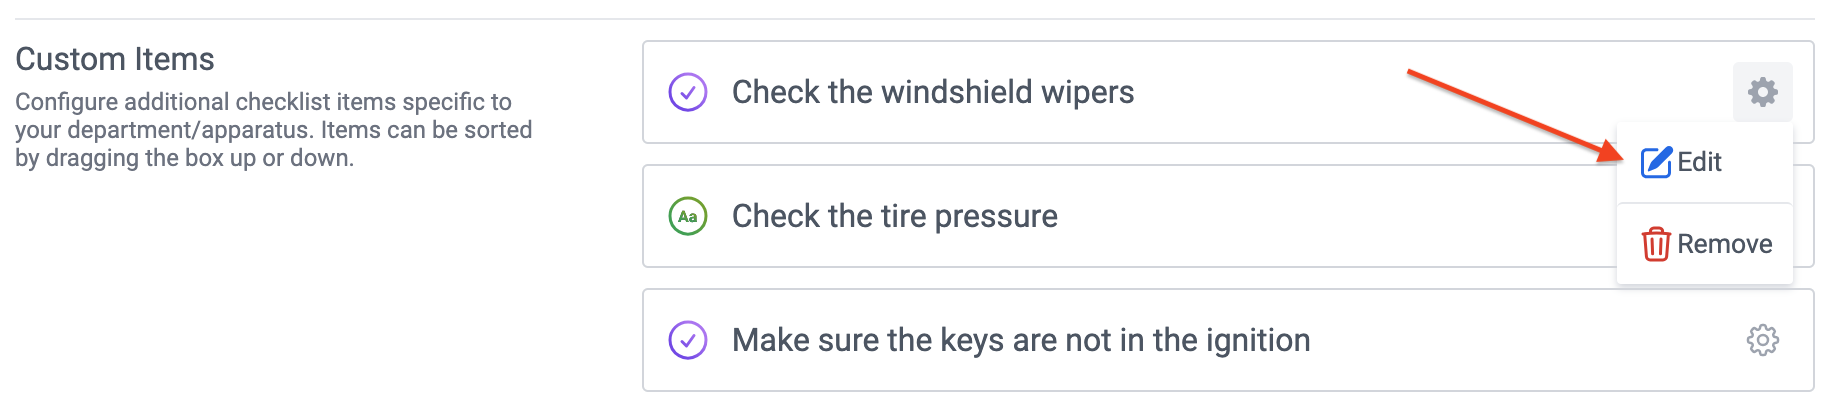
Edit Custom Items
- Click the gear button on the right side of the item.
- Select "Edit".
- Update the form details.
- Click "Save" at the bottom of the modal dialog.
- Click "Save Items" at the top of the page.
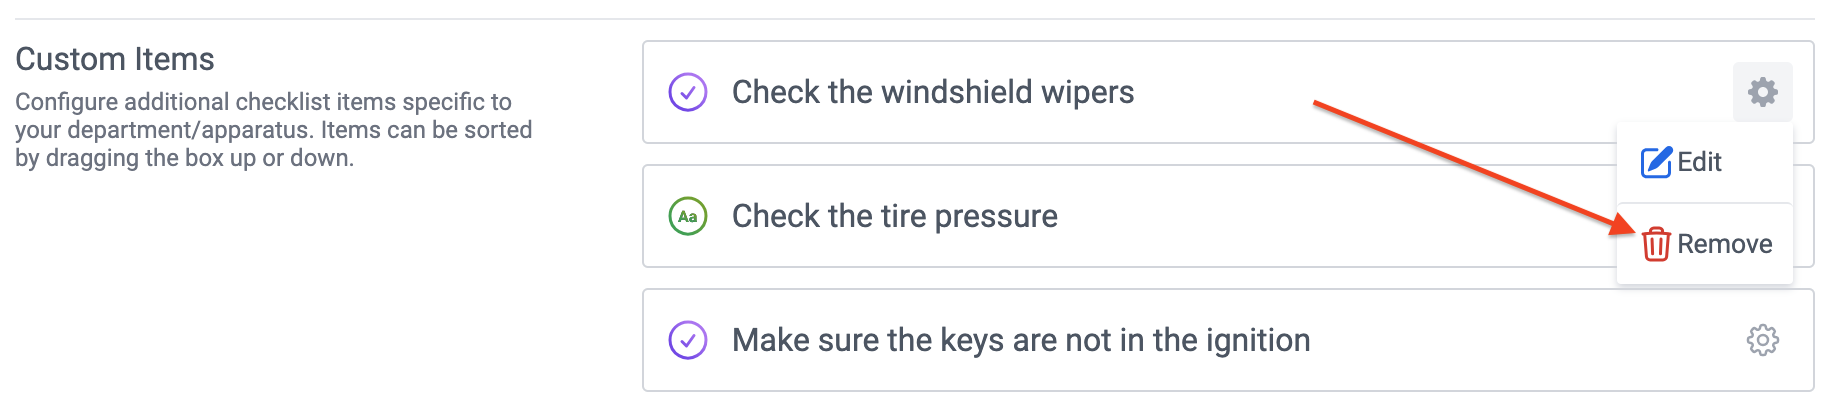
Delete Custom Items
- Click the gear button on the right side of the item.
- Select "Edit".
- Update the form details.
- Click "Confirm" at the bottom of the modal dialog.
- Click "Save Items" at the top of the page.
Organize Custom Items
You can reorder custom items:
- Click and hold on the icon or name of the item row to begin dragging it.
- Drag the row up and down and release your mouse to move the row to a new location.
- When you are done, click "Save Items" at the top of the page.
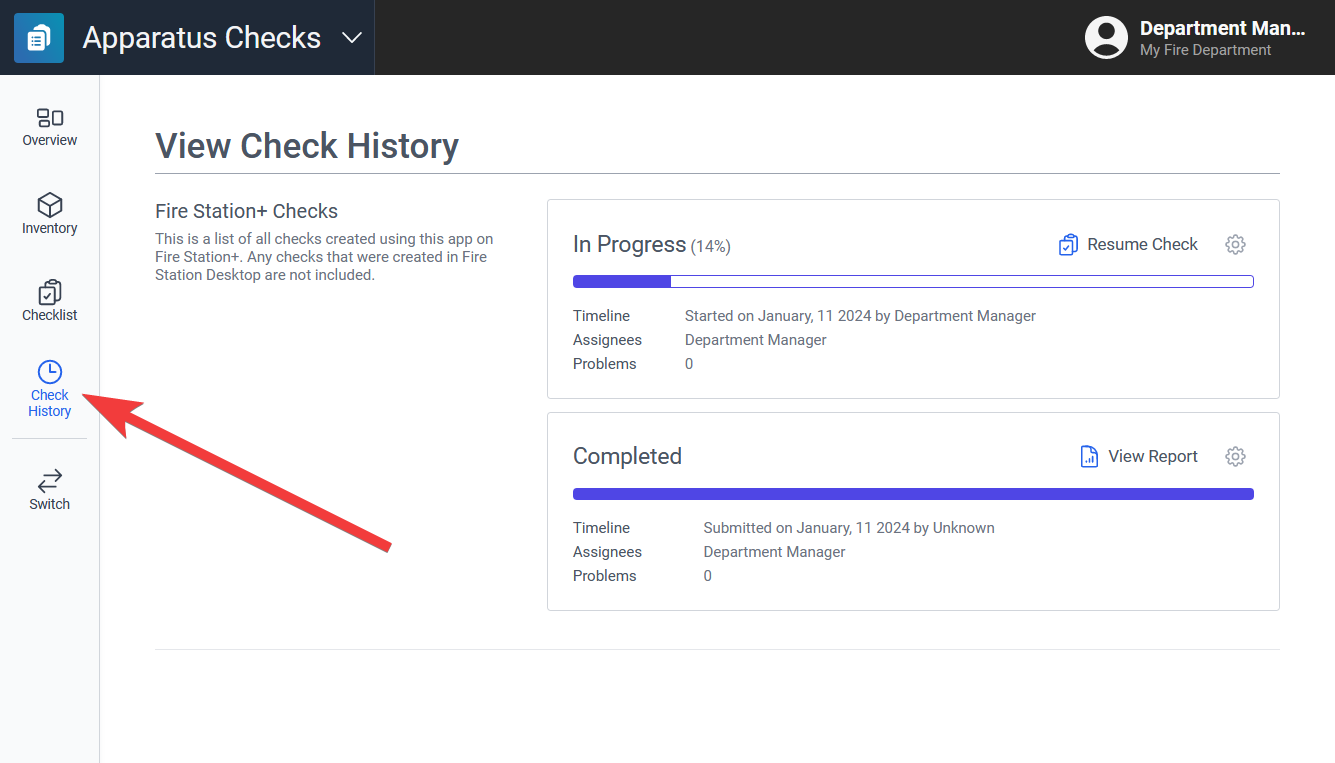
View Check History
View a Check Report
You need Apparatus Manager, Apparatus Checks Coordinator, or Apparatus Checks Participant permissions to view apparatus check history and reports.
You can pick the questions that appear on the checklist when conducting an apparatus check. You can also add custom items to the checklist.
- On a browser, go to https://apparatus-checks.platform.firestationsoftware.com/select-apparatus. You may need to sign in.
- Select the apparatus you want to view.
- In the left menu select Check History.
- Click the "View Report" button on the right side of a completed check row.
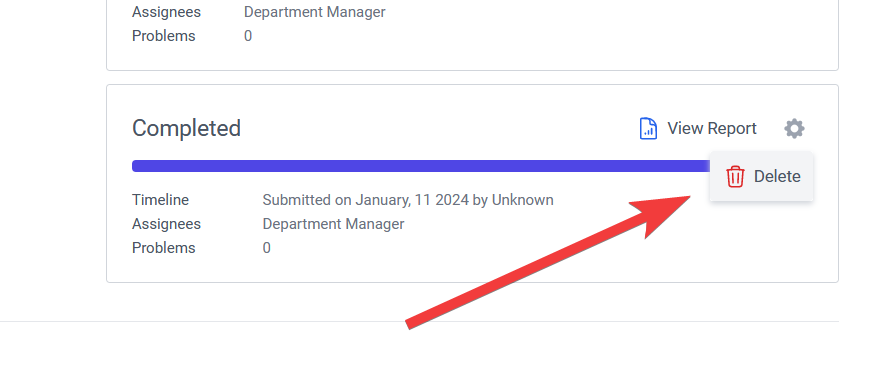
Delete a Check
You need Apparatus Manager permissions to delete apparatus checks.
- Click the gear button on the right side of a check row.
- Select "Delete".
- Click "Confirm" at the bottom of the modal dialog.
Check an Apparatus
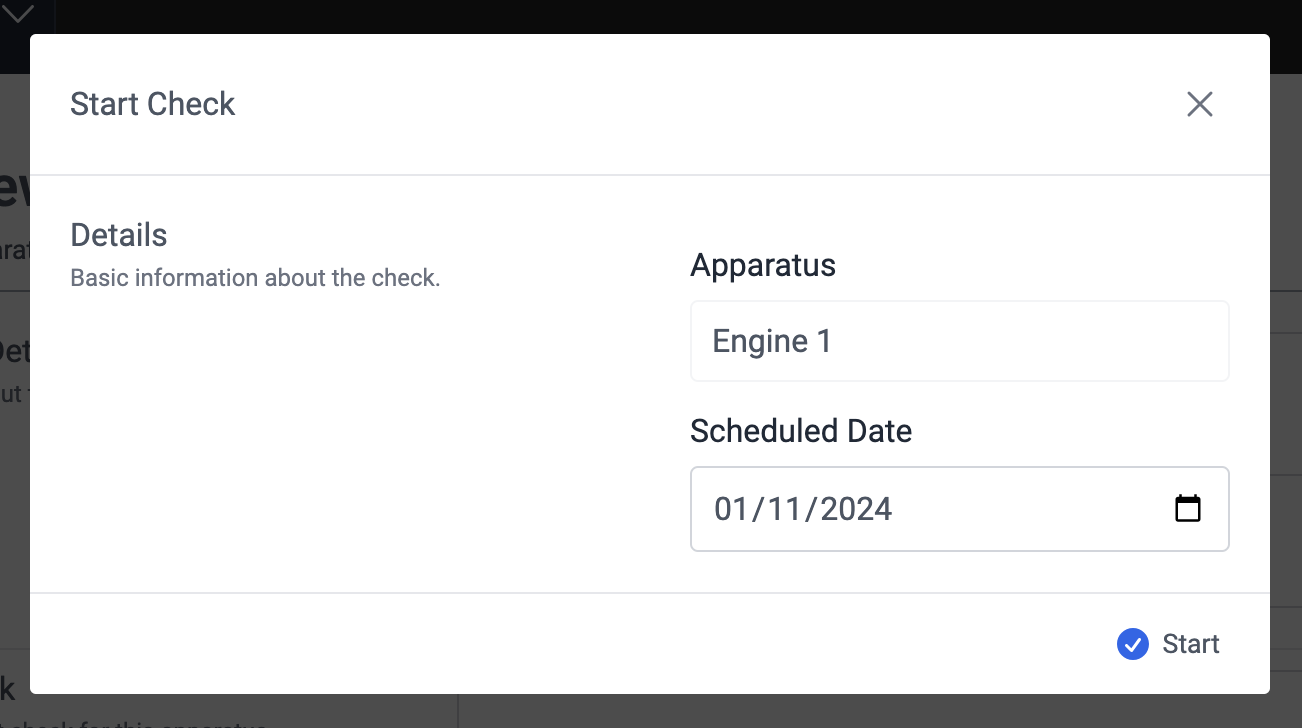
Start a Check
You must have Apparatus Checks Coordinator permissions to start a new check.
After you configure your apparatus, you can conduct a check for it.
- On a browser, go to https://apparatus-checks.platform.firestationsoftware.com/select-apparatus. You may need to sign in.
- Select the apparatus you want to check.
- Click the "New Check" button at the top of the page or on the right side of the box in the Latest Check section.
- Pick the date the check is scheduled for.
- Click "Start" at the bottom of the modal dialog.
Resume a Check
You must have Apparatus Checks Participant or Apparatus Checks Coordinator permissions to resume a check.
- On a browser, go to https://apparatus-checks.platform.firestationsoftware.com/select-apparatus. You may need to sign in.
- Select the apparatus you want to check.
- If a check has been started, click the "Resume Check" button at the top of the page or on the right side of the box in the Latest Check section.
You can also resume a check by clicking the "Resume Check" button on the in-progress check on the Check History page.
Understanding the Check Interface
You must have Apparatus Checks Participant or Apparatus Checks Coordinator permissions to conduct a check.
Saving
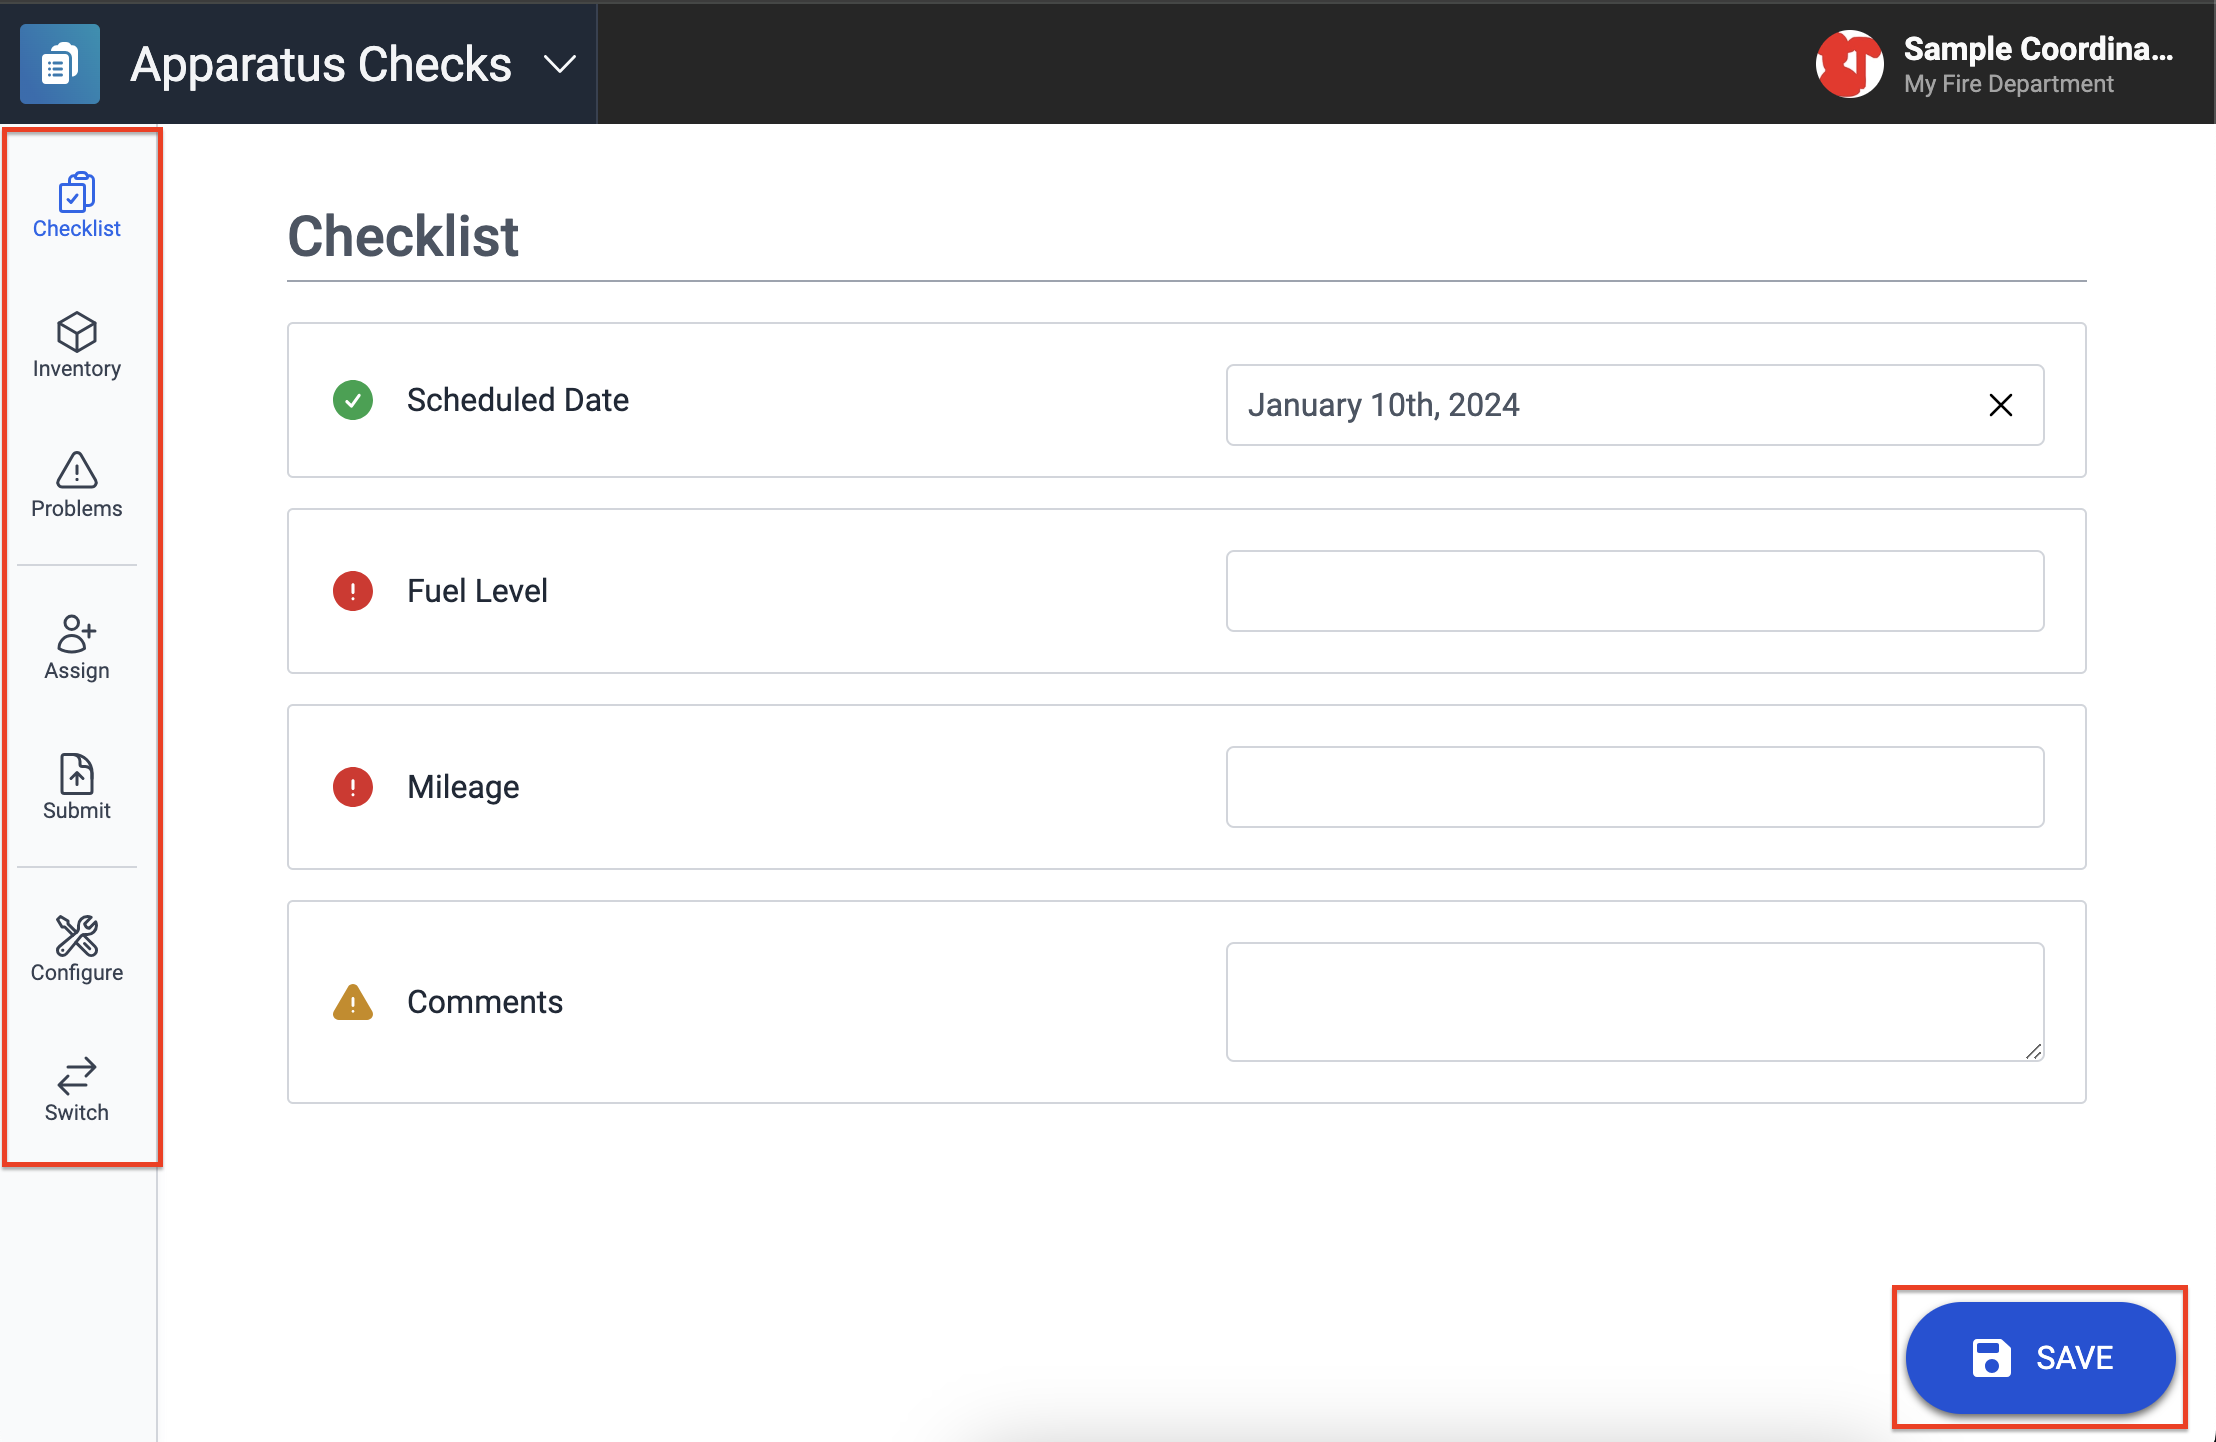
The system will auto-save any changes when you navigate between screens. You can save manually at any time when the Save button is present on the screen.

Navigation
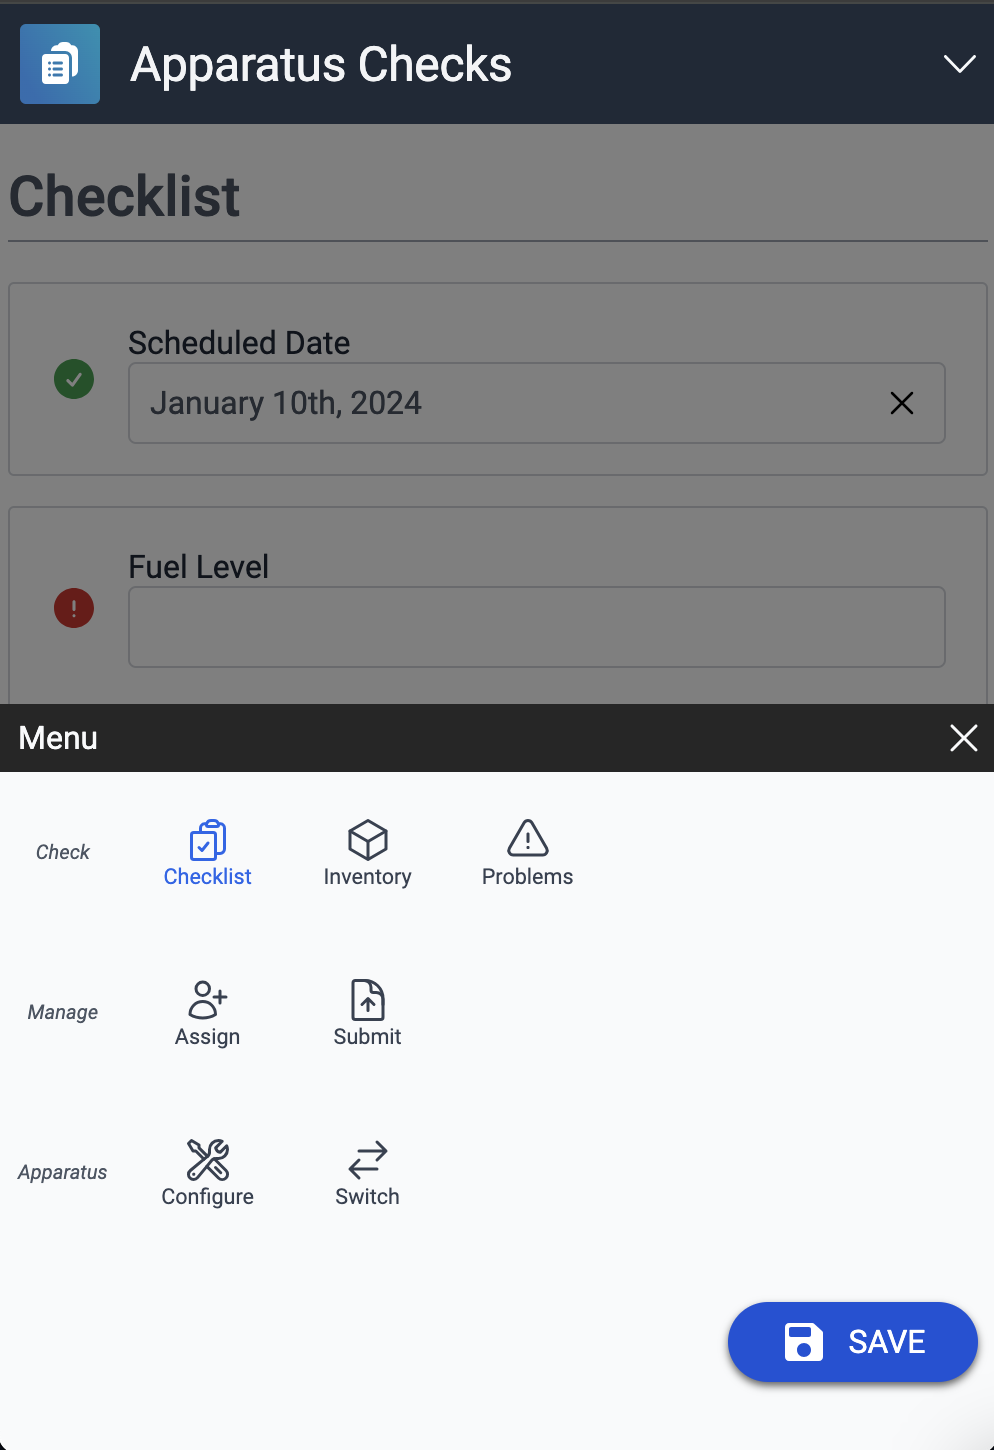
An apparatus check is broken out into 3 main steps:
- Checklist - answer general questions (i.e. indicate the fuel level)
- Inventory - check items stored on the apparatus
- Problems - entering problems noted with the apparatus
You can also perform these additional actions on a check:
- Assign - view and edit the apparatus and compartment assignments
- Submit - review and complete the check
- Configure - exit the check and return to the apparatus configuration
- Switch - exit the check and return to the apparatus selection
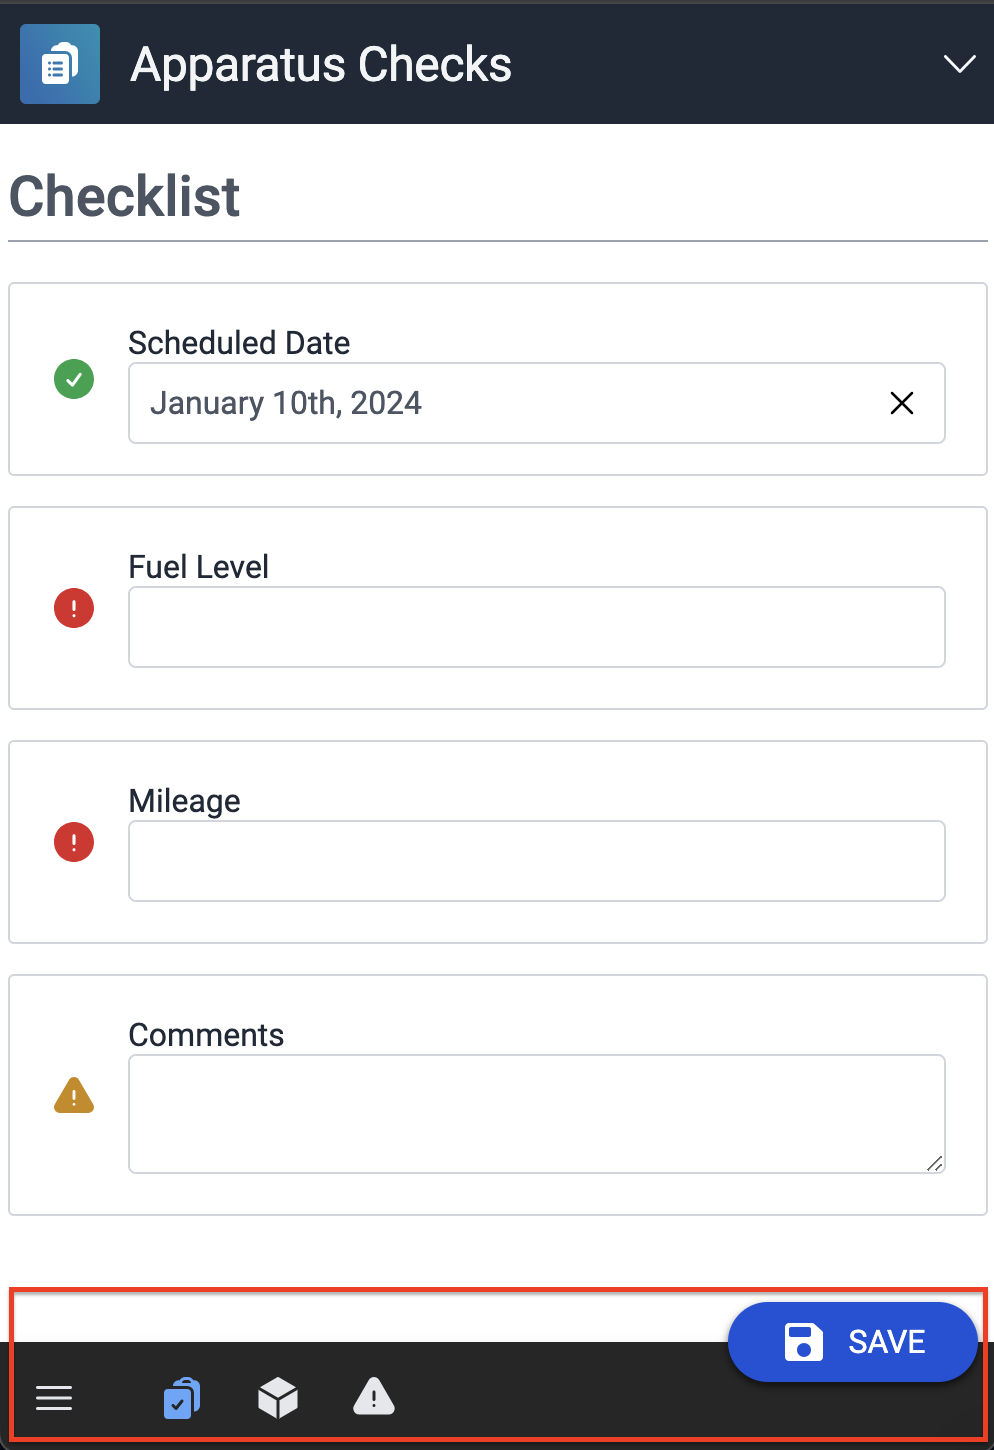
You can access each step and actions directly from the sidebar menu.
On devices with small screens, the menu is collapsed and appears on the bottom bar instead. You can expand the menu to reveal all navigation options.
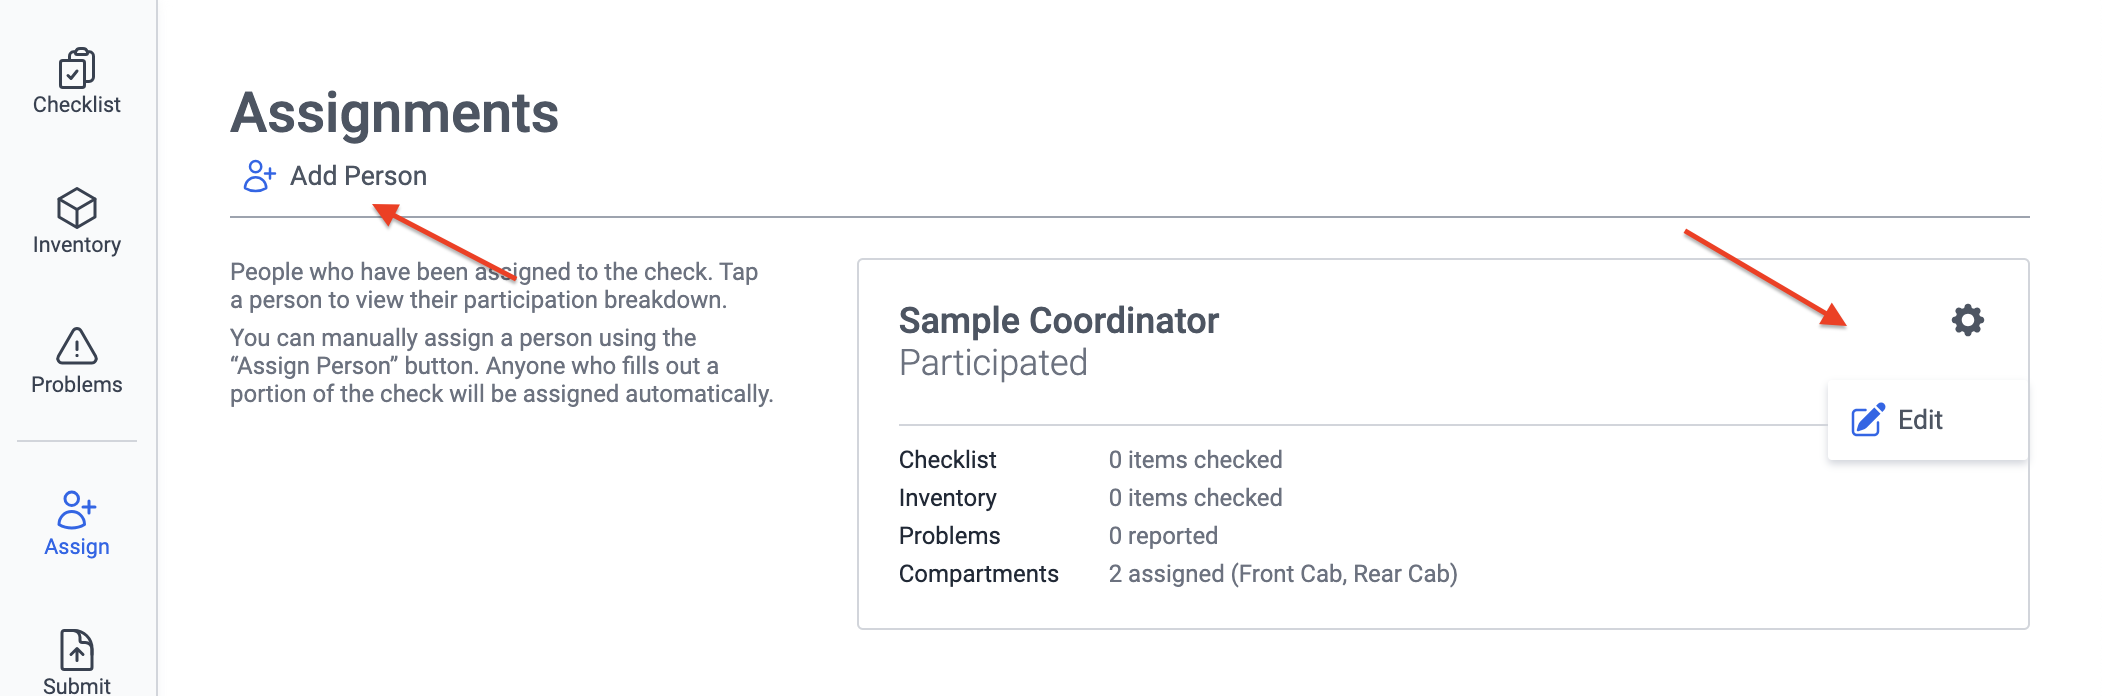
Manage Assignments
You must have Apparatus Checks Coordinator permissions to make these changes.
- On a browser, go to https://apparatus-checks.platform.firestationsoftware.com/select-apparatus. You may need to sign in.
- Select the apparatus you want to check.
- Start or resume a check.
- Select "Assign" from the navigation menu.
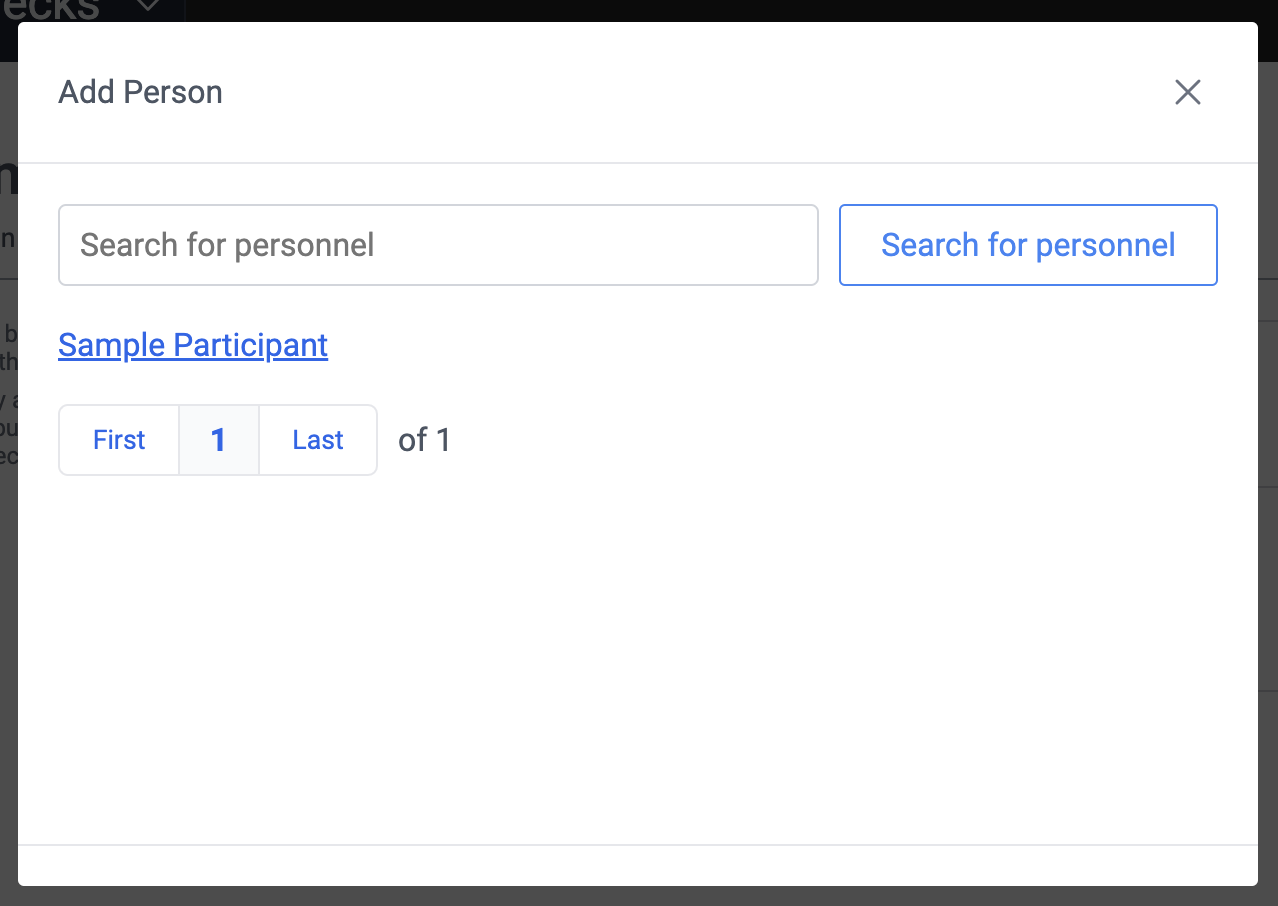
- Click the "Add Person" button at the top of the page, and select the person you want to add.
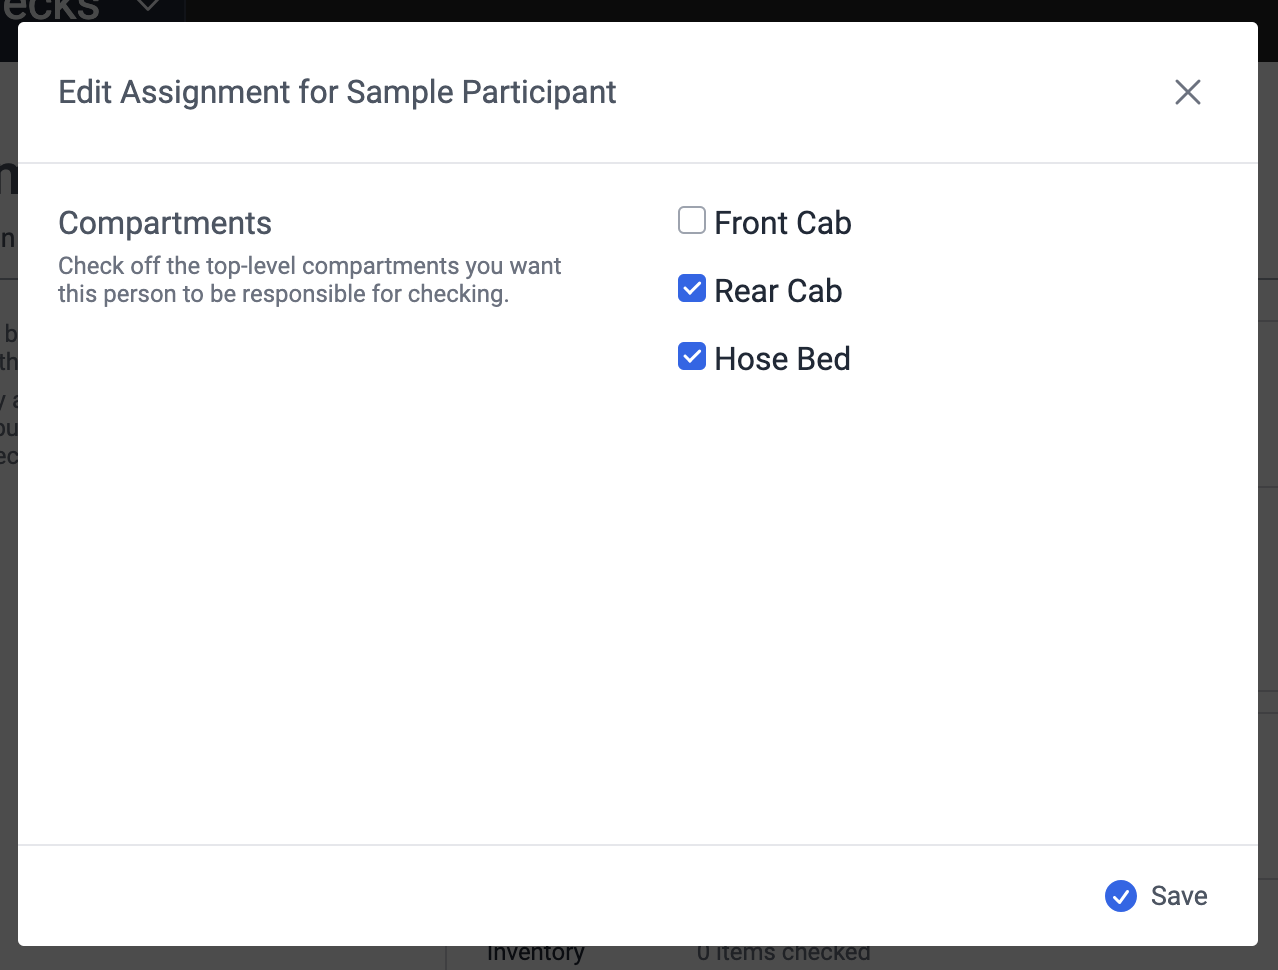
- To edit an assignment, click the gear button to the right of their name and select "Edit".
- Check off any compartments you want to assign to this person.
- Click "Save" at the bottom of the modal dialog.
You can assign any person from the active personnel list in Fire Station desktop, even if they do not have an FSSID. However, they must have an FSSID to sign in to the Apparatus Checks app and save changes on the check to receive credit for participating.
The person who starts the check, or anyone that enters information on the check, will be added to the check automatically, and the system will indicate that they have participated.
People who have participated in a check cannot have their assignment removed.
Fill Out the Checklist
You must have Apparatus Checks Participant permissions to complete the checklist, and you must have Apparatus Check Coordinator permissions to change the Scheduled Date for a check.
- On a browser, go to https://apparatus-checks.platform.firestationsoftware.com/select-apparatus. You may need to sign in.
- Select the apparatus you want to check.
- Start or resume a check.
- Select "Checklist" from the navigation menu.
- Edit the answers to checklist items.
- Click "Save" at the bottom of the modal dialog.
Each checklist item has an icon to indicate the validation status:
- Green Checkbox - indicates the item is complete
- Red Exclamation Mark - indicates the item is not complete and is required
- Yellow Exclamation Mark - indicates the item is not complete, but it is optional

Check the Inventory
You must have Apparatus Checks Participant permissions to check inventory.
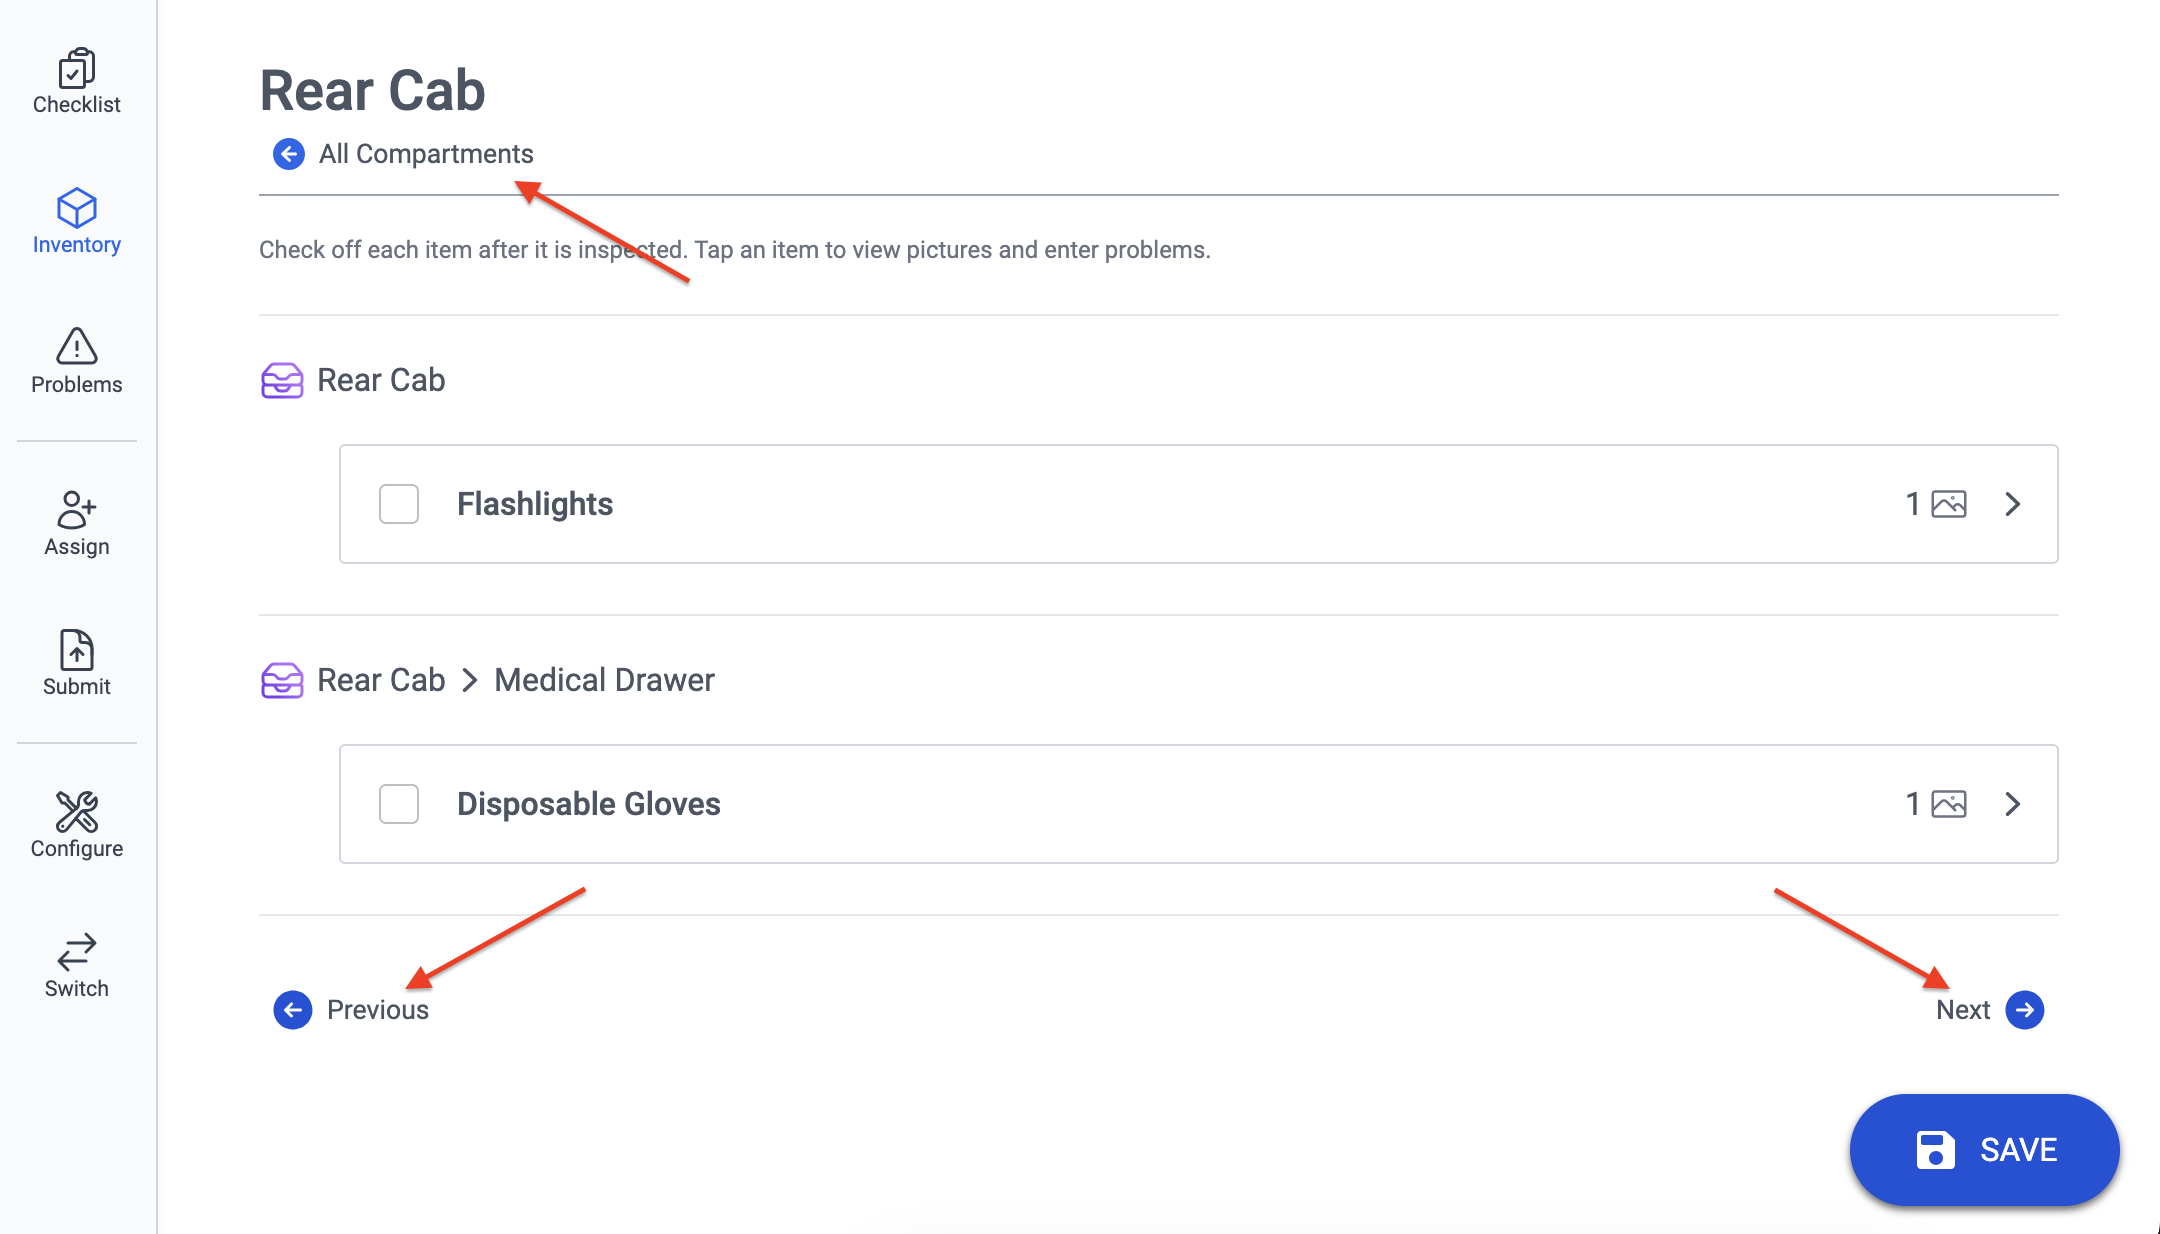
Select a Compartment
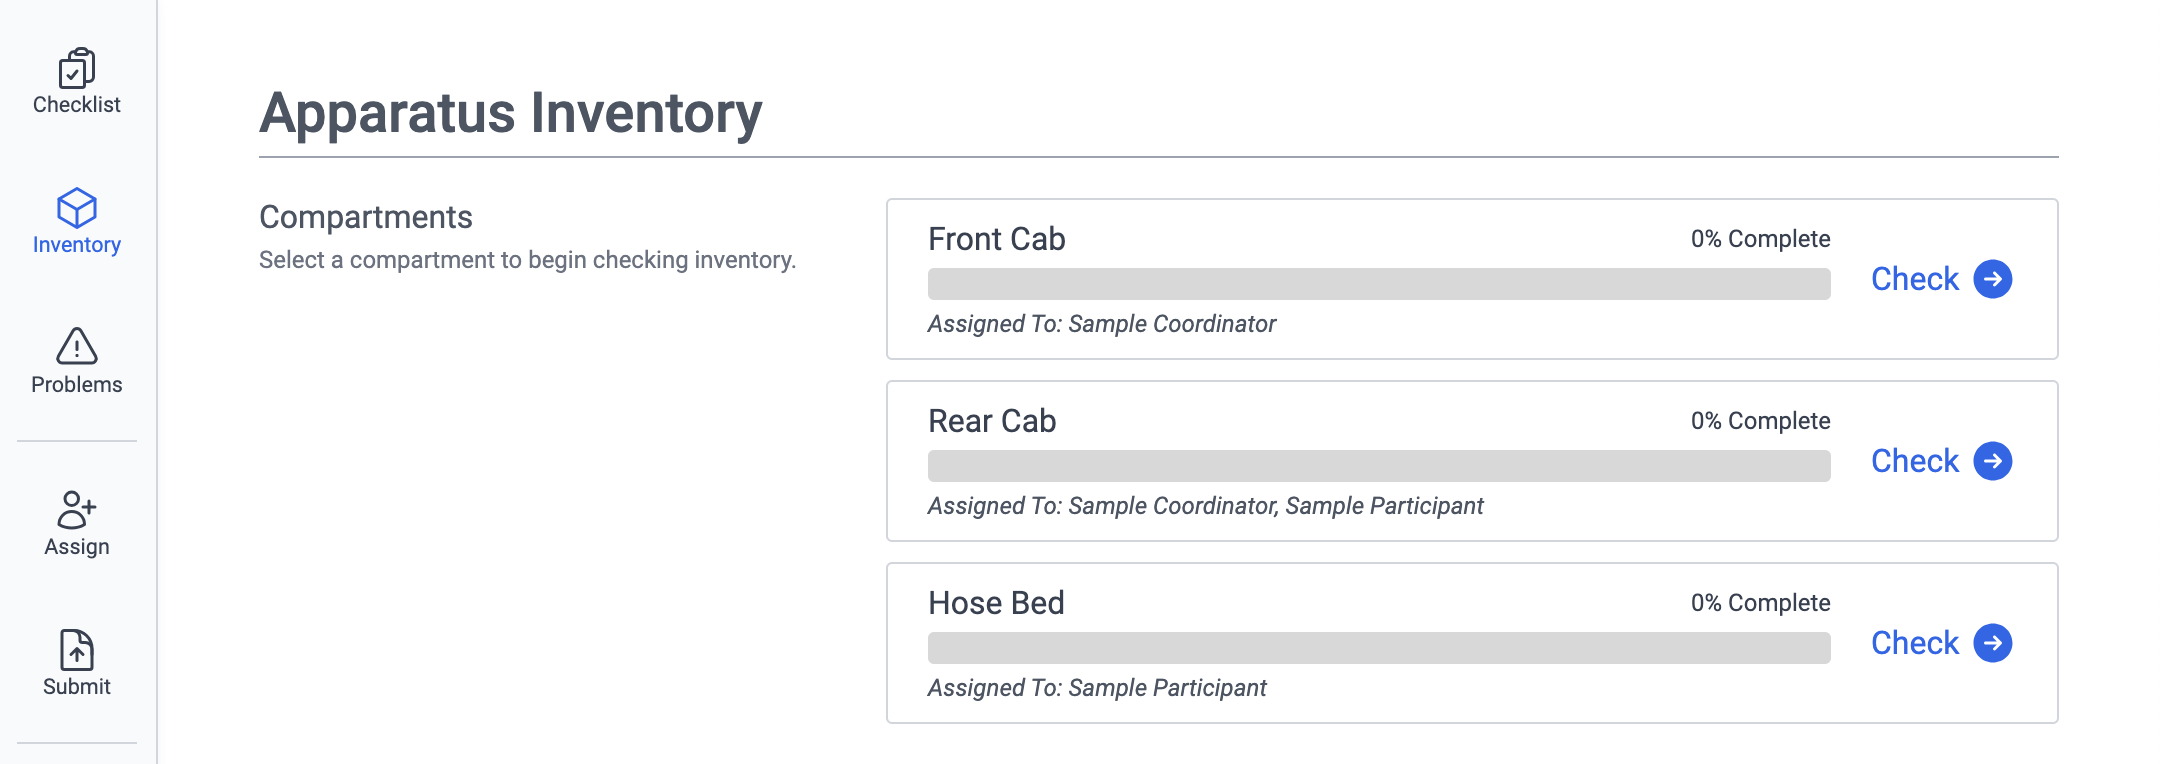
Inventory is organized by top-level compartments. Each compartment lists assignees and the progress of item checks for that compartment and sub-compartments.
- On a browser, go to https://apparatus-checks.platform.firestationsoftware.com/select-apparatus. You may need to sign in.
- Select the apparatus you want to check.
- Start or resume a check.
- Select "Inventory" from the navigation menu.
- Click the "Check" button on the right side of a compartment.
Click the "All Compartments" button at the top of the page to return to the compartment list. Click the "Previous" or "Next" buttons at the bottom of the page to navigate between compartments.
If you click "Previous" on the first top-level compartment, you will be taken to the Checklist screen, and if you click "Next" on the last top-level compartment, you will be taken to the Problems screen.
Check an Item
All items are grouped under the top-level compartment and any sub-compartments. To check an item:
- Follow the steps in above to select a compartment.
- Select the checkbox to the left of the item name to indicate it is complete.
- Click the "Save" button at the bottom of the page.

View Item Pictures
If you see the photo icon, that means that the item has pictures available in the expanded view. Click anywhere in the item's box (except the checkbox) to expand it and view the pictures.
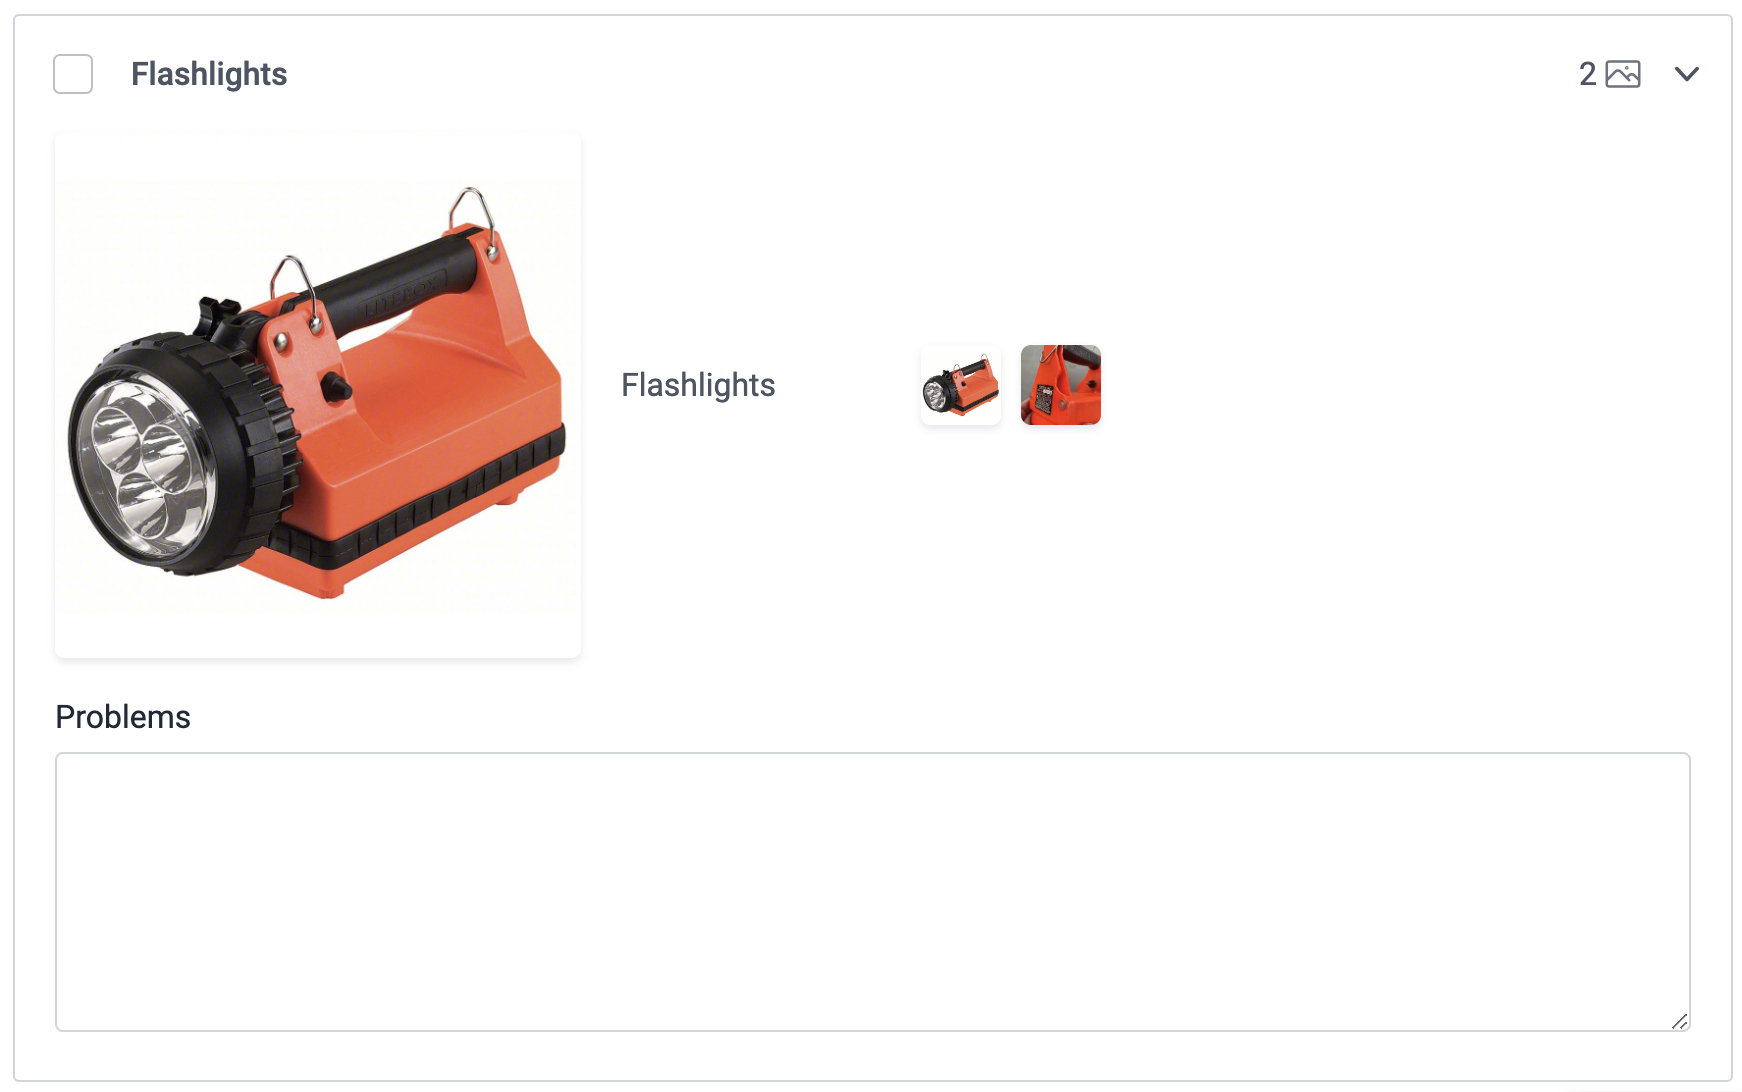
Note Item Problems
You can also enter problems specific to that item in the expanded view. Any problems entered for an item will be visible when the item is collapsed. To enter an item problem:
- Follow the steps in above to select a compartment.
- Click the item to expand it.
- Enter the problem details in the text area.
- Click the "Save" button at the bottom of the page.

Report Problems
You must have Apparatus Checks Participant permissions to report problems.
View All Reported Problems
- On a browser, go to https://apparatus-checks.platform.firestationsoftware.com/select-apparatus. You may need to sign in.
- Select the apparatus you want to check.
- Start or resume a check.
- Select "Problems" from the navigation menu.
This screen lists out all problems, including ones entered during inventory checks.
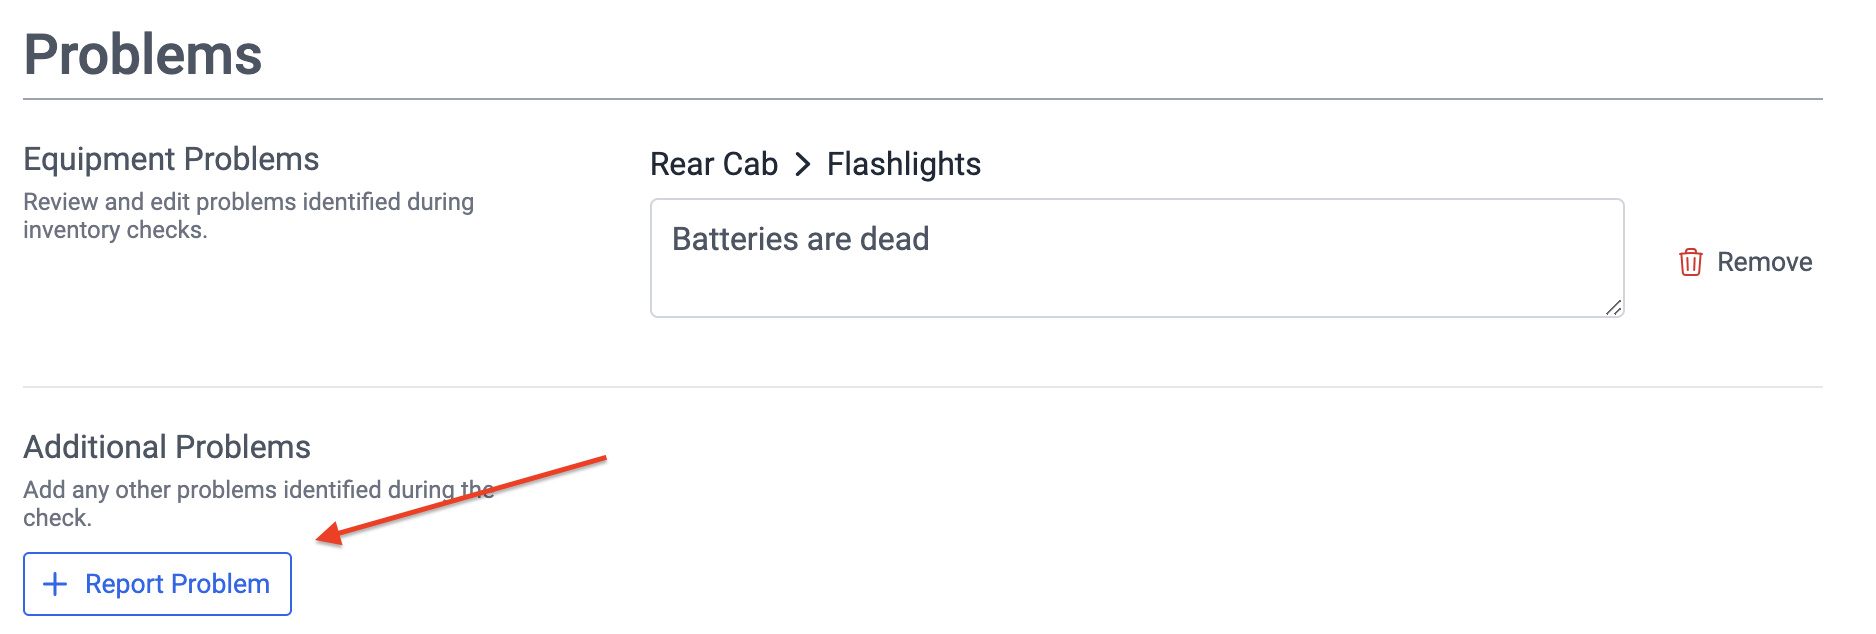
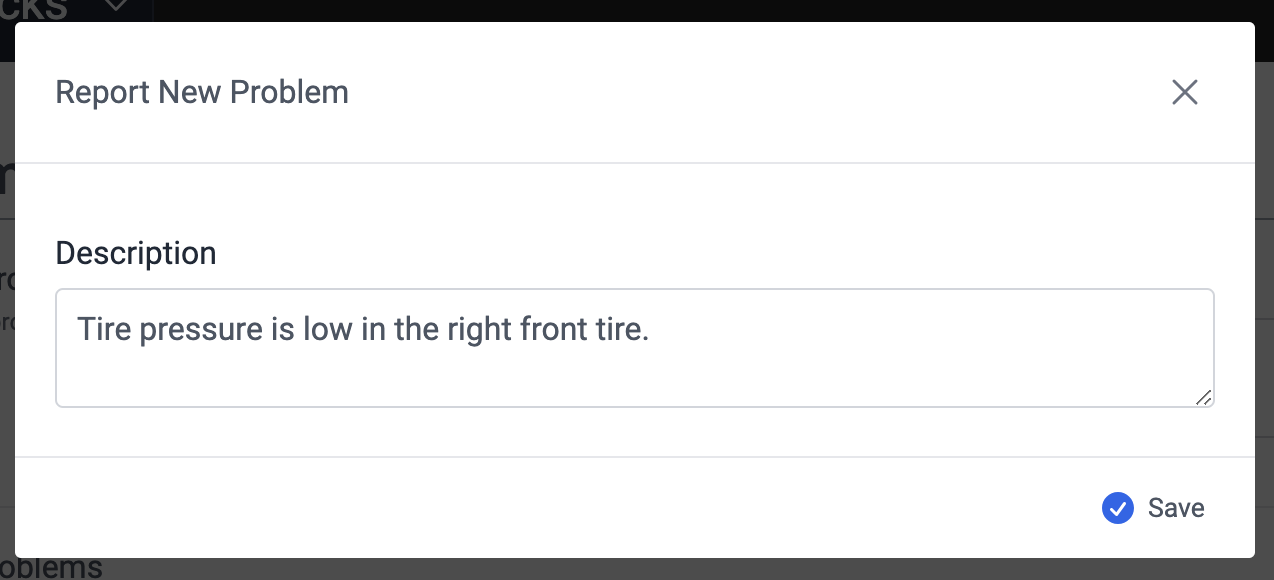
Report Additional Problems
- Follow the instructions above to view all reported problems.
- Click the "Report Problem" button at the bottom of the page.
- Enter the problem description.
- Click "Save" at the bottom of the modal dialog.
Edit a Problem
- Follow the instructions above to view all problems.
- Modify the problems description in the text box.
- Click the "Save" button at the bottom of the page.
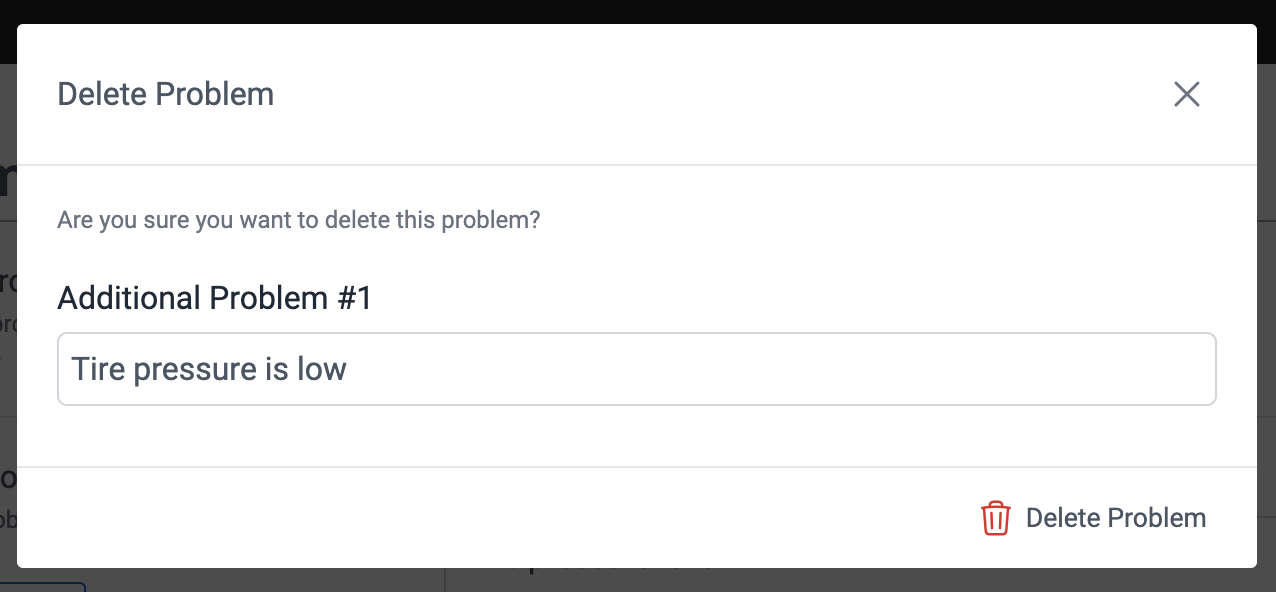
Delete a Problem
- Follow the instructions above to view all problems.
- Click the "Remove" button to the right of the problem description.
- Click the "Delete Problem" button at the bottom of the modal dialog to confirm.
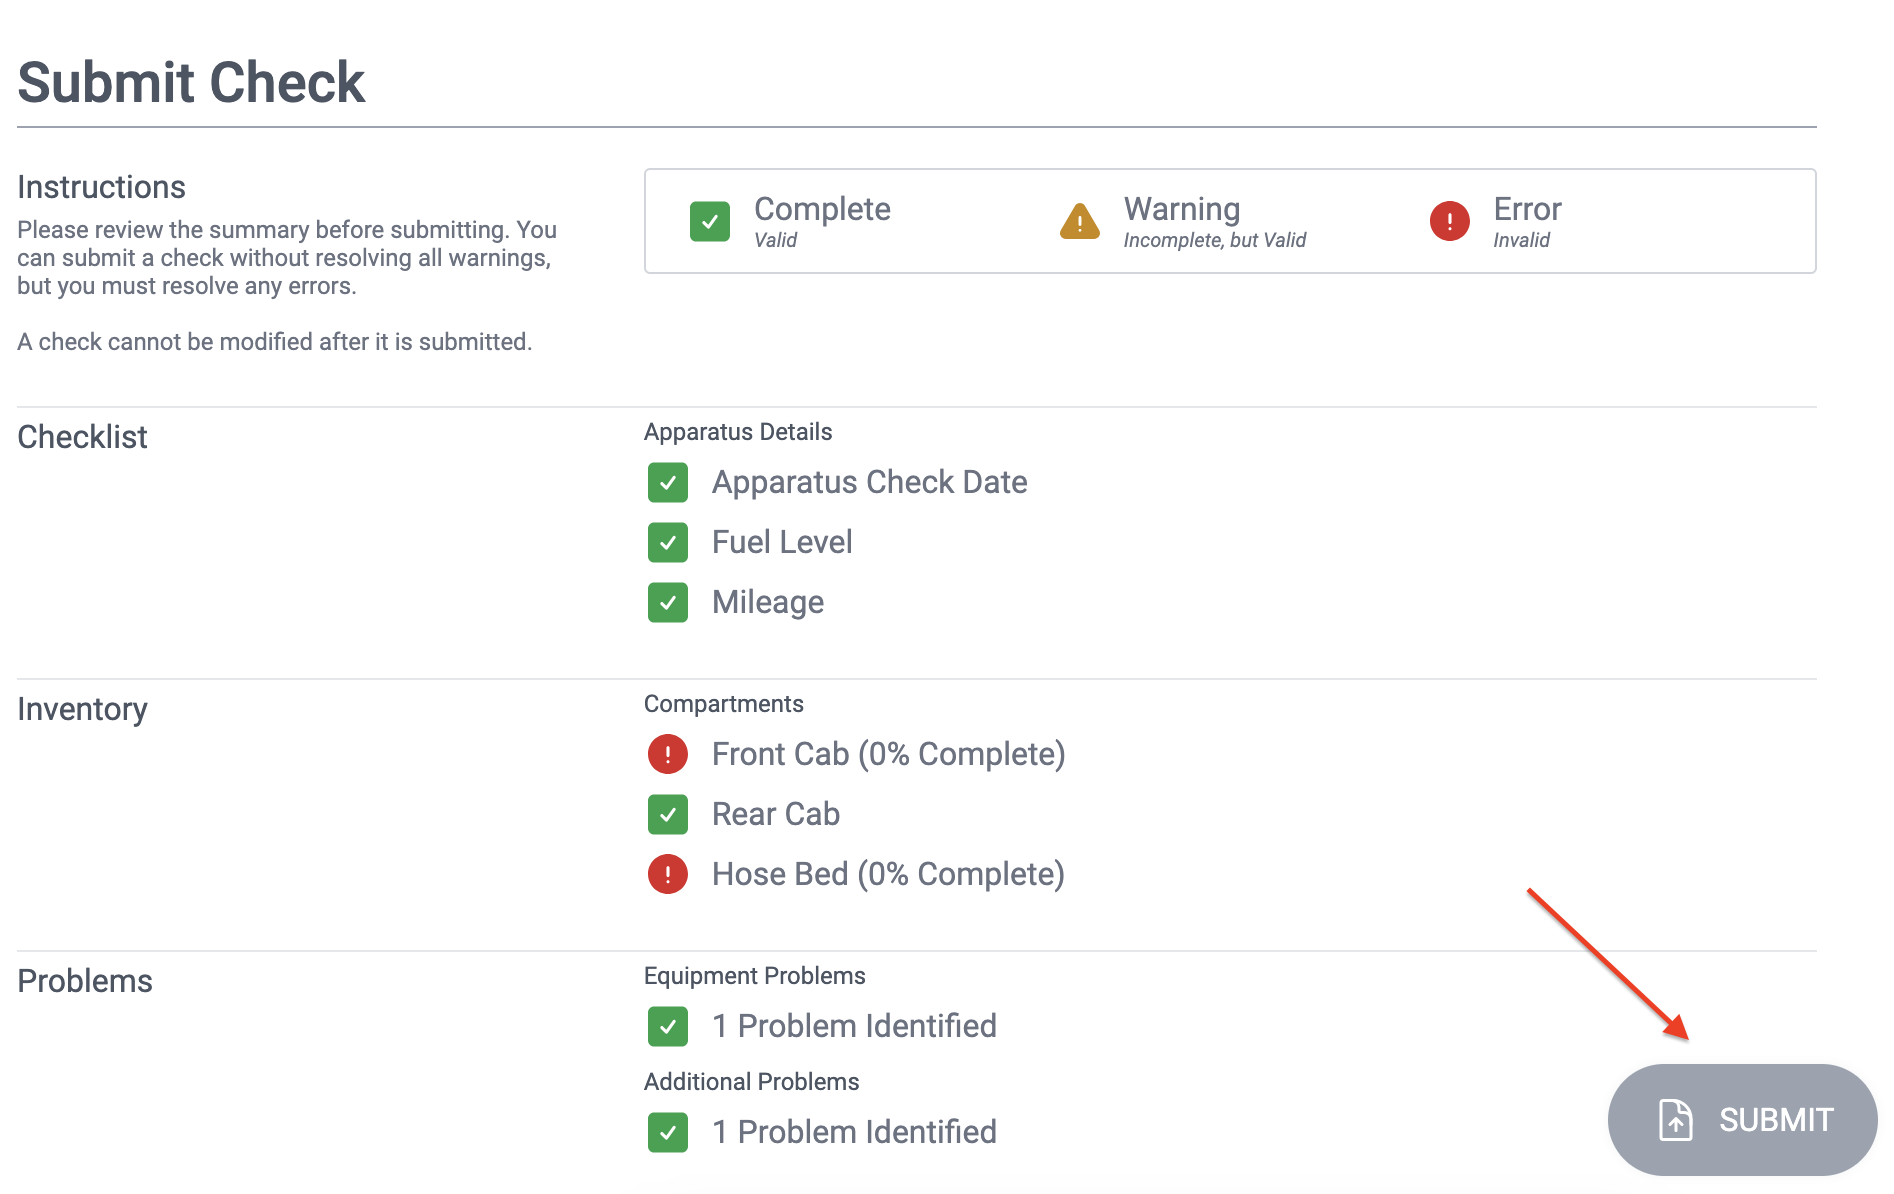
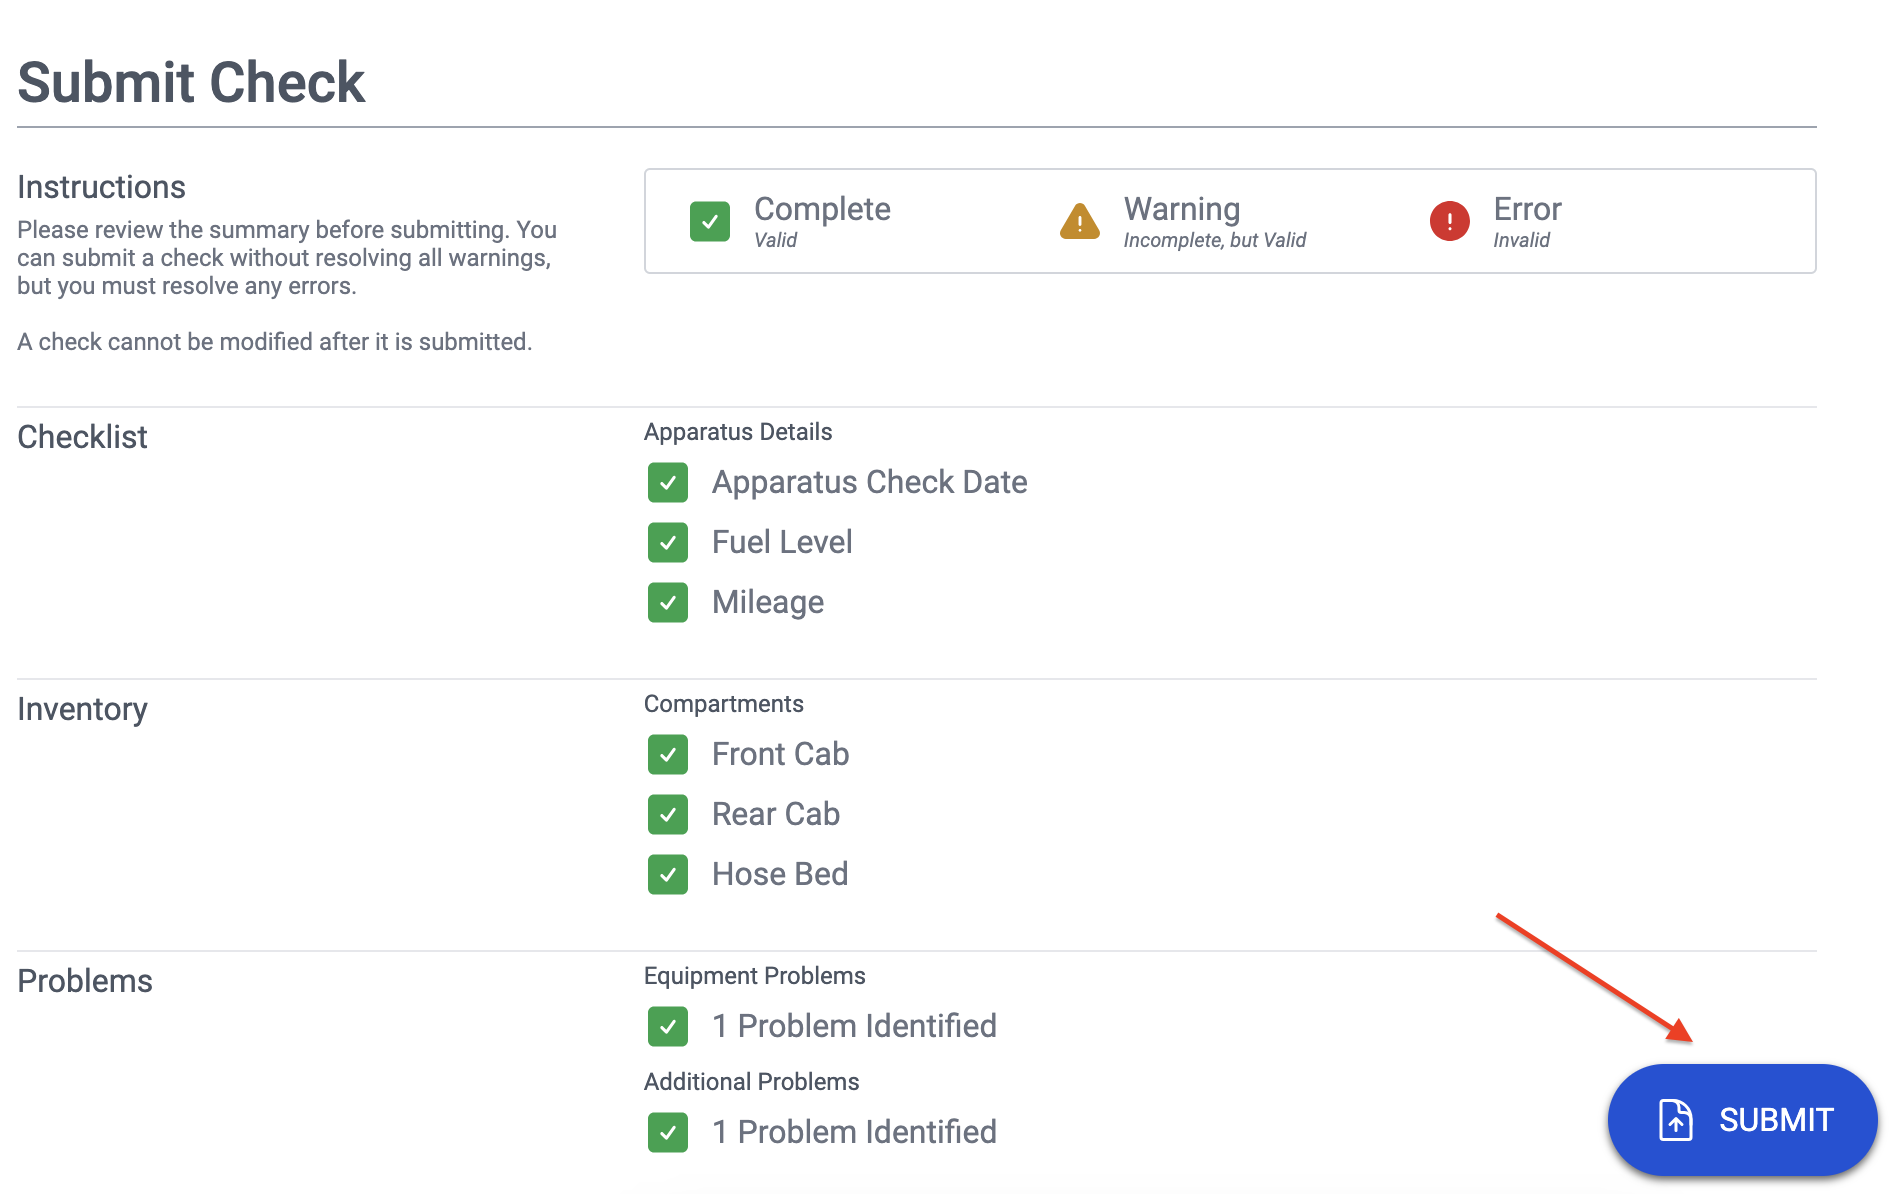
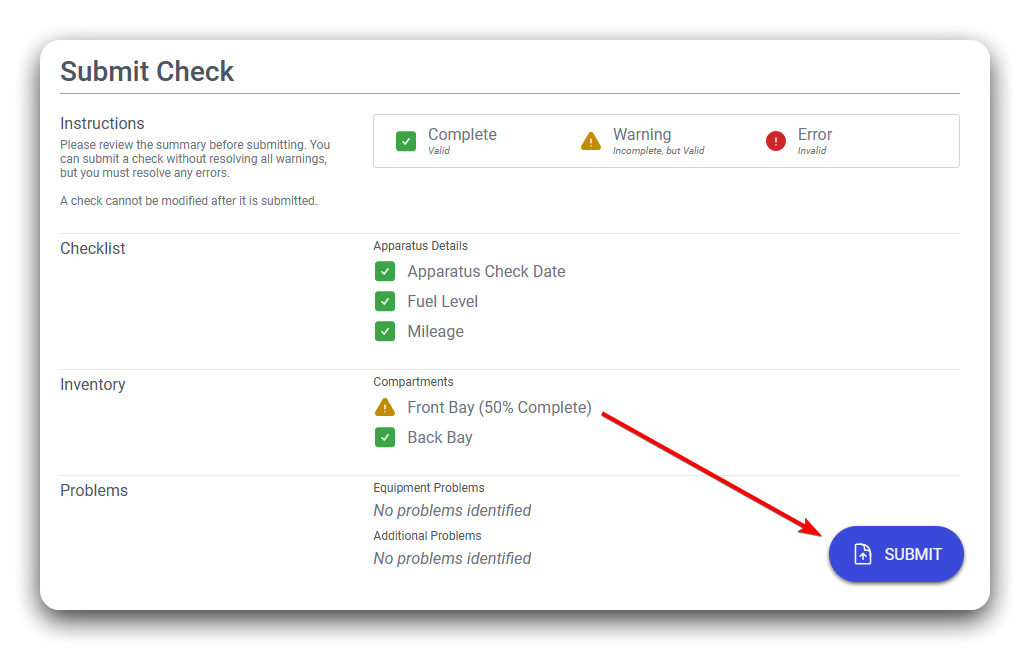
Submit a Check
You must have Apparatus Checks Participant permissions to submit a check.
You can review and submit a check to complete it:
- On a browser, go to https://apparatus-checks.platform.firestationsoftware.com/select-apparatus. You may need to sign in.
- Select the apparatus you want to check.
- Start or resume a check.
- Select "Submit" from the navigation menu.
- Click the "Submit" button at the bottom of the page.
If there are any validation errors, the "Submit" button is grayed out. Once you resolve all validation errors, the button will turn blue and you can submit the check.
- Green Checkbox - indicates the item is complete
- Red Exclamation Mark - indicates the item is not complete and is required
- Yellow Exclamation Mark - indicates the item is not complete, but it is optional
You cannot edit a submitted check as the data is saved and copied to Fire Station Desktop.
Configure Notifications
Apparatus Check Notifications
Apparatus check notifications are sent from Fire Station+ immediately when checks are submitted. The recipients of these emails are configured from the Fire Station Desktop application.
Apparatus Check Completed Notification
The system will send an email titled "Apparatus Check Completed" to anyone who is listed in an Email Group with one of the two settings for Email Apparatus Checks:
- Always
- Only Problems (only sent when the check has at least one problem in it)
Email Groups can be managed in Admin >Manage Settings >Notifications.


Apparatus Check Problem Assigned Notification
The system will send an email titled "Apparatus Check Problem Assigned" to the person who is assigned to the problem. The system determines problem assignment using the following logic:
- If the Assign Problems To setting is filled in (Admin > Manage Settings > Apparatus Checks), then problems will always be assigned to this person.

- If no one is specified in Assign Problems To, then the system will check to see if the person who submitted the check is in an Apparatus Check Group (Apparatus Checks > Manage Groups). If so, the problems will be assigned to the highest ranking person in the group. If the submitter is in multiple groups, the first one the system finds will be used.

- If the person who submitted the check is not in any Apparatus Check Groups, then the highest ranking personnel in Fire Station will be assigned the problems.
- If there is an issue determining the problem assignee with steps 1-3, then the default is to assign problems to the first participant in a check that the system can find.
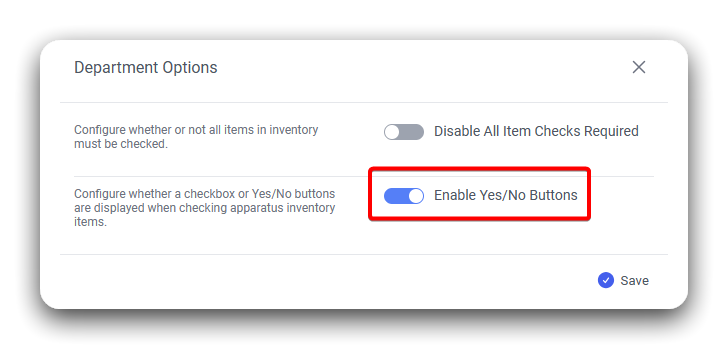
Configure Department Options
Open the Options Form
You need Apparatus Manager permissions to make these changes.
Application options for the entire department are found on the Select Apparatus page.
- On a browser, go to https://apparatus-checks.platform.firestationsoftware.com/select-apparatus. You may need to sign in.
- Click the "Department Options" button at the top of the page.

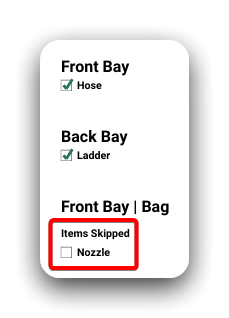
Disable "All Items Checks Required"
You can enable or disable the rule that requires all inventory items to be checked in order to submit a check. When this is enabled you may submit checks without checking off every item. If the Yes/No buttons are enabled, and this option is enabled, you may submit checks without either "Yes" or "No" selected for each item.
- Follow the instructions above to open the options form.
- Toggle the slider labeled "Disable All Item Checks Required" on or off.
- Click the "Save" button at the bottom of the modal dialog.
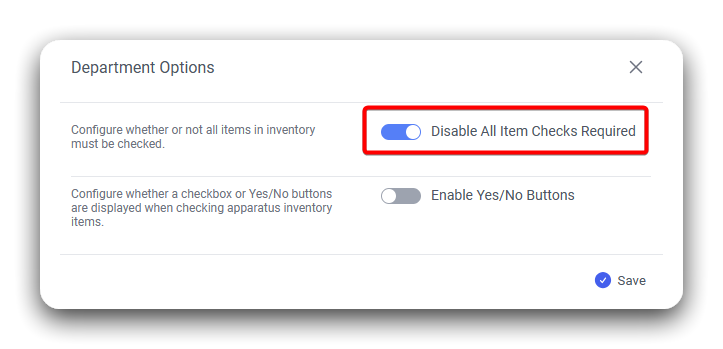
Skipped item checks appear in the check report PDF report under a separate heading for the compartment.
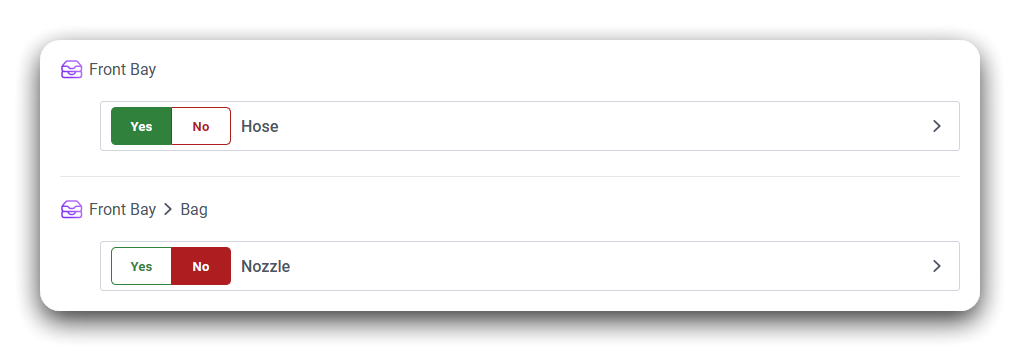
Enable Yes/No Buttons
You can enable Yes/No buttons as an alternative to the checkbox for completing an item check.
- Follow the instructions above to open the options form.
- Toggle the slider labeled "Disable All Item Checks Required" on or off.
- Click the "Save" button at the bottom of the modal dialog.
When conducting a check, if you select "No", then the check report PDF will show a red "X" indicator next to the item's name, even if you do not report a problem with that item.

Incident Reports
The Incident Reports web app and Field Reports mobile app are an extensions of the Incident Reporting module in Fire Station. You can collect notes in the field and upload them for filling out NFIRS reports. Additionally, you can quickly enter NFIRS reports— or save them to be finished later.
Getting Started
Summary
The Field Reports app is a tablet app that allows you to take notes while responding to an incident even if you do not have an internet connection. Once you have returned and have an internet connection, you can upload these notes to the Fire Station platform where they can be used while completing an NFIRS report with the Incident Reports web app. The web app allows you to save and validate your report at any time and submit it to Fire Station Desktop when the report passes validation.
Requirements
- Field Reports Tablet App - In order to use the app, you must have an Android device with:
- An OS version of Android Marshmallow (2015) or higher
- A modern web browser with connection to the internet
- This is required to sign in or upload reports
- An active license for Incident Reporting and CDH
- An FSSID linked to your personnel record from the Fire Station Desktop
- Incident Reports Web App - In order to use the web app, you must have:
- A computer, tablet or mobile device with a modern web browser and connection to the internet
- An active license for Incident Reporting and CDH
- An FSSID linked to your personnel record from the Fire Station Desktop
You need one of the following permission on your FSSID:
- Field Reports User
This permission allows you to use both apps.
You can manage your registered tablet devices in the Department Hub. You need Field Reports Manager permissions to make these changes.
Create a Field Report
Install the App
- On your tablet, open a browser and go to https://hub.firestationsoftware.com.
- In the left menu, select Settings in the Fire Station+ group.
- Scroll down to the Mobile Apps section and tap the the "Download" button on the right side of the Field Reports box.
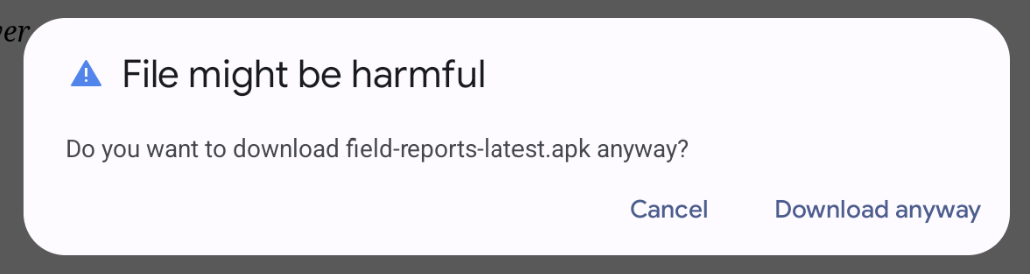
-
Tap "Download Anyway" if presented with a "File Might Be Harmful" popup window.

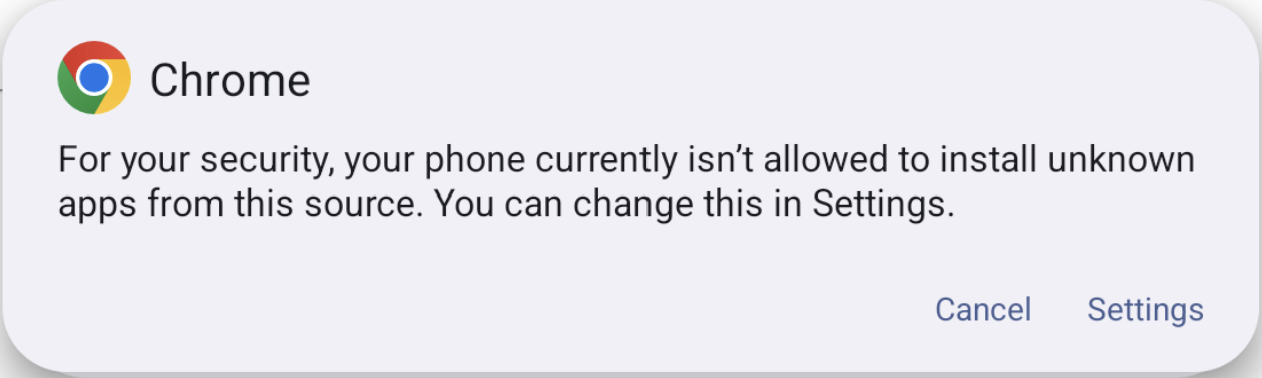
- Open the APK file to begin installation.
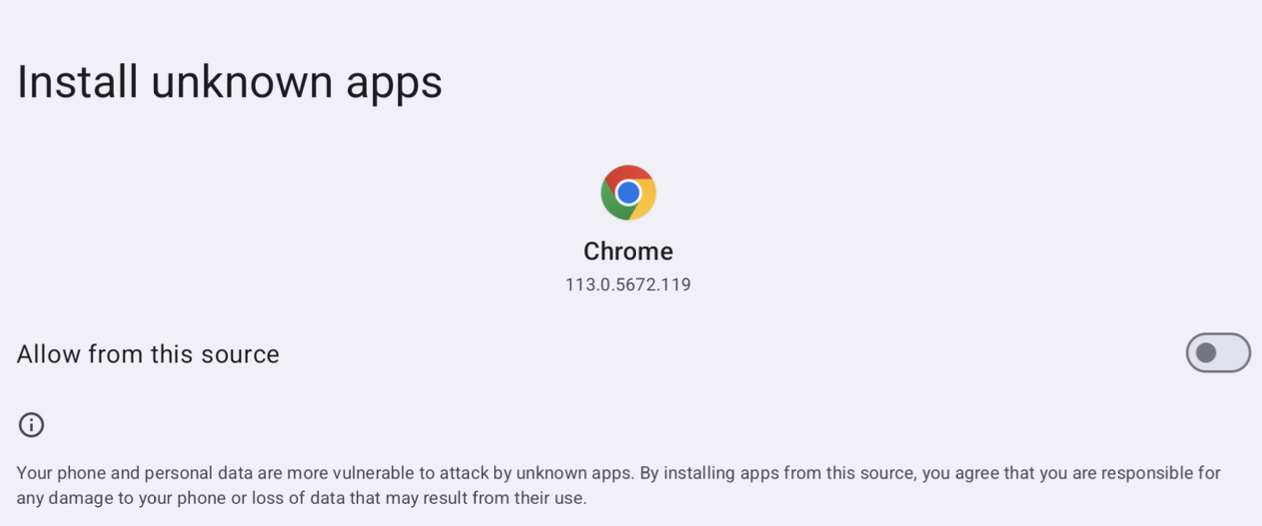
- If presented with a security popup, tap the "Settings" button and toggle "Allow from this source".


-
Tap the "Install" button.
- If presented with a Play Protect warning, tap “More Details > Install Anyway” to complete installation.
Register Your Device
You must have Field Reports User permissions to make these changes.
- Launch the Field Reports app while connected to the internet.
-
If the app asks if it should be sent to Google for a security review, tap the "Don’t
Send" button.
-
- Fill out the form with your FSSID email and password, and enter a recognizable name for your device.
- Tap the "Register Device" button.
File the Report
You can collect notes in the field while responding to an incident:
- Conduct the Report
Gather notes while in the field, even without an internet connection. - Upload the Report
Submit your Field Report to the Fire Station platform to reference when creating an Incident Report.
Create an Incident Report
Open the App
There are two ways to access the Incident Reports web application:
- Go to the application directly
- On a browser, go to https://field-reports.firestationsoftware.com.
- Launch the application from the Department Hub
- On a browser, go to https://hub.firestationsoftware.com.
- In the top left, click the Department Hub app name to open the app shortcut menu.
- Select Incident Reports from the menu, or click "All Apps" and select Incident Repots from the App Launcher.

Enter a Report
- Create an Incident Report
This screen allows you to enter NFIRS report information. - Submit an Incident Report
This screen allows you to upload field reports to Fire Station Desktop.
Enter a Field Report
Open a Report
You do not need an internet connection to open reports and collect notes.
To open a field report:
- Launch the app.
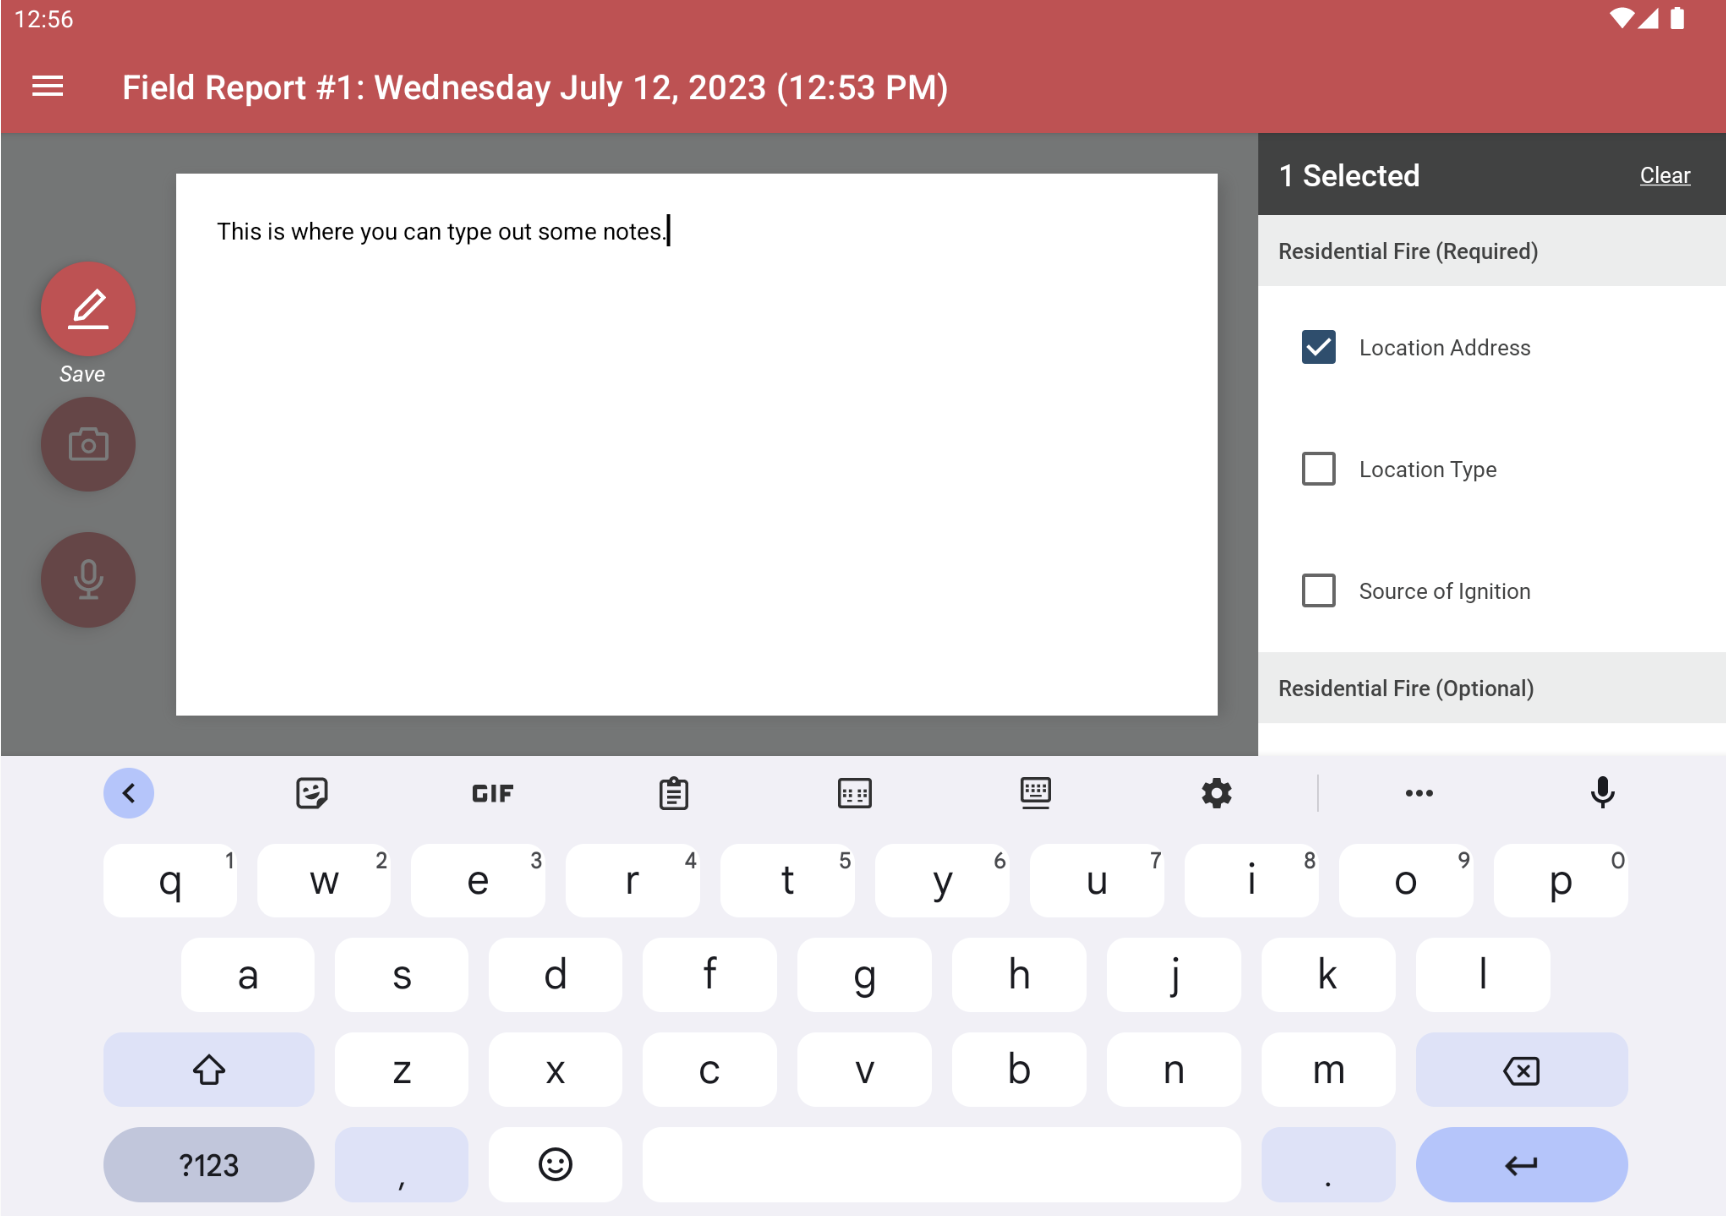
- From the main menu, select "New Field Report". If you want to continue a report, select "Pending Field Reports" and then select it from the list.
- Select a category on the right side of the screen. A list of goals will appear so you know what notes need to be taken.

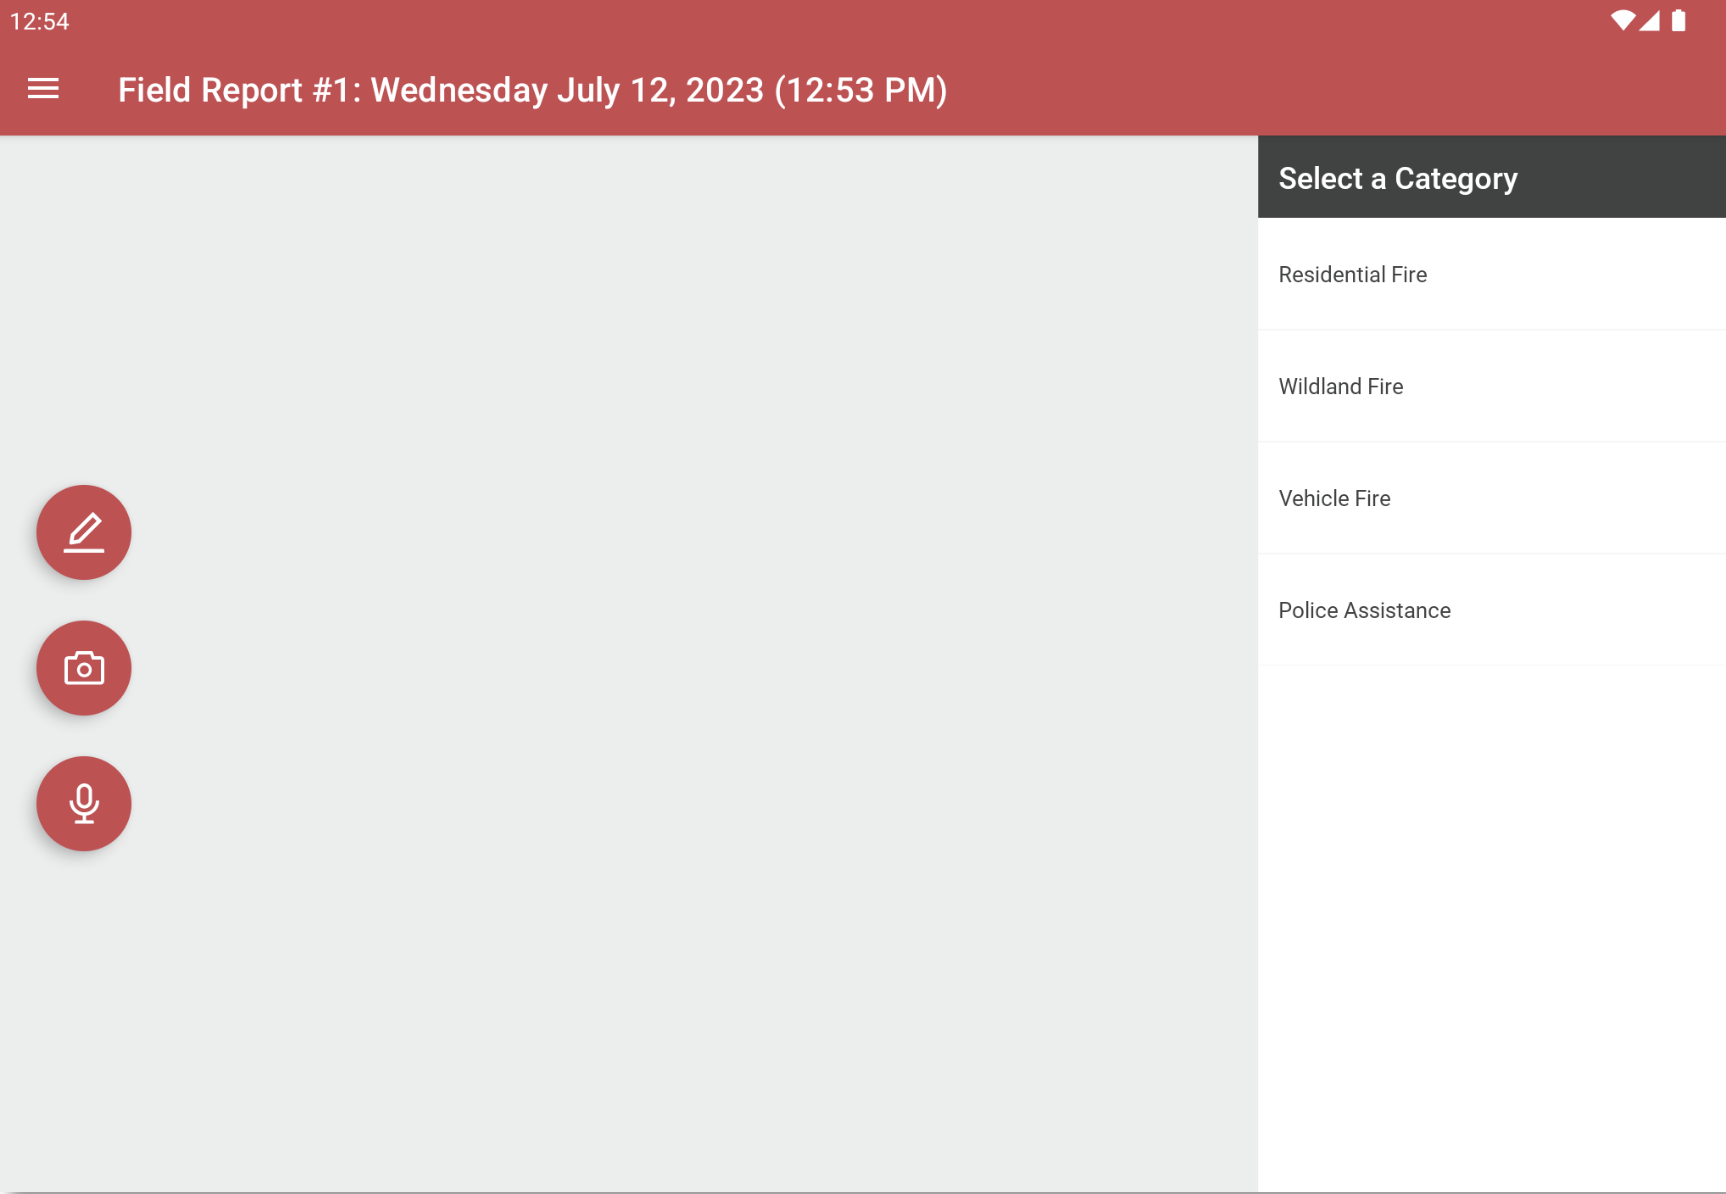
|
|
|
As you collect notes, you can link them to goals. Doing so will show that that goal has been met. Goals with an exclamation mark icon are listed as required, but that is only a suggestion. You do not need to take notes for every goal in order to save or submit a field report.
Collect Notes
A field report is a collection of notes. You can enter three types of notes:
- Text
- Pictures
- Recorded Audio
Add a Note
- Select the corresponding button on the left side of the screen.
- Record the note using the controls that appear.
- If you want the note to complete a goal, check off the goal(s) on the right menu.
- Tap the same note button again to save the information.
Edit a Note
- Tap the note to open it.
- Make any modifications.
- Tap the note button on the left to save the changes.
Delete a Note
- Tap and hold a note.
- Select "Delete Note' from the popup menu to confirm.
Close a Report
You can stop working on a report and return to the main menu:
- Tap the icon in the top left of the screen to open the menu.
- Select "Close Report".
You can reopen a report from the main menu.
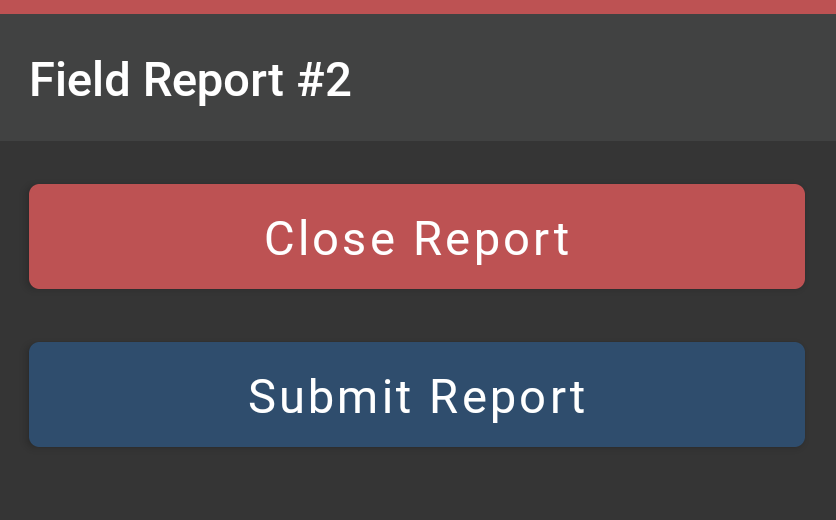
Upload a Report
After you have saved notes to a report, you can submit it to the Fire Station platform:
- Tap the icon in the top left of the screen to open the menu.
- Select "Submit Report".
- Select "Submit" to confirm.
You cannot reopen a Field Report that has been submitted.

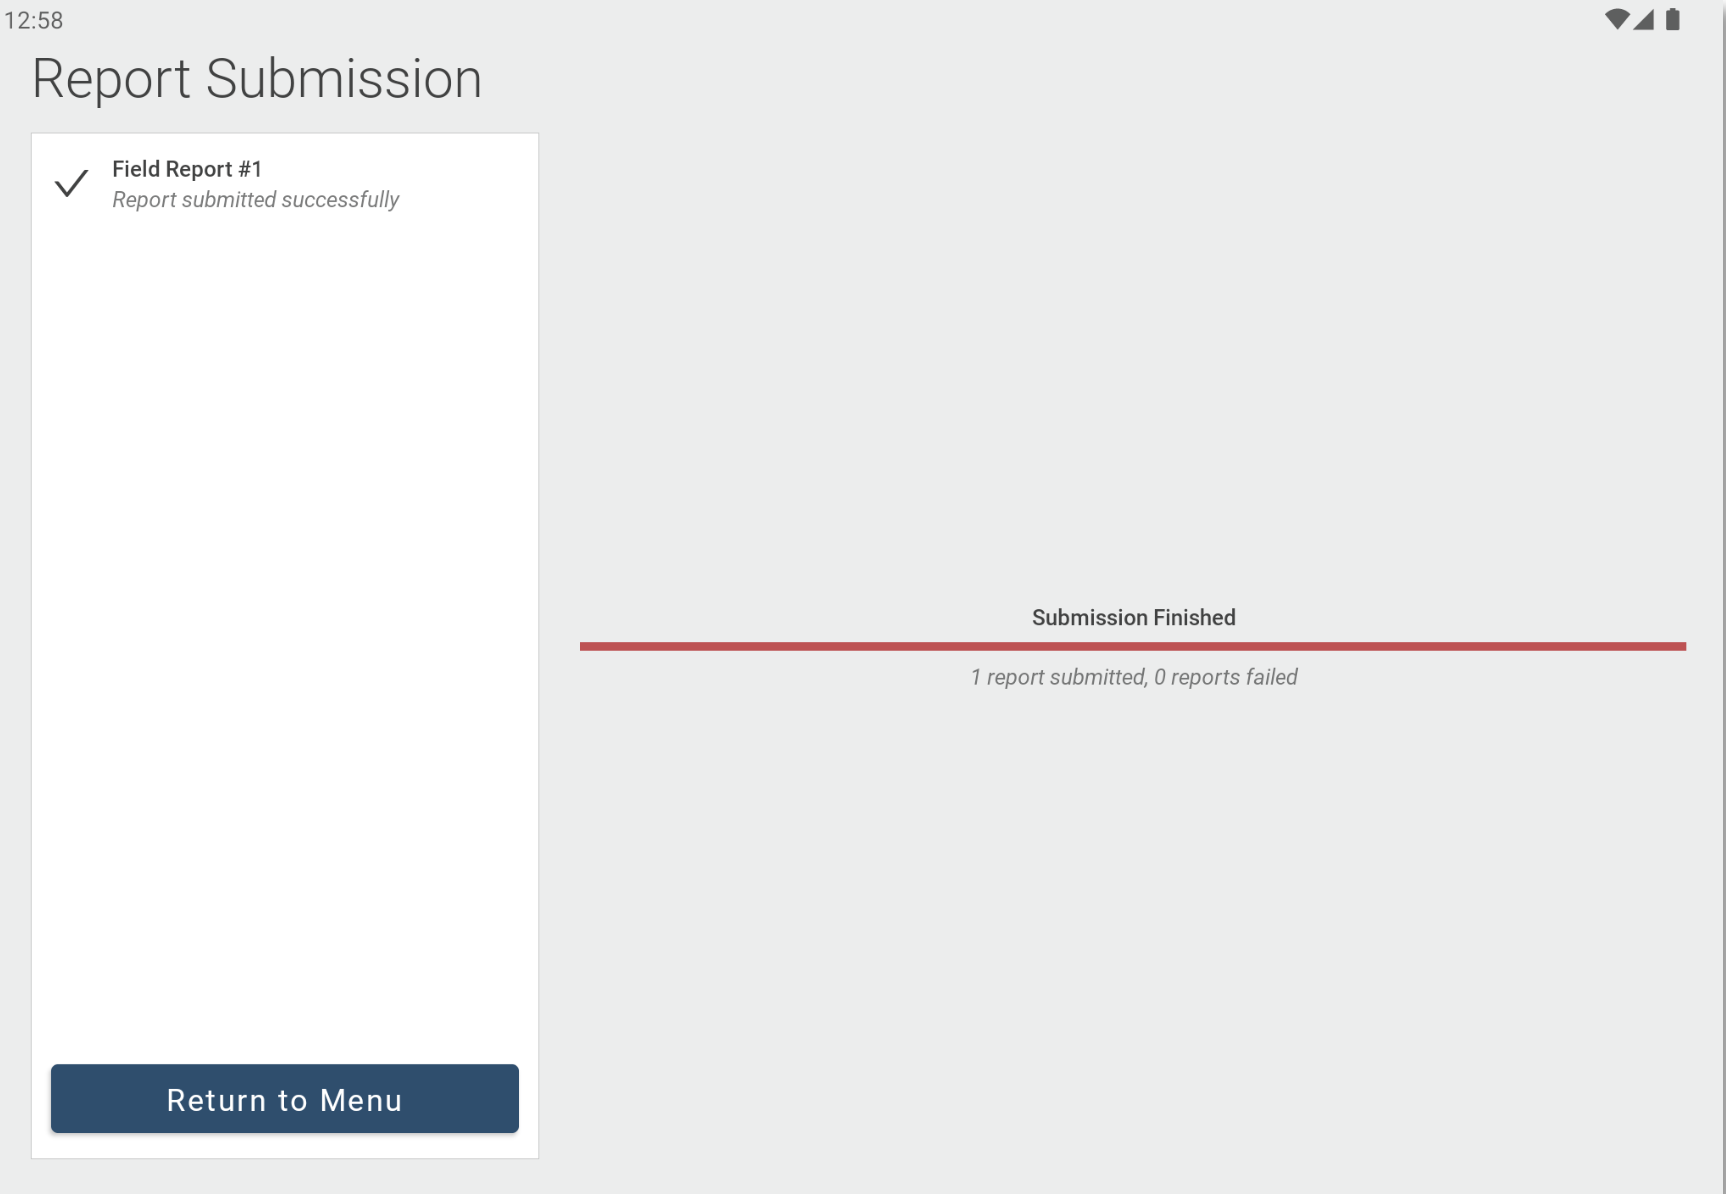
Upload All Pending Reports
You can upload multiple reports at the same time:
Enter an Incident Report
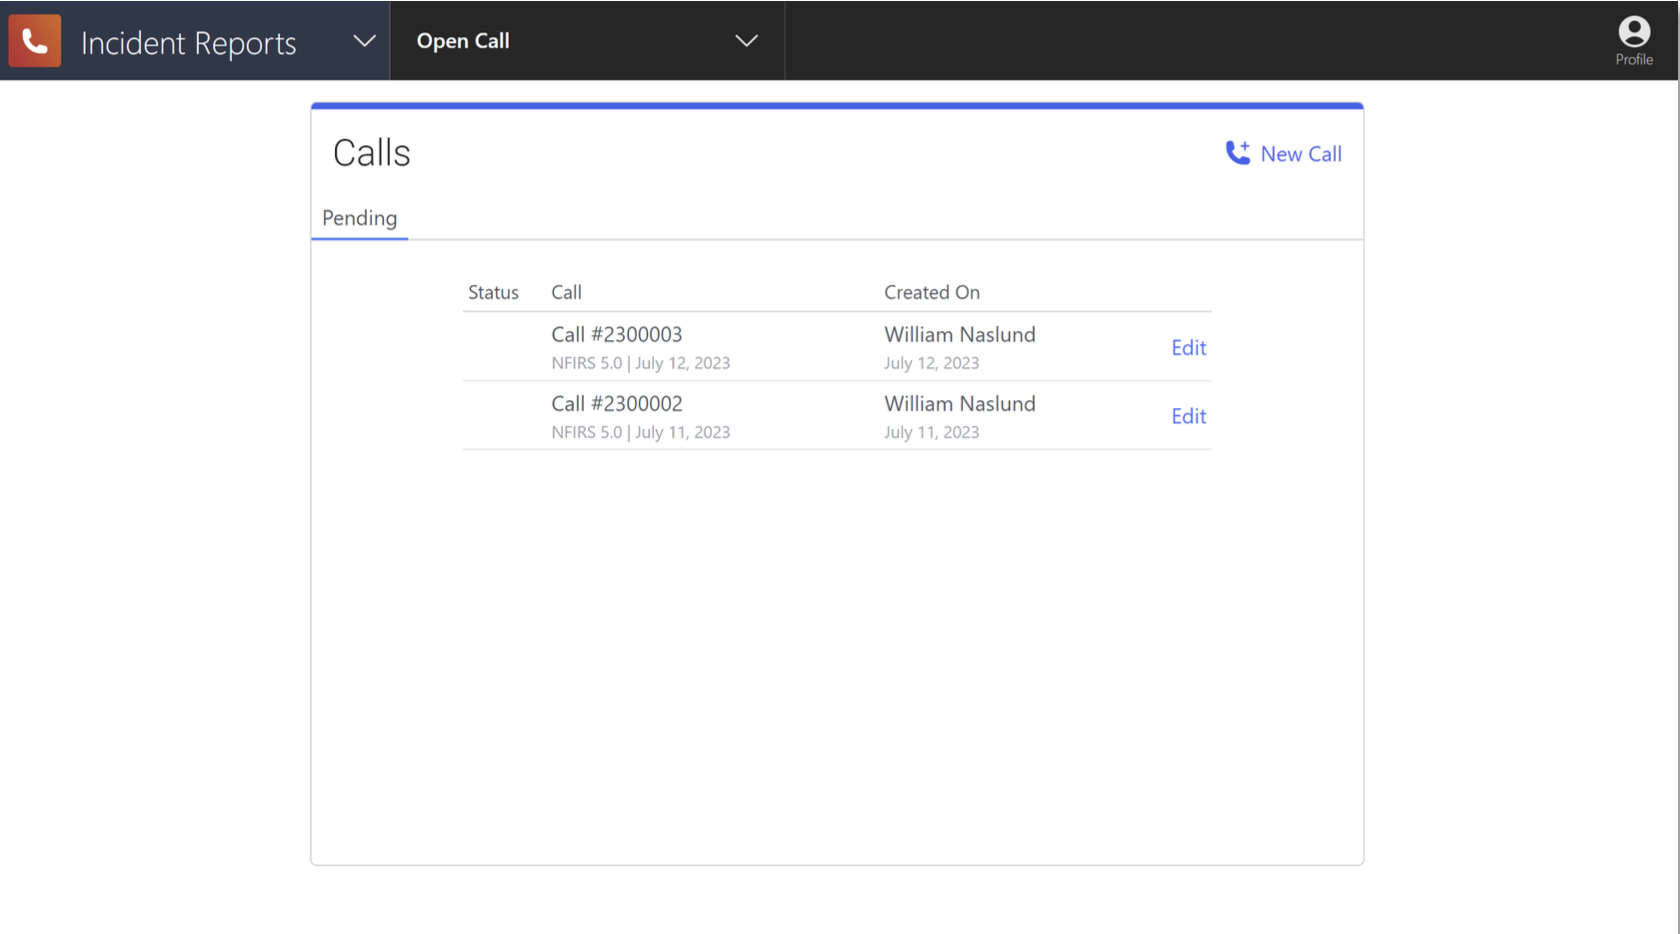
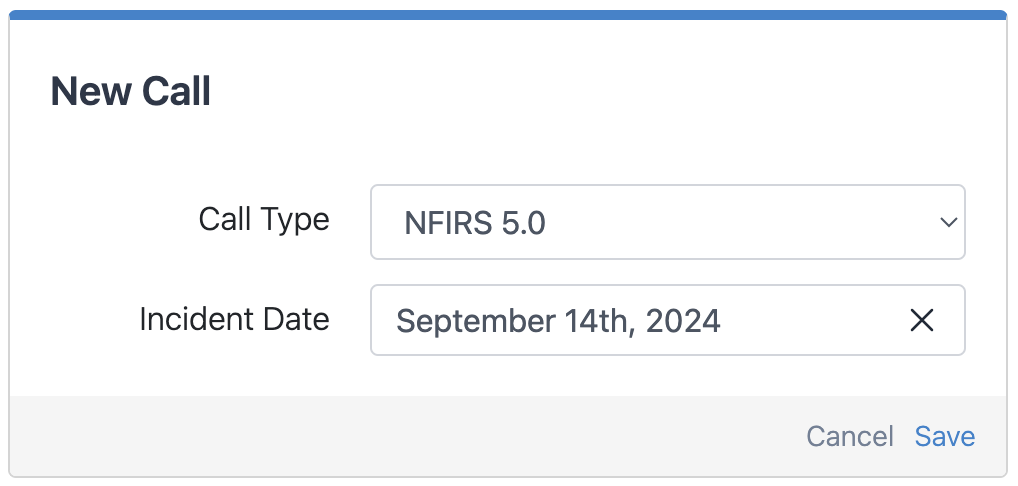
Open a Call in the Editor
You must have Field Reports User to make these changes.
To enter an incident report for a new call:
- On a browser, go to https://field-reports.firestationsoftware.com. You may need to sign in.
- Click the "New Call" button on the top right of the Calls list.
- Select an Incident Date and click "Save" at the bottom of the form.
To edit a report for an existing call:
- On a browser, go to https://field-reports.firestationsoftware.com. You may need to sign in.
- Click the "Edit" link to the right of a pending call.
Use the Call Editor
There are four areas on the call editor screen.

Form
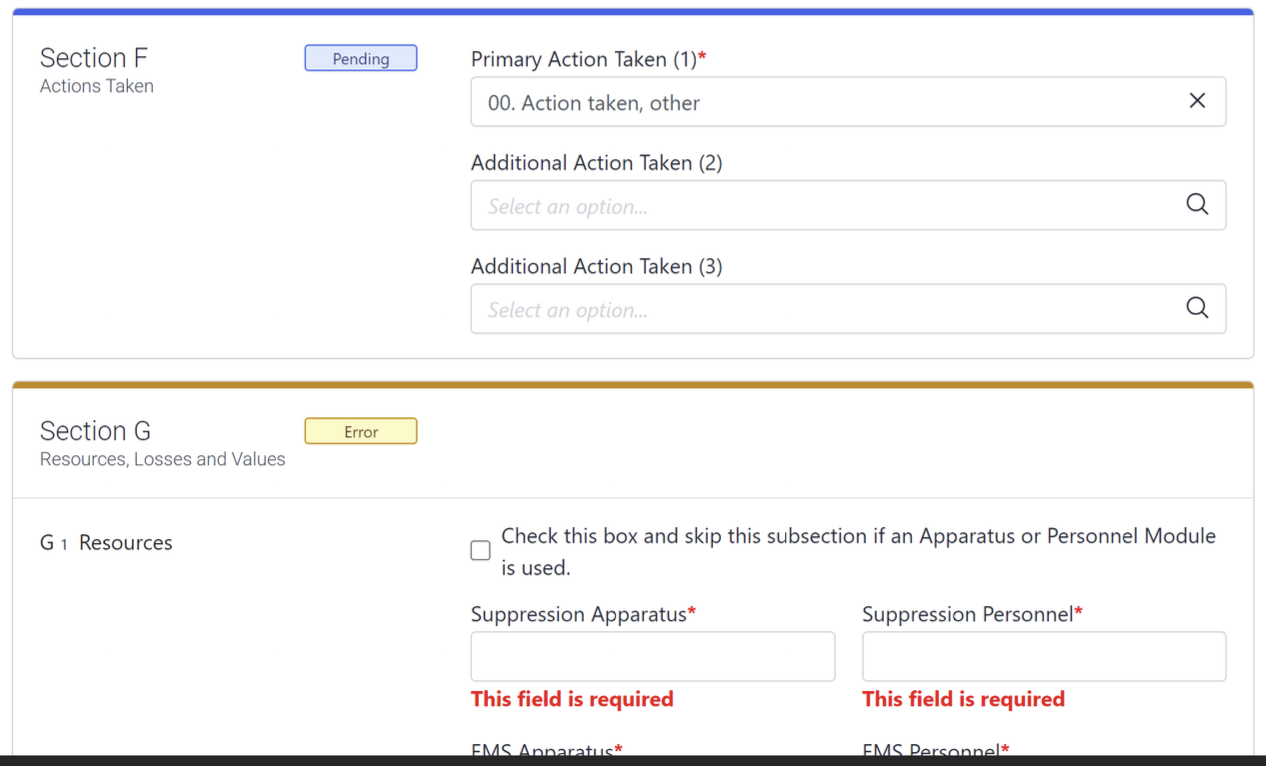
The center of the page shows the selected form. The validation status is indicated on each form to match the status in the left navigation menu.
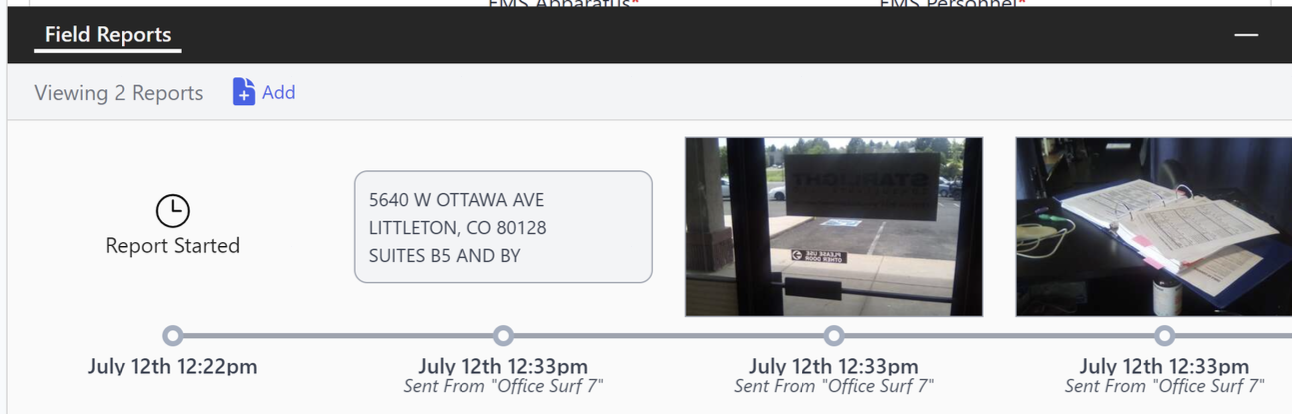
Field Report Tray
The field report tray appears at the bottom of the editor. It shows notes from any field report linked to the call. The tray can be collapsed to show more of the selected form.
Save and Validate
You can save the report at any time by clicking the "Save" button at the top of the page. When saved, the entire report is checked and validated based on the NFIRS 5.0 specification (link). Any changes to the form are saved even if the report has validation errors.

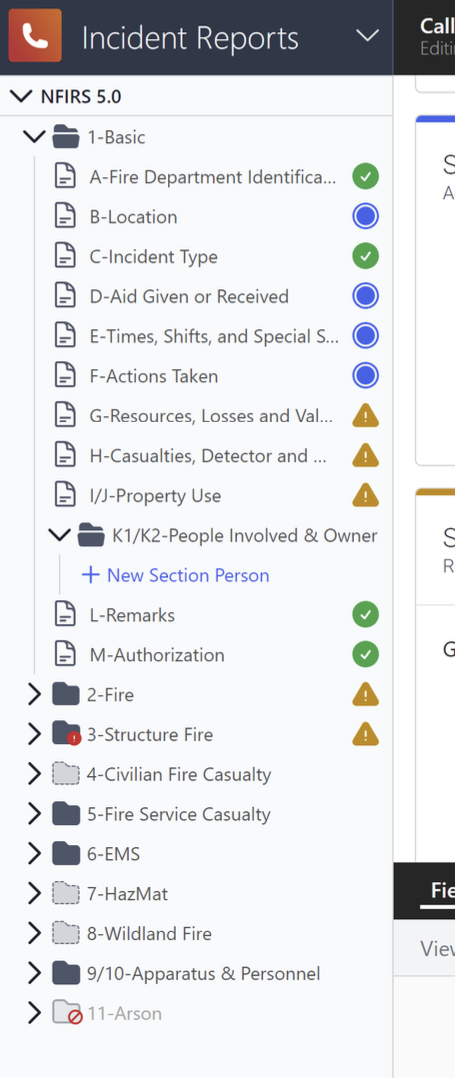
Form/Folder Types
Forms are grouped into folders that represent NFIRS modules and module sections. There are three types of folders and they indicate which forms need to be completed. The NFIRS Incident Type in (1-Basic > Section C) primarily controls which forms must be filled out.
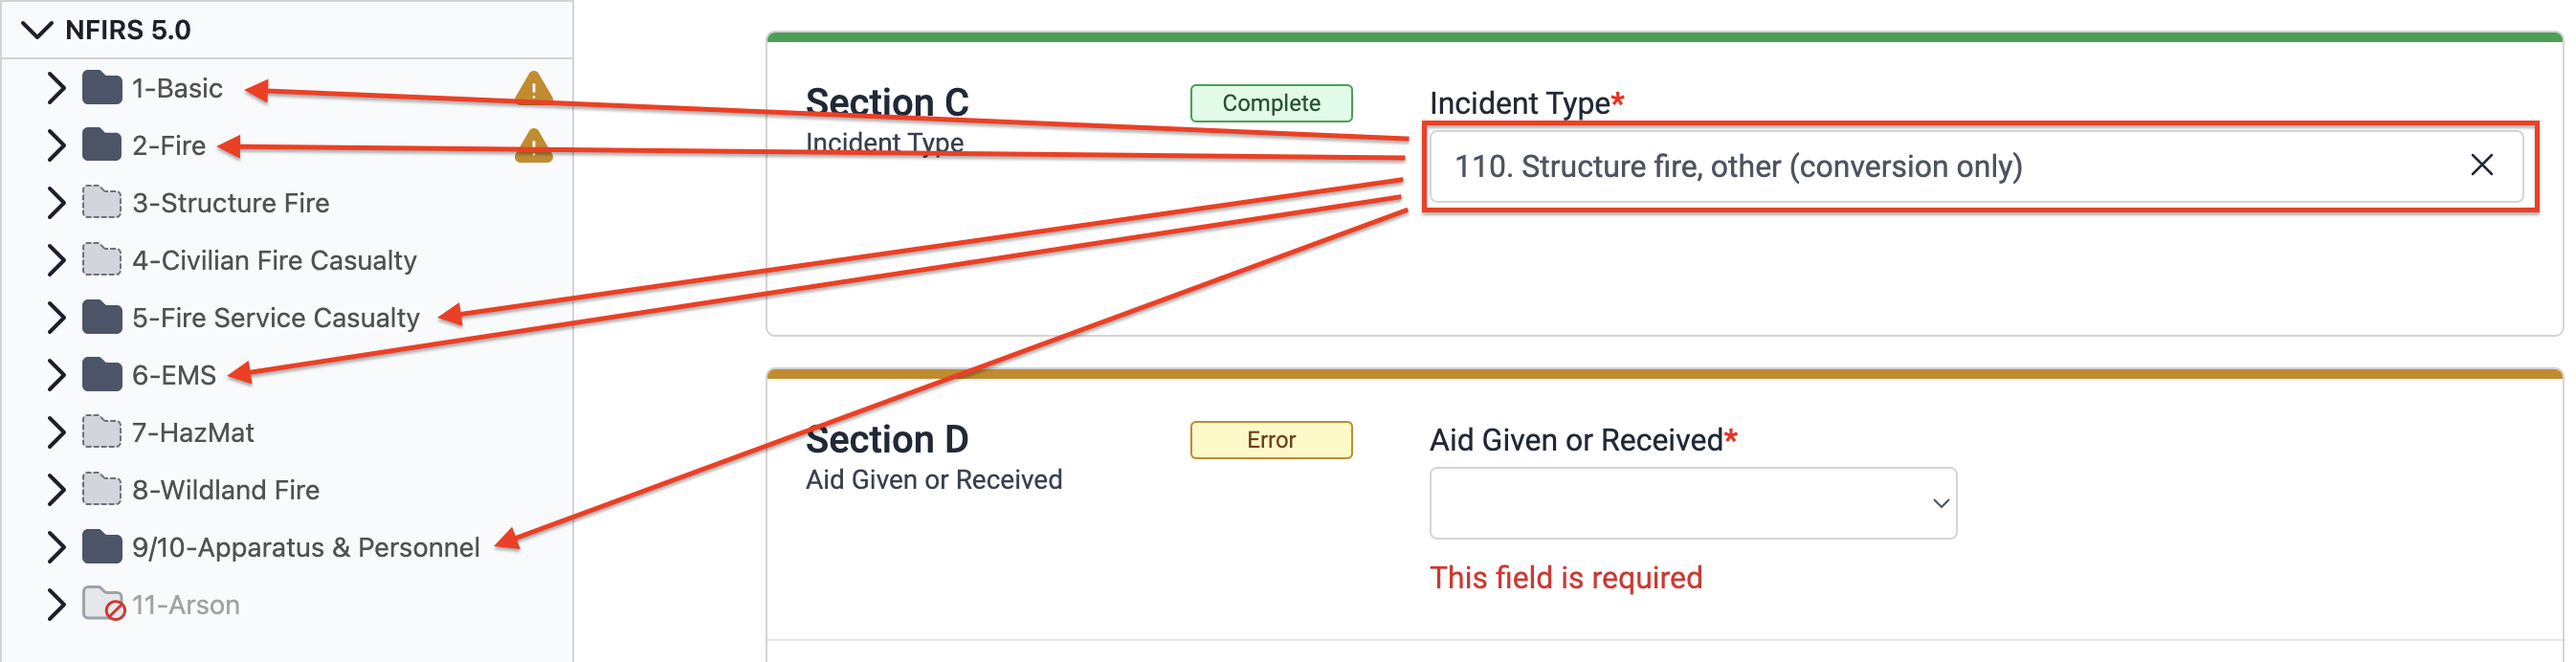
Required Folders
Forms in required folders must be completed and pass validation.

Optional Folders
Forms in optional folders do not need to be completed, but can be. By default, forms in optional folders are opted out of validation upon saving.

If you want to fill out an optional form section and validate the information, check off the opt-in checkbox at the top of the form. This changes the icon for the folder and it will behave like a required folder.


Disabled Folders
Forms in disabled folders do not need to be filled out and will not be validated.

Form/Folder Statuses
Forms and folders have a status that indicate which ones need to be completed. Each status has a symbol and an associated color. When you click the "Save" button at the top of the page, the entire report is checked and the status for each form is updated.
Complete
A green checkbox is displayed for forms that are filled out and valid. Once all required and opted-in forms are completed, the report can be exported.

Error
A yellow exclamation triangle is displayed for required or opted-in forms that are incomplete or invalid. These forms must be completed or corrected.

Pending
A blue circle is displayed for forms with pending changes that need to be saved.

Optional (Opted-Out) and Disabled
These statuses have no corresponding icon and will not change if information is entered and the report is saved.


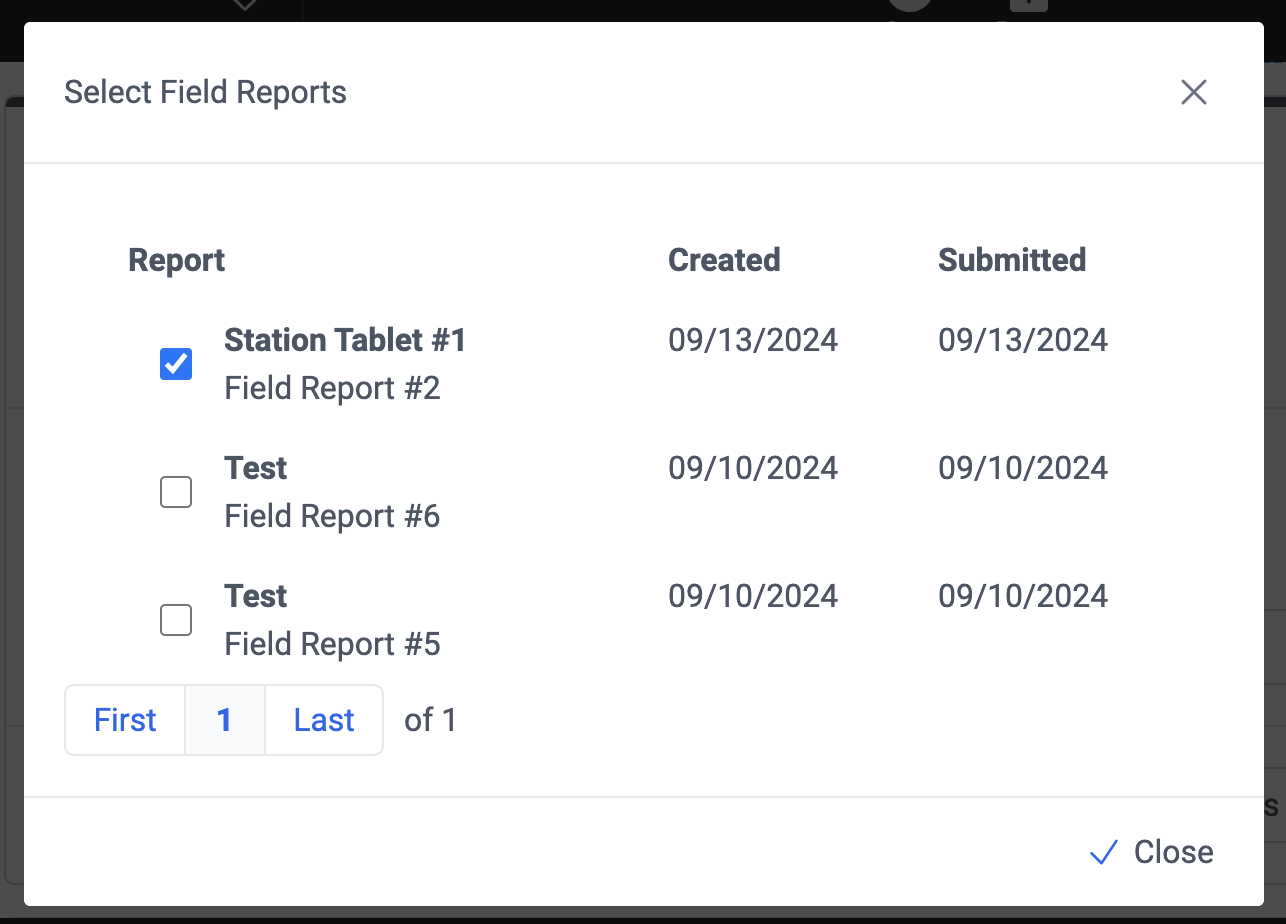
Link Field Reports
You can link one or more field report that has been uploaded from a tablet:
- Click the "Add" button on the top left of the field report tray. You may need to expand the tray by clicking the icon on the top right of the tray.

- Select any field reports you want to include.

- Click the "Close" button at the bottom of the modal dialog. The notes for the reports are displayed in a timeline in the field report tray.


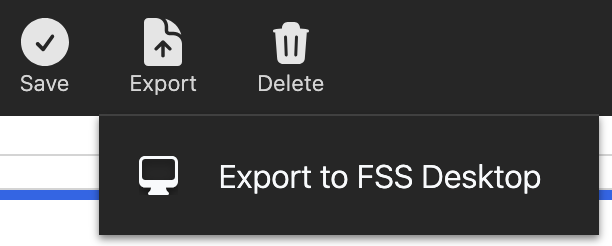
Export a Call
You can export a call to Fire Station Desktop:
- Click the "Export" button at the top of the page.
- Select "Export to FSS Desktop" from the menu.

- If there are any validation errors, you will see an error. Fix any errors in the call and and start from step 1. If the call is complete and there are no errors, click "Submit" to confirm.


Once a call has been exported to the Fire Station Desktop, you can edit it online, but it you cannot be export it again. If you want to edit a call further, you can edit it in Fire Station Desktop.
Delete a Call
You can delete a call that has not been exported to Fire Station Desktop:
- Click the "Delete" button at the top of the page.
- Click "Yes, Delete This Call" from the modal pop up screen.
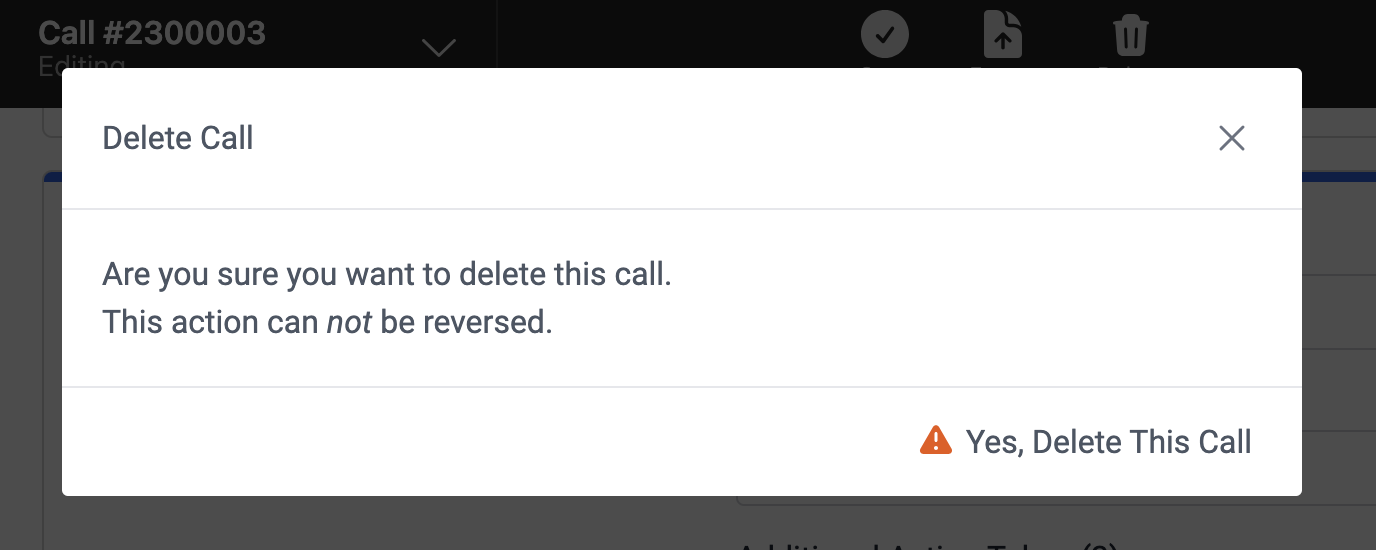
When a call is saved, the next call number is reserved in Fire Station Desktop. When the call is deleted in Fire Station+, the call number is freed up in Fire Station Desktop.
Fire Station & NERIS
Manage NERIS incidents for you department through the Fire Station online platform.
Fire Station NERIS Online Setup
Follow these instructions to connect to your department in NERIS from the Fire Station online platform. This must be completed before entering any NERIS incidents.
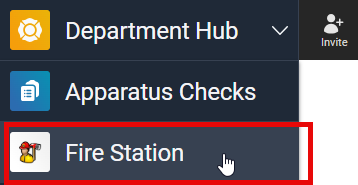
To access the NERIS functionality of Fire Station online, sign in to your Department HUB and select "Fire Station" from the drop-down menu in the top-left.
Connecting a NERIS Department
Your department in Fire Station may be connected to a department in NERIS. Follow these steps to make that connection.
Your FSSID must have the NERIS Manager permission assigned to complete these steps.
Expand the "Admin" section in the sidebar and click the "NERIS Settings" link.
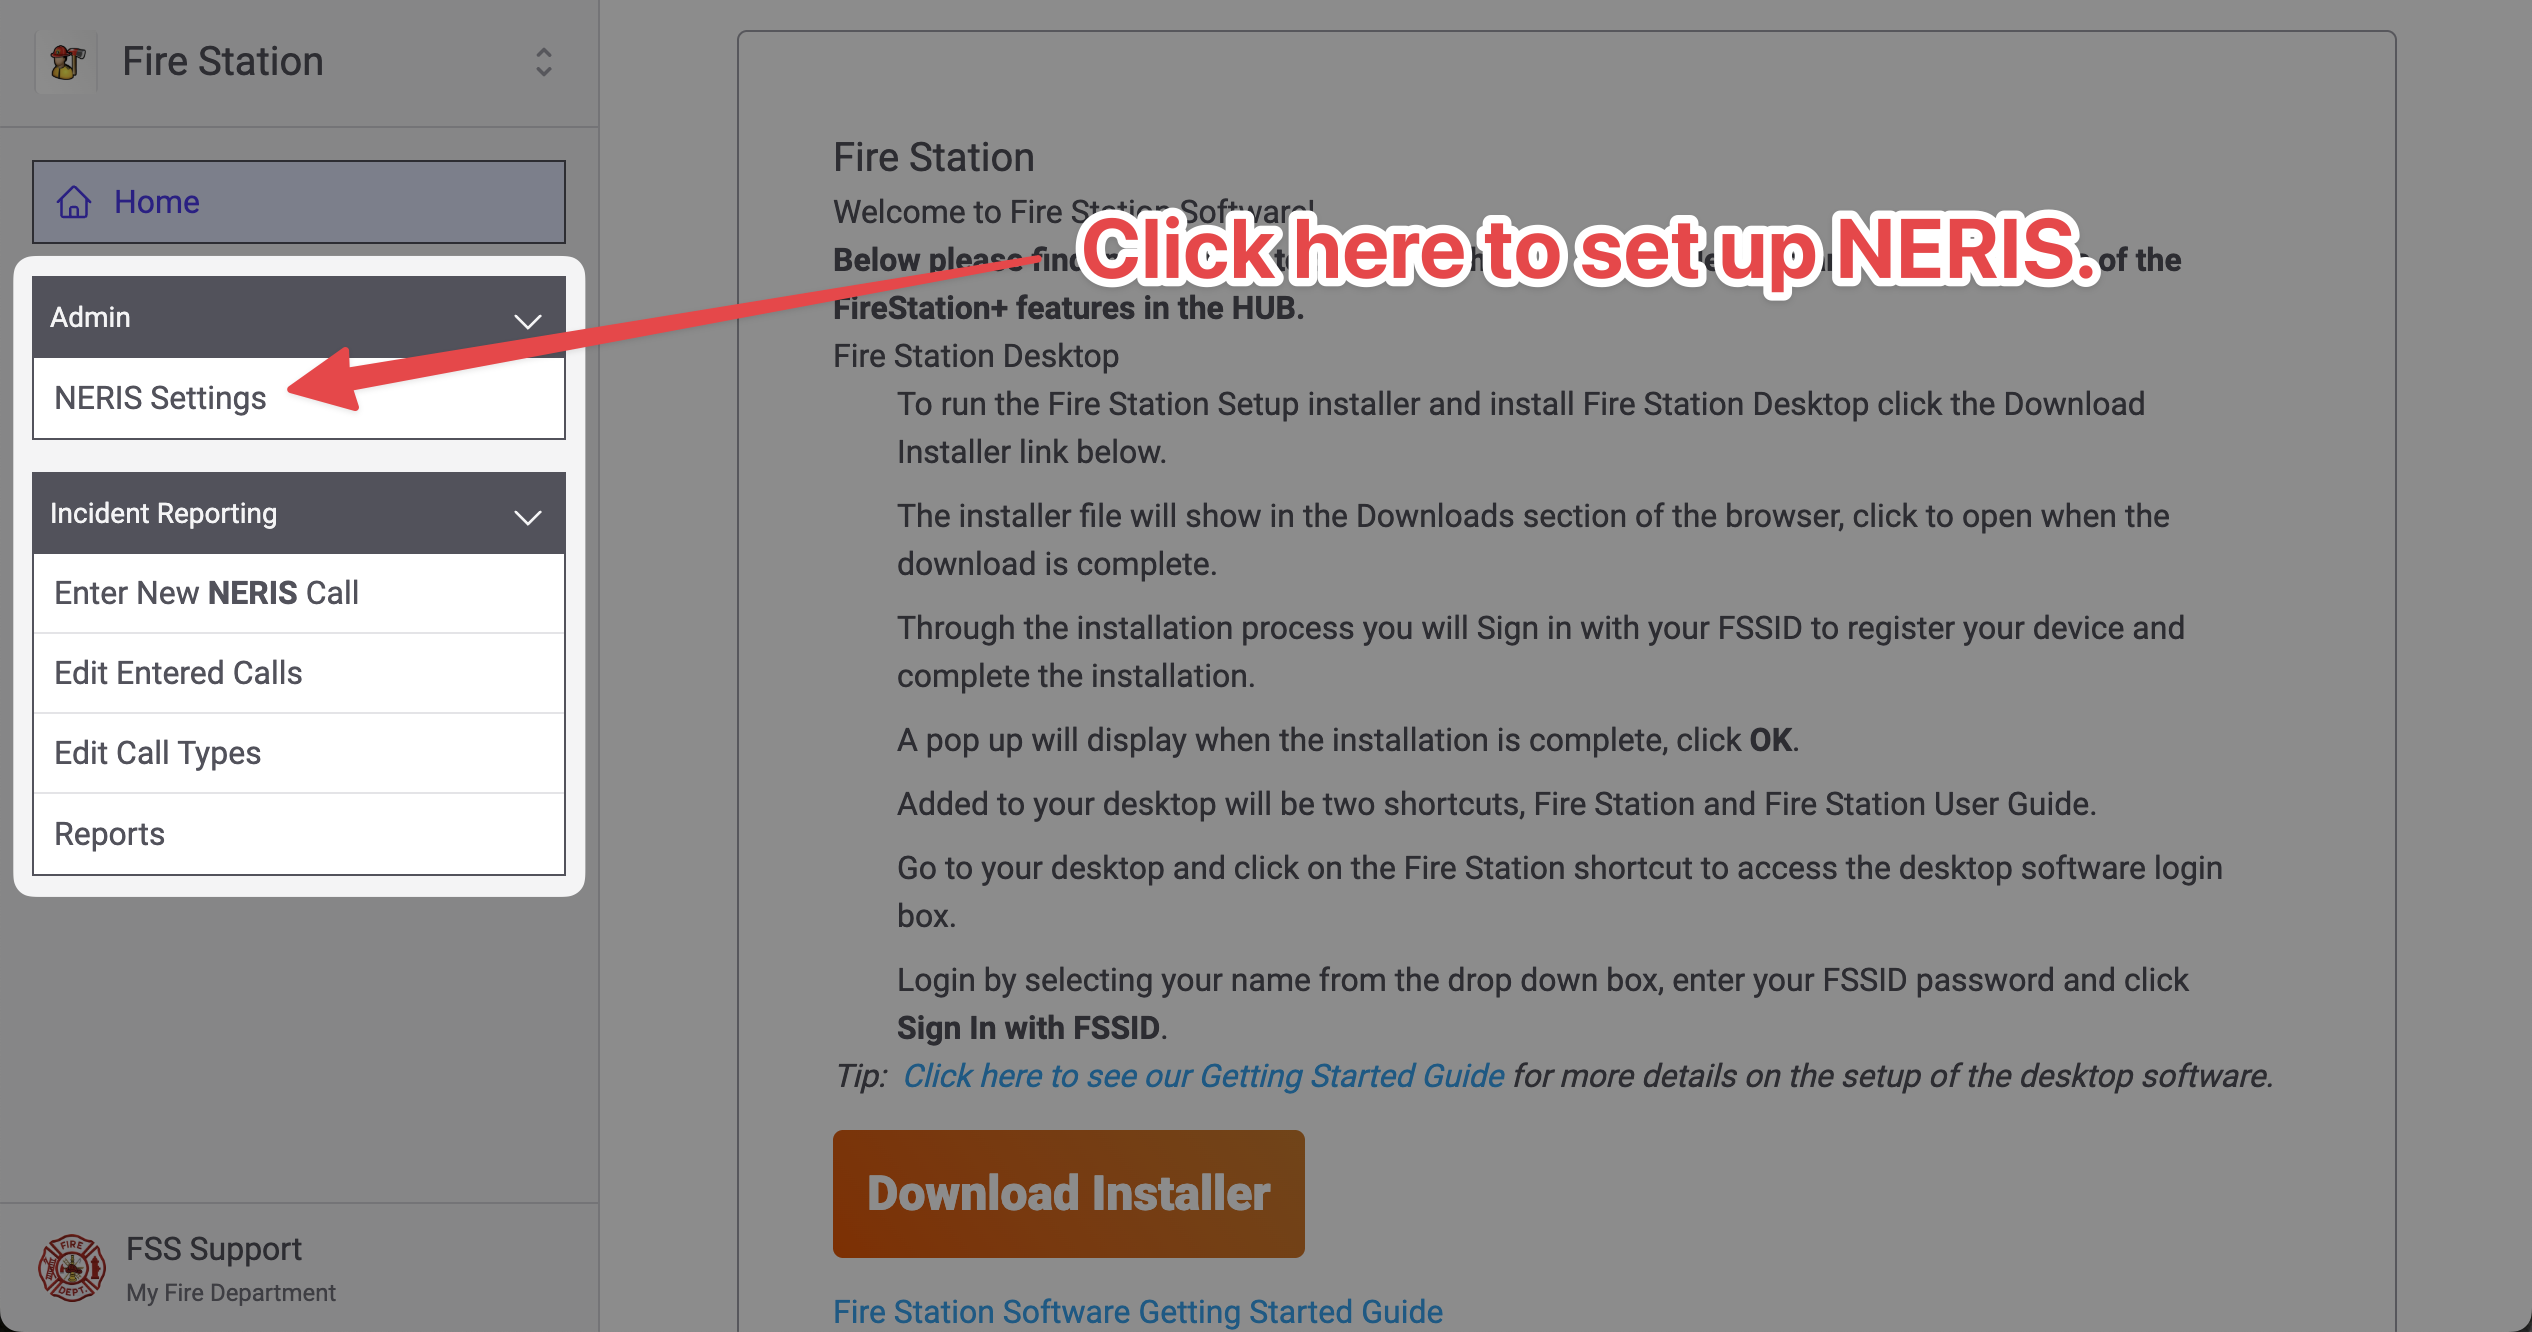
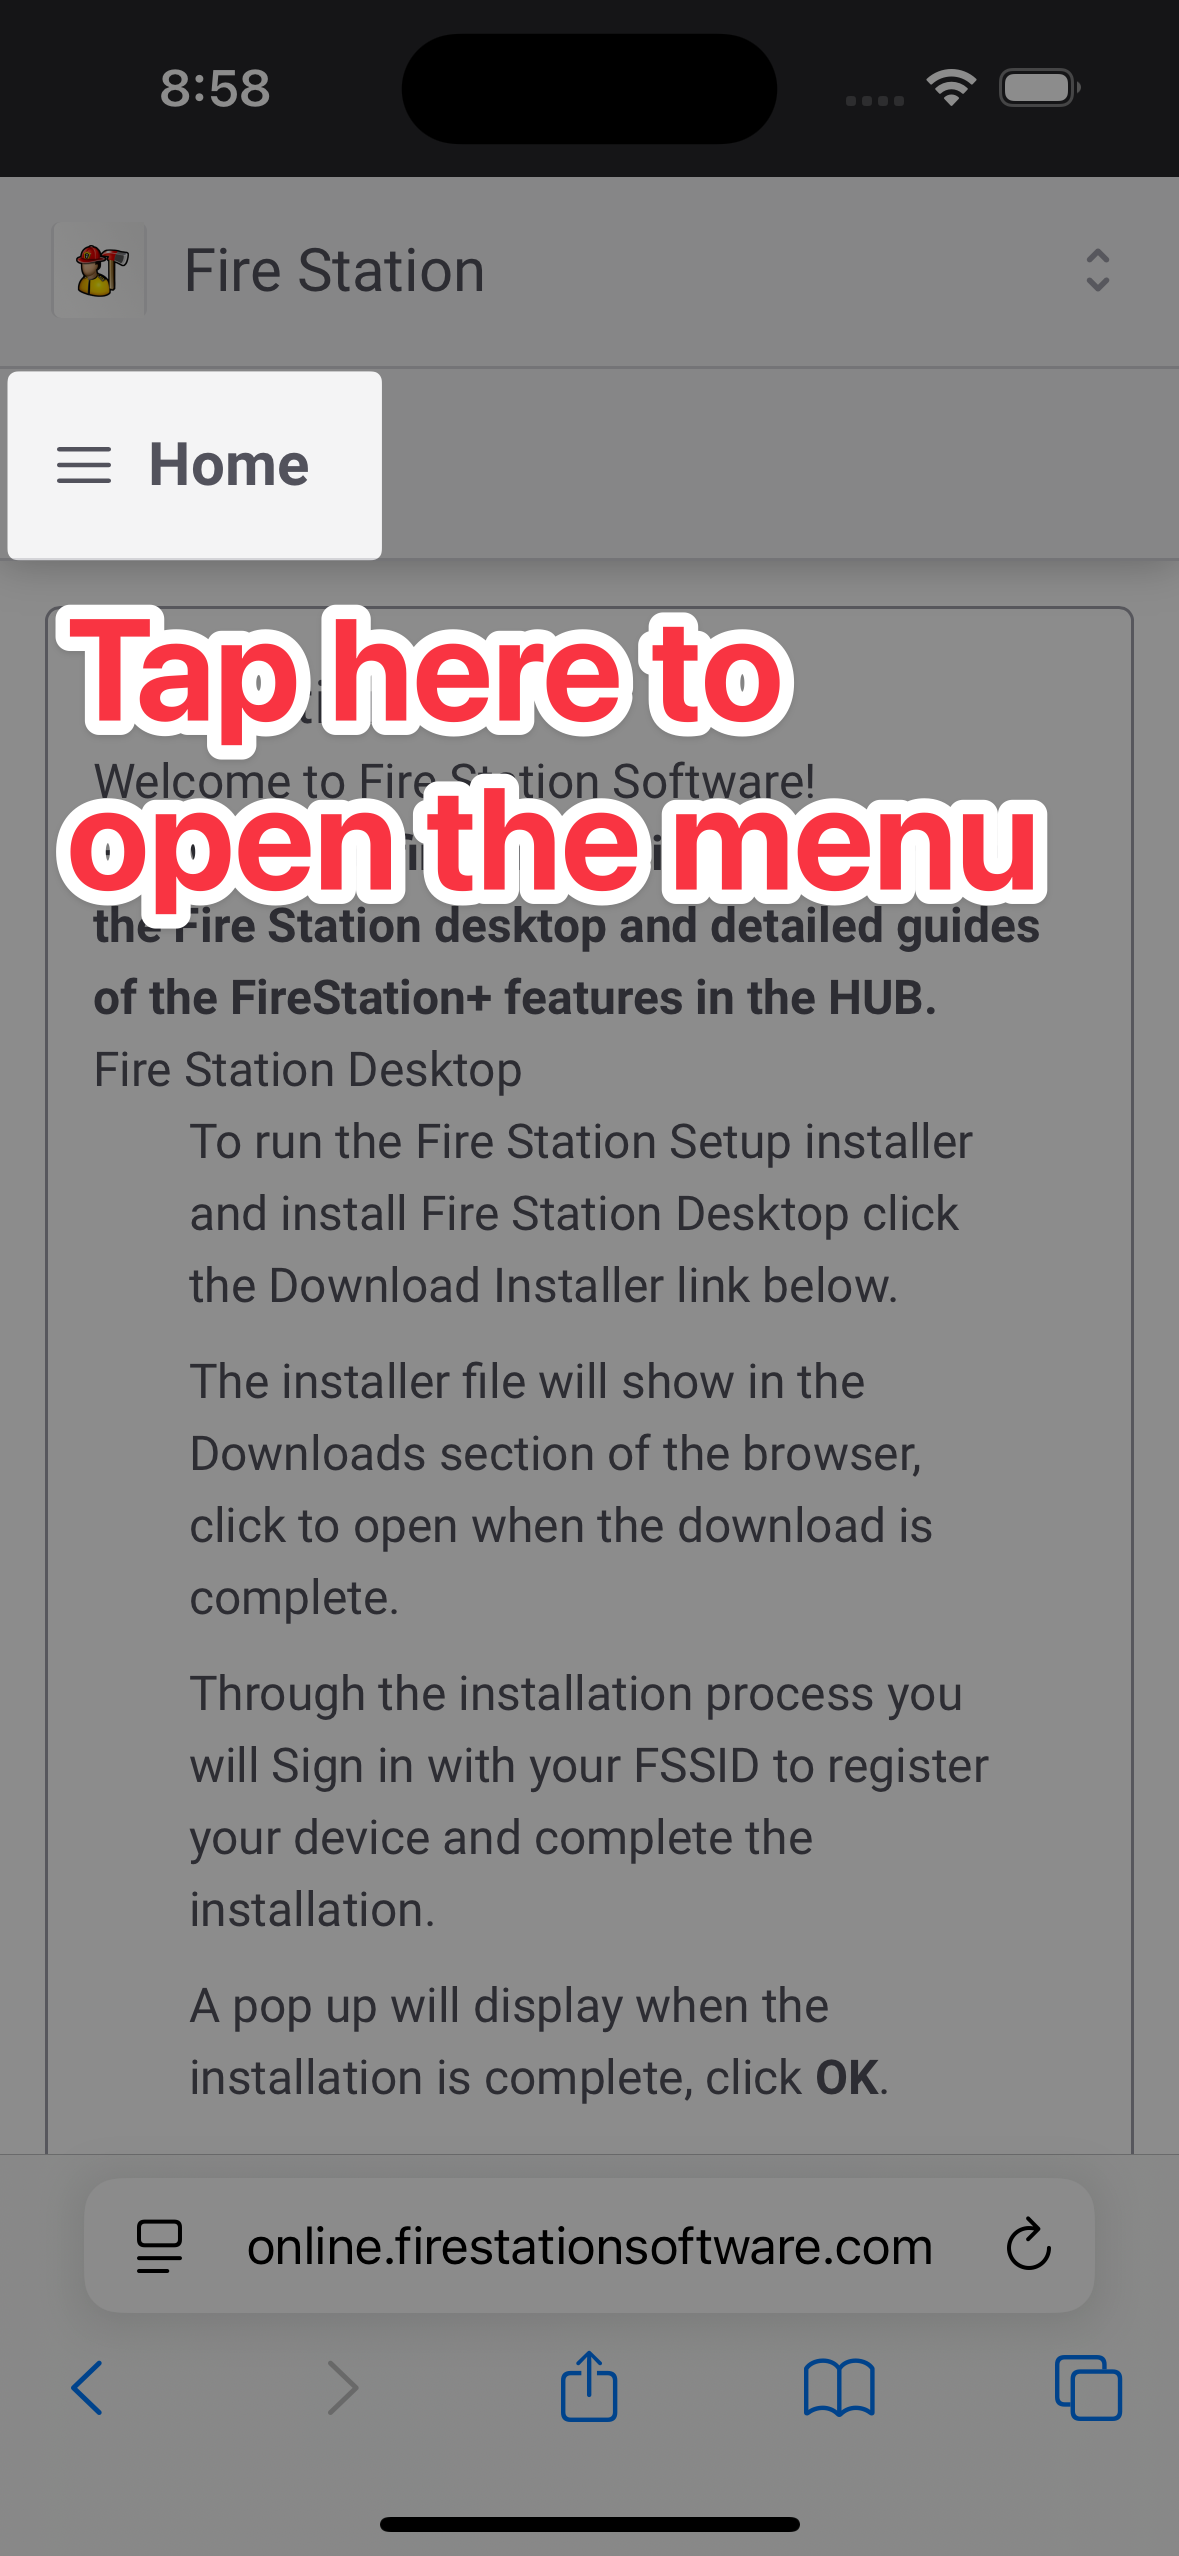
On mobile devices, tap the menu bar at the top of the screen to access the main menu.
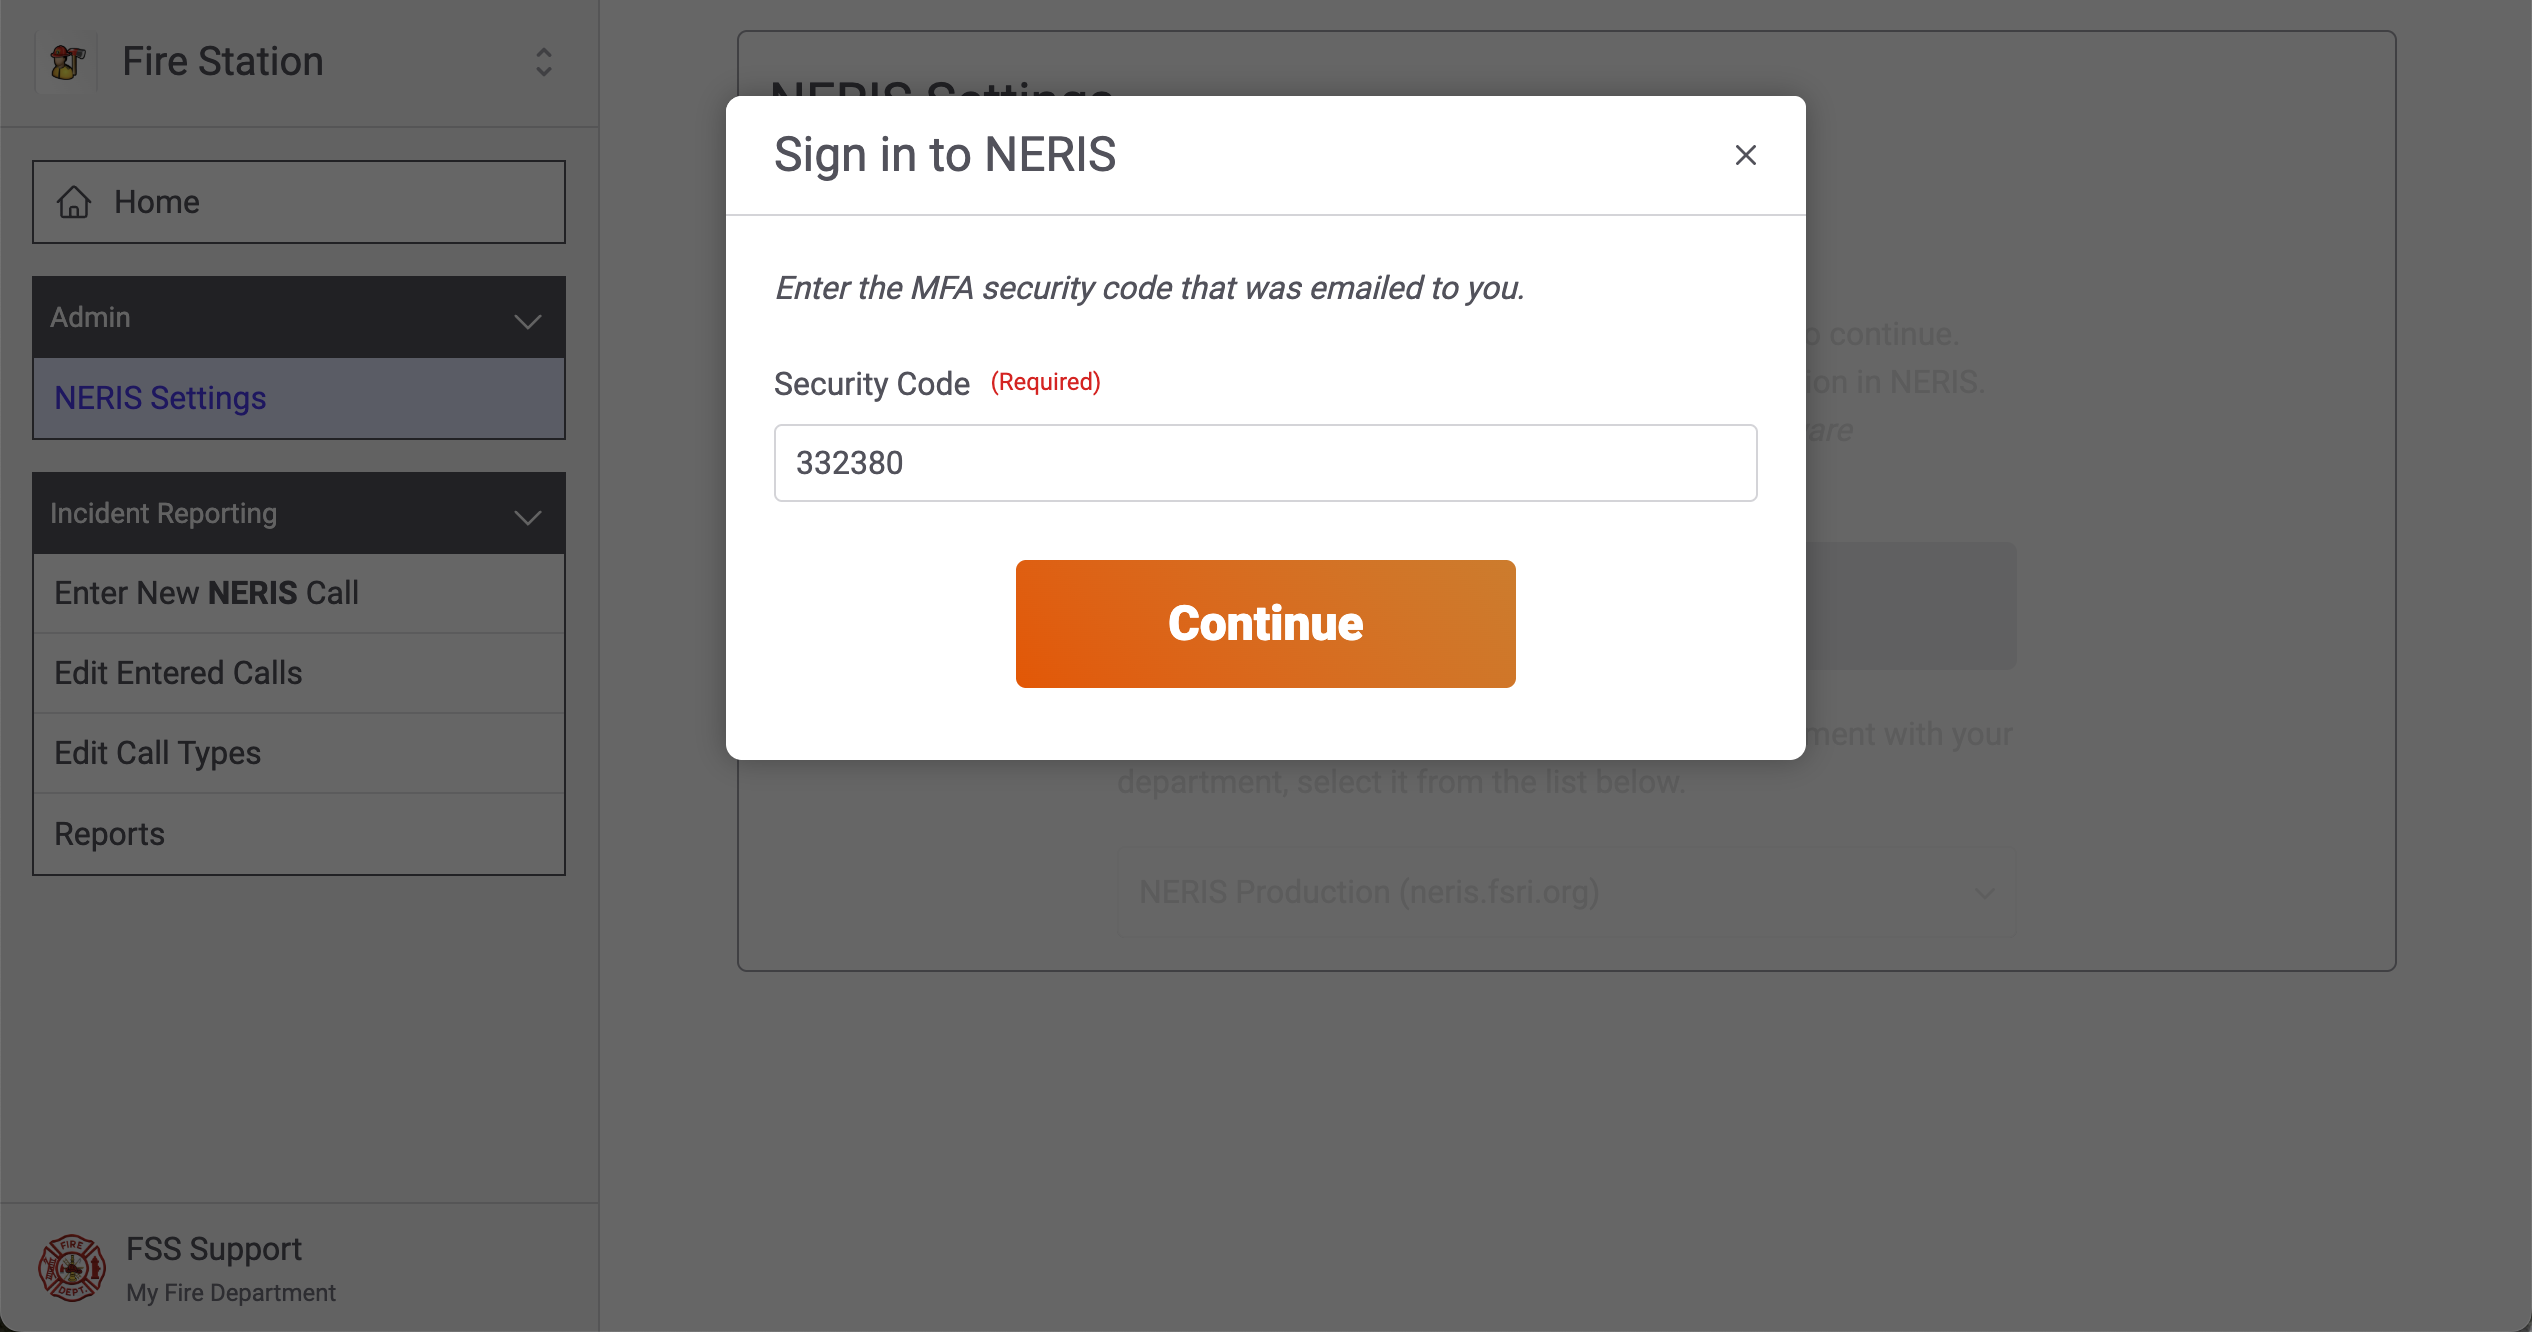
You will be brought to the NERIS settings page. Click the "Get Started" button and enter your NERIS username & password when prompted.

Then, you will be prompted to enter a login verification code. Enter the verification code that was sent to your email, then click "Continue" to sign in.
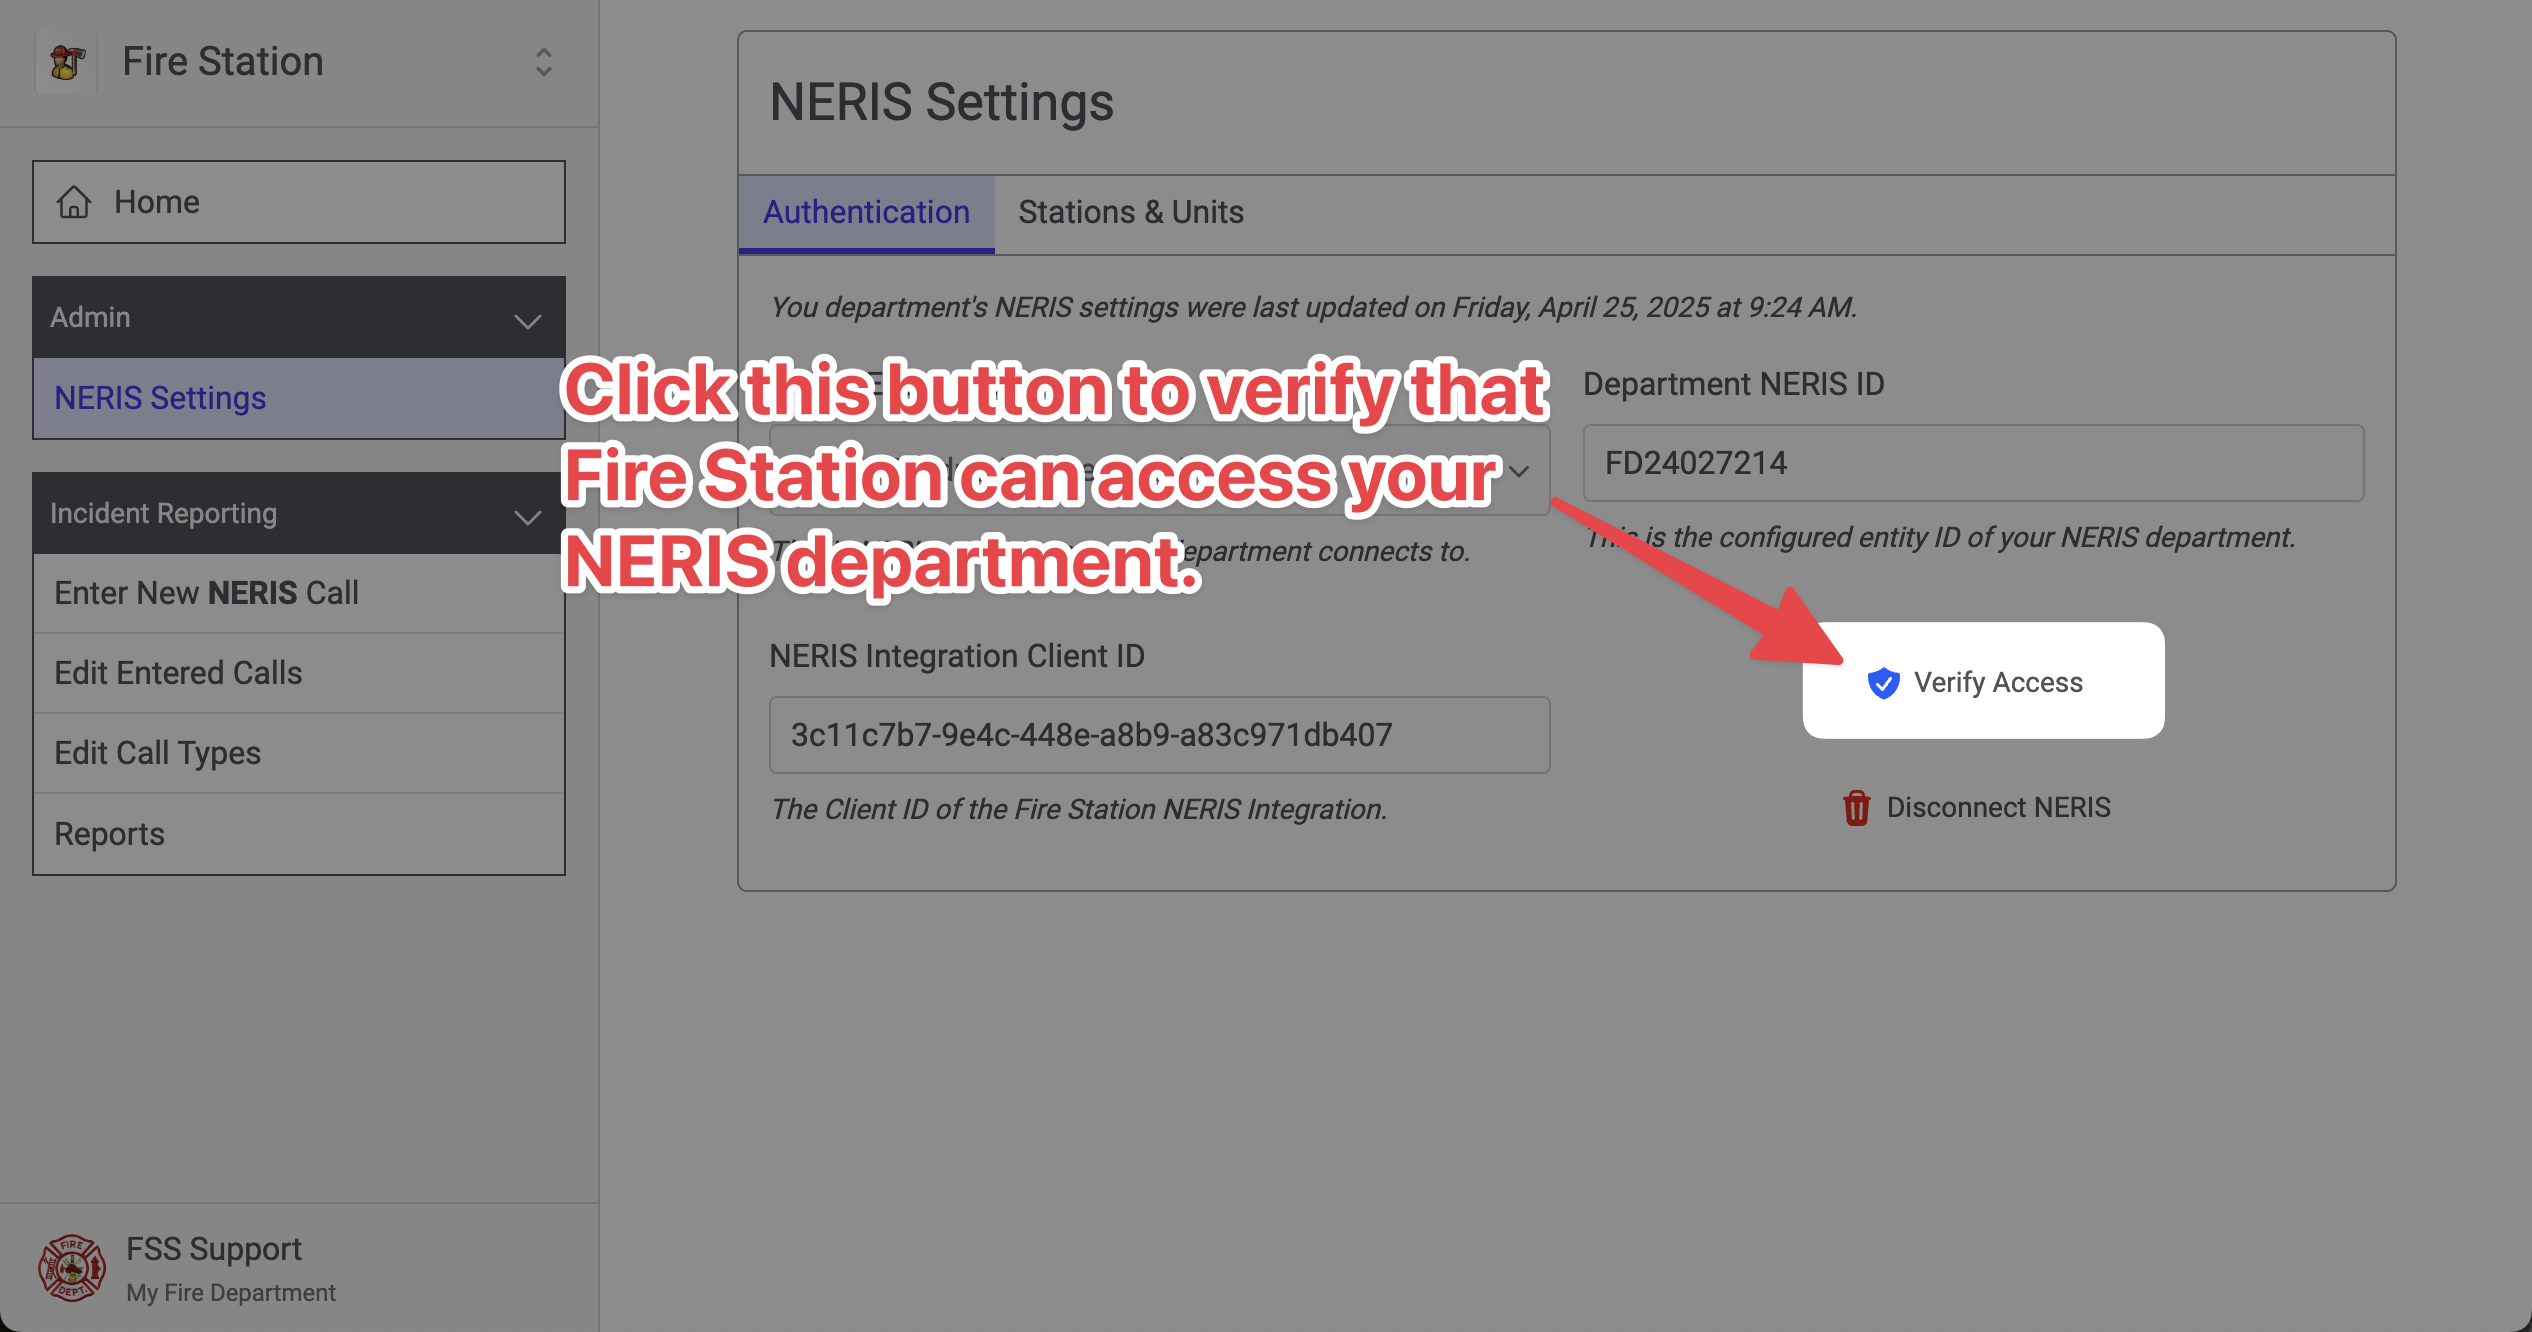
Next, you will see a list of NERIS departments that you are a member of. Click the name of the department that you want to connect Fire Station to.
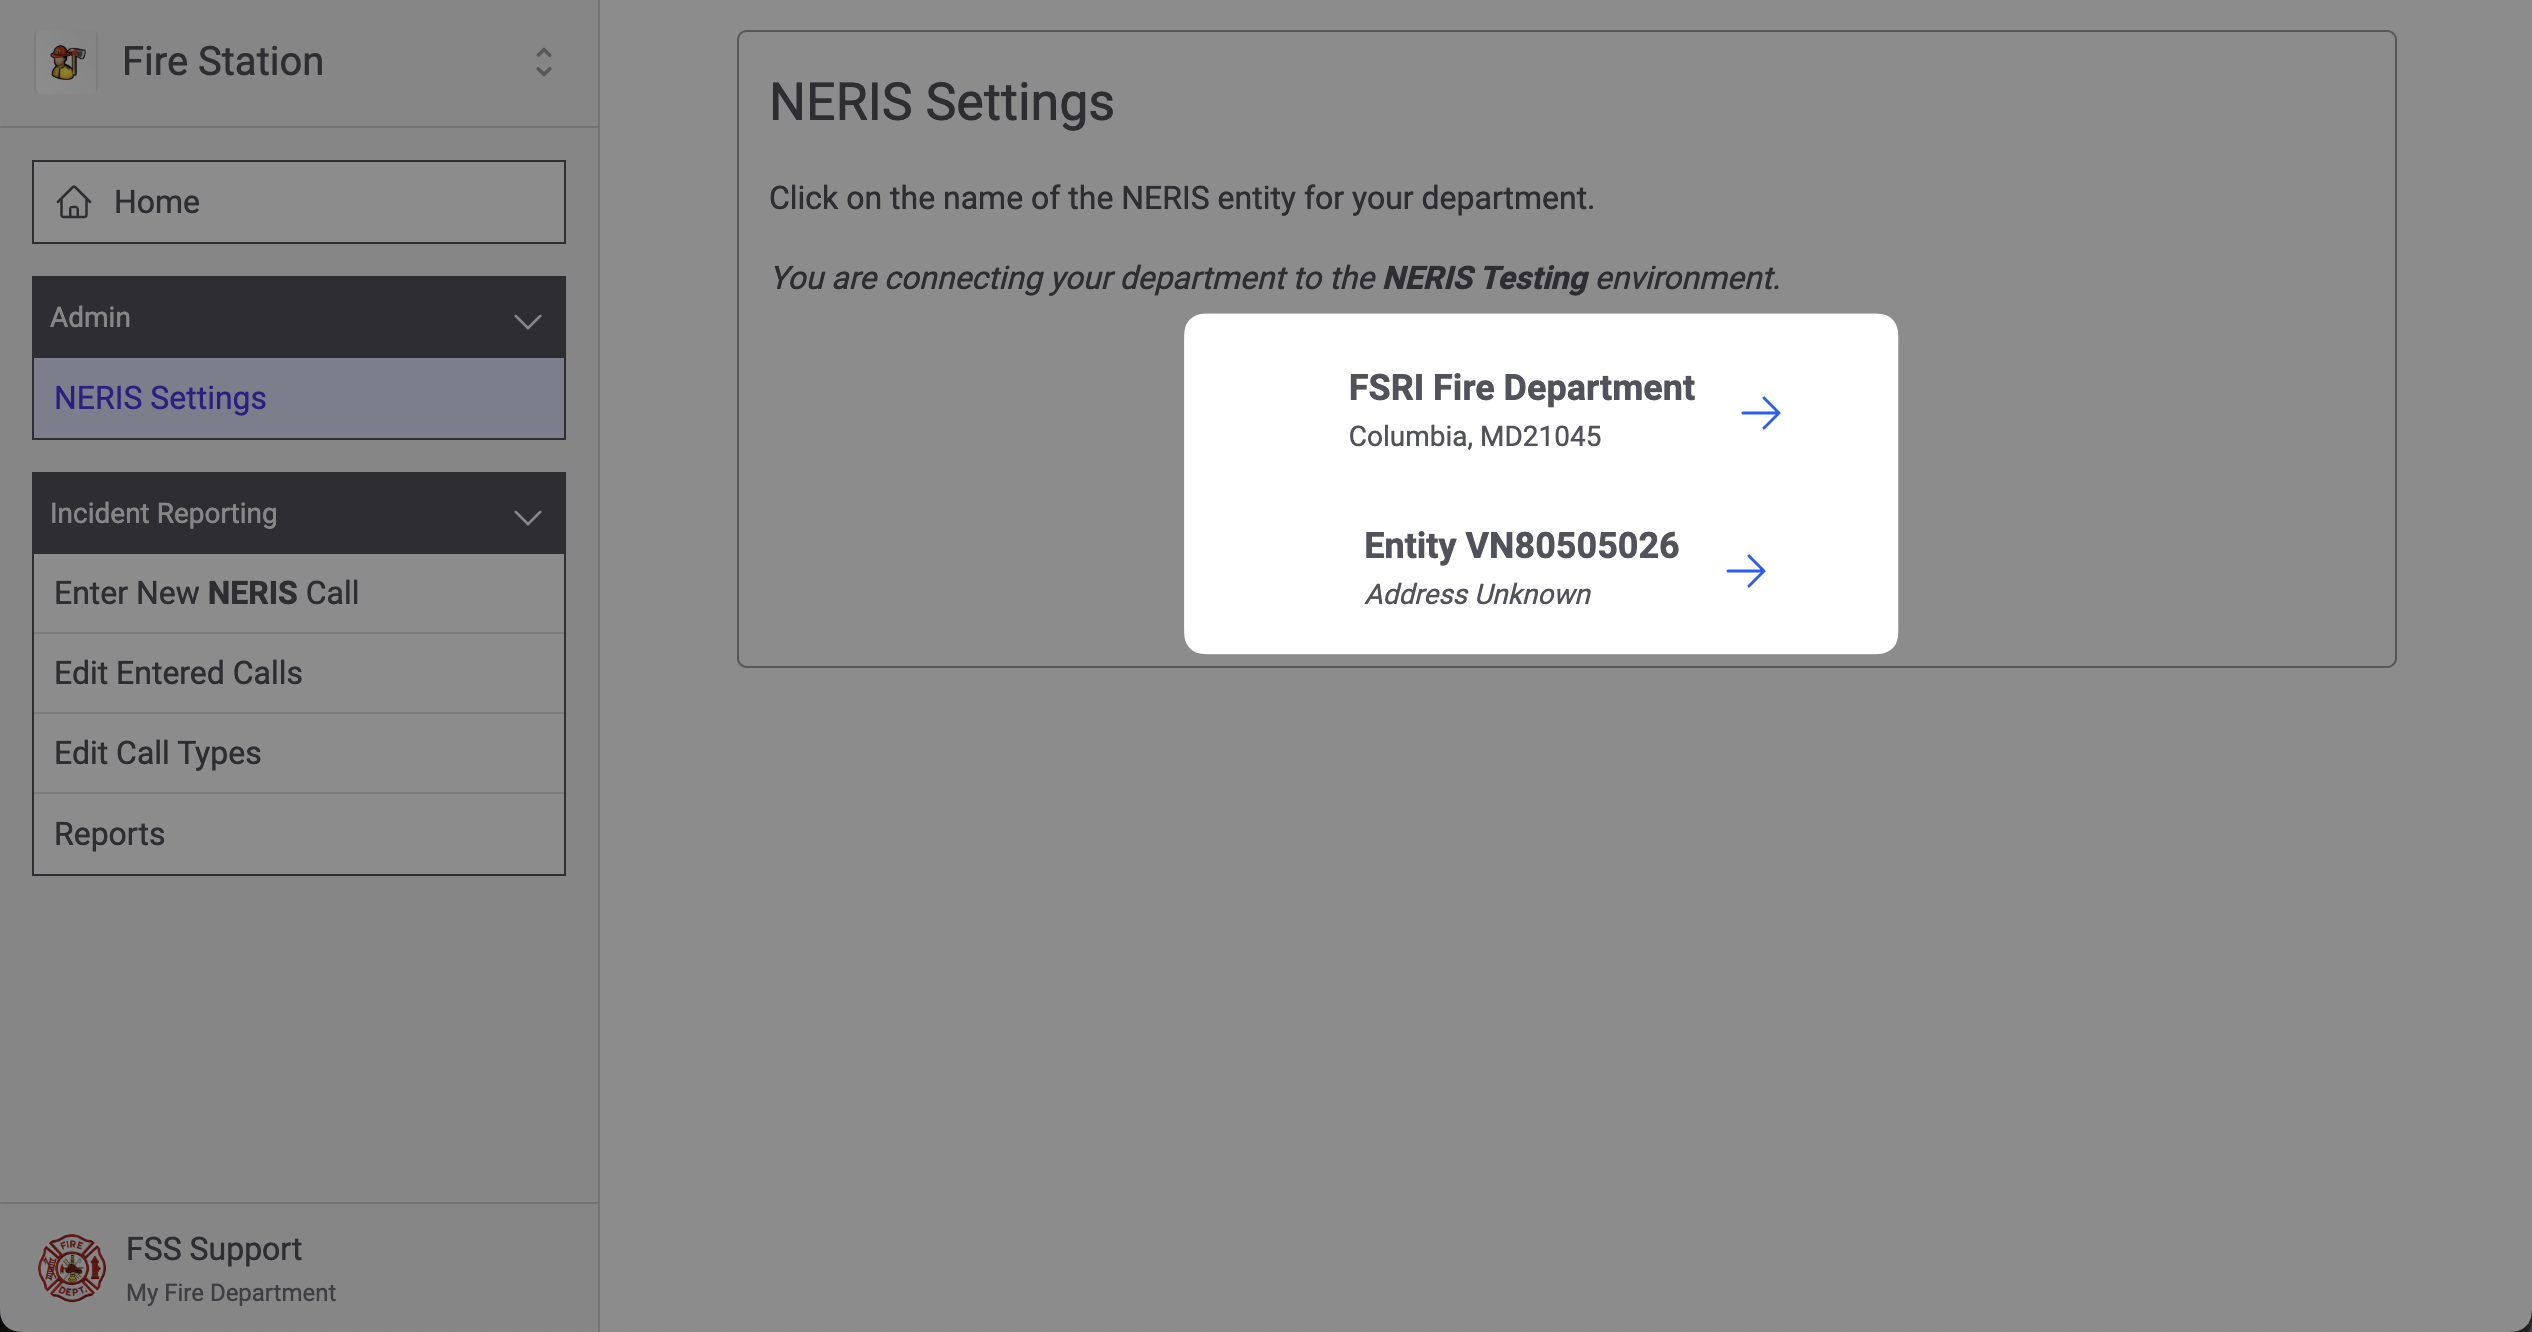
Once you have selected your department, you will see the NERIS Settings page. Click the "Verify Access" button to ensure that Fire Station can connect to your NERIS department.
Mapping NERIS Stations & Units
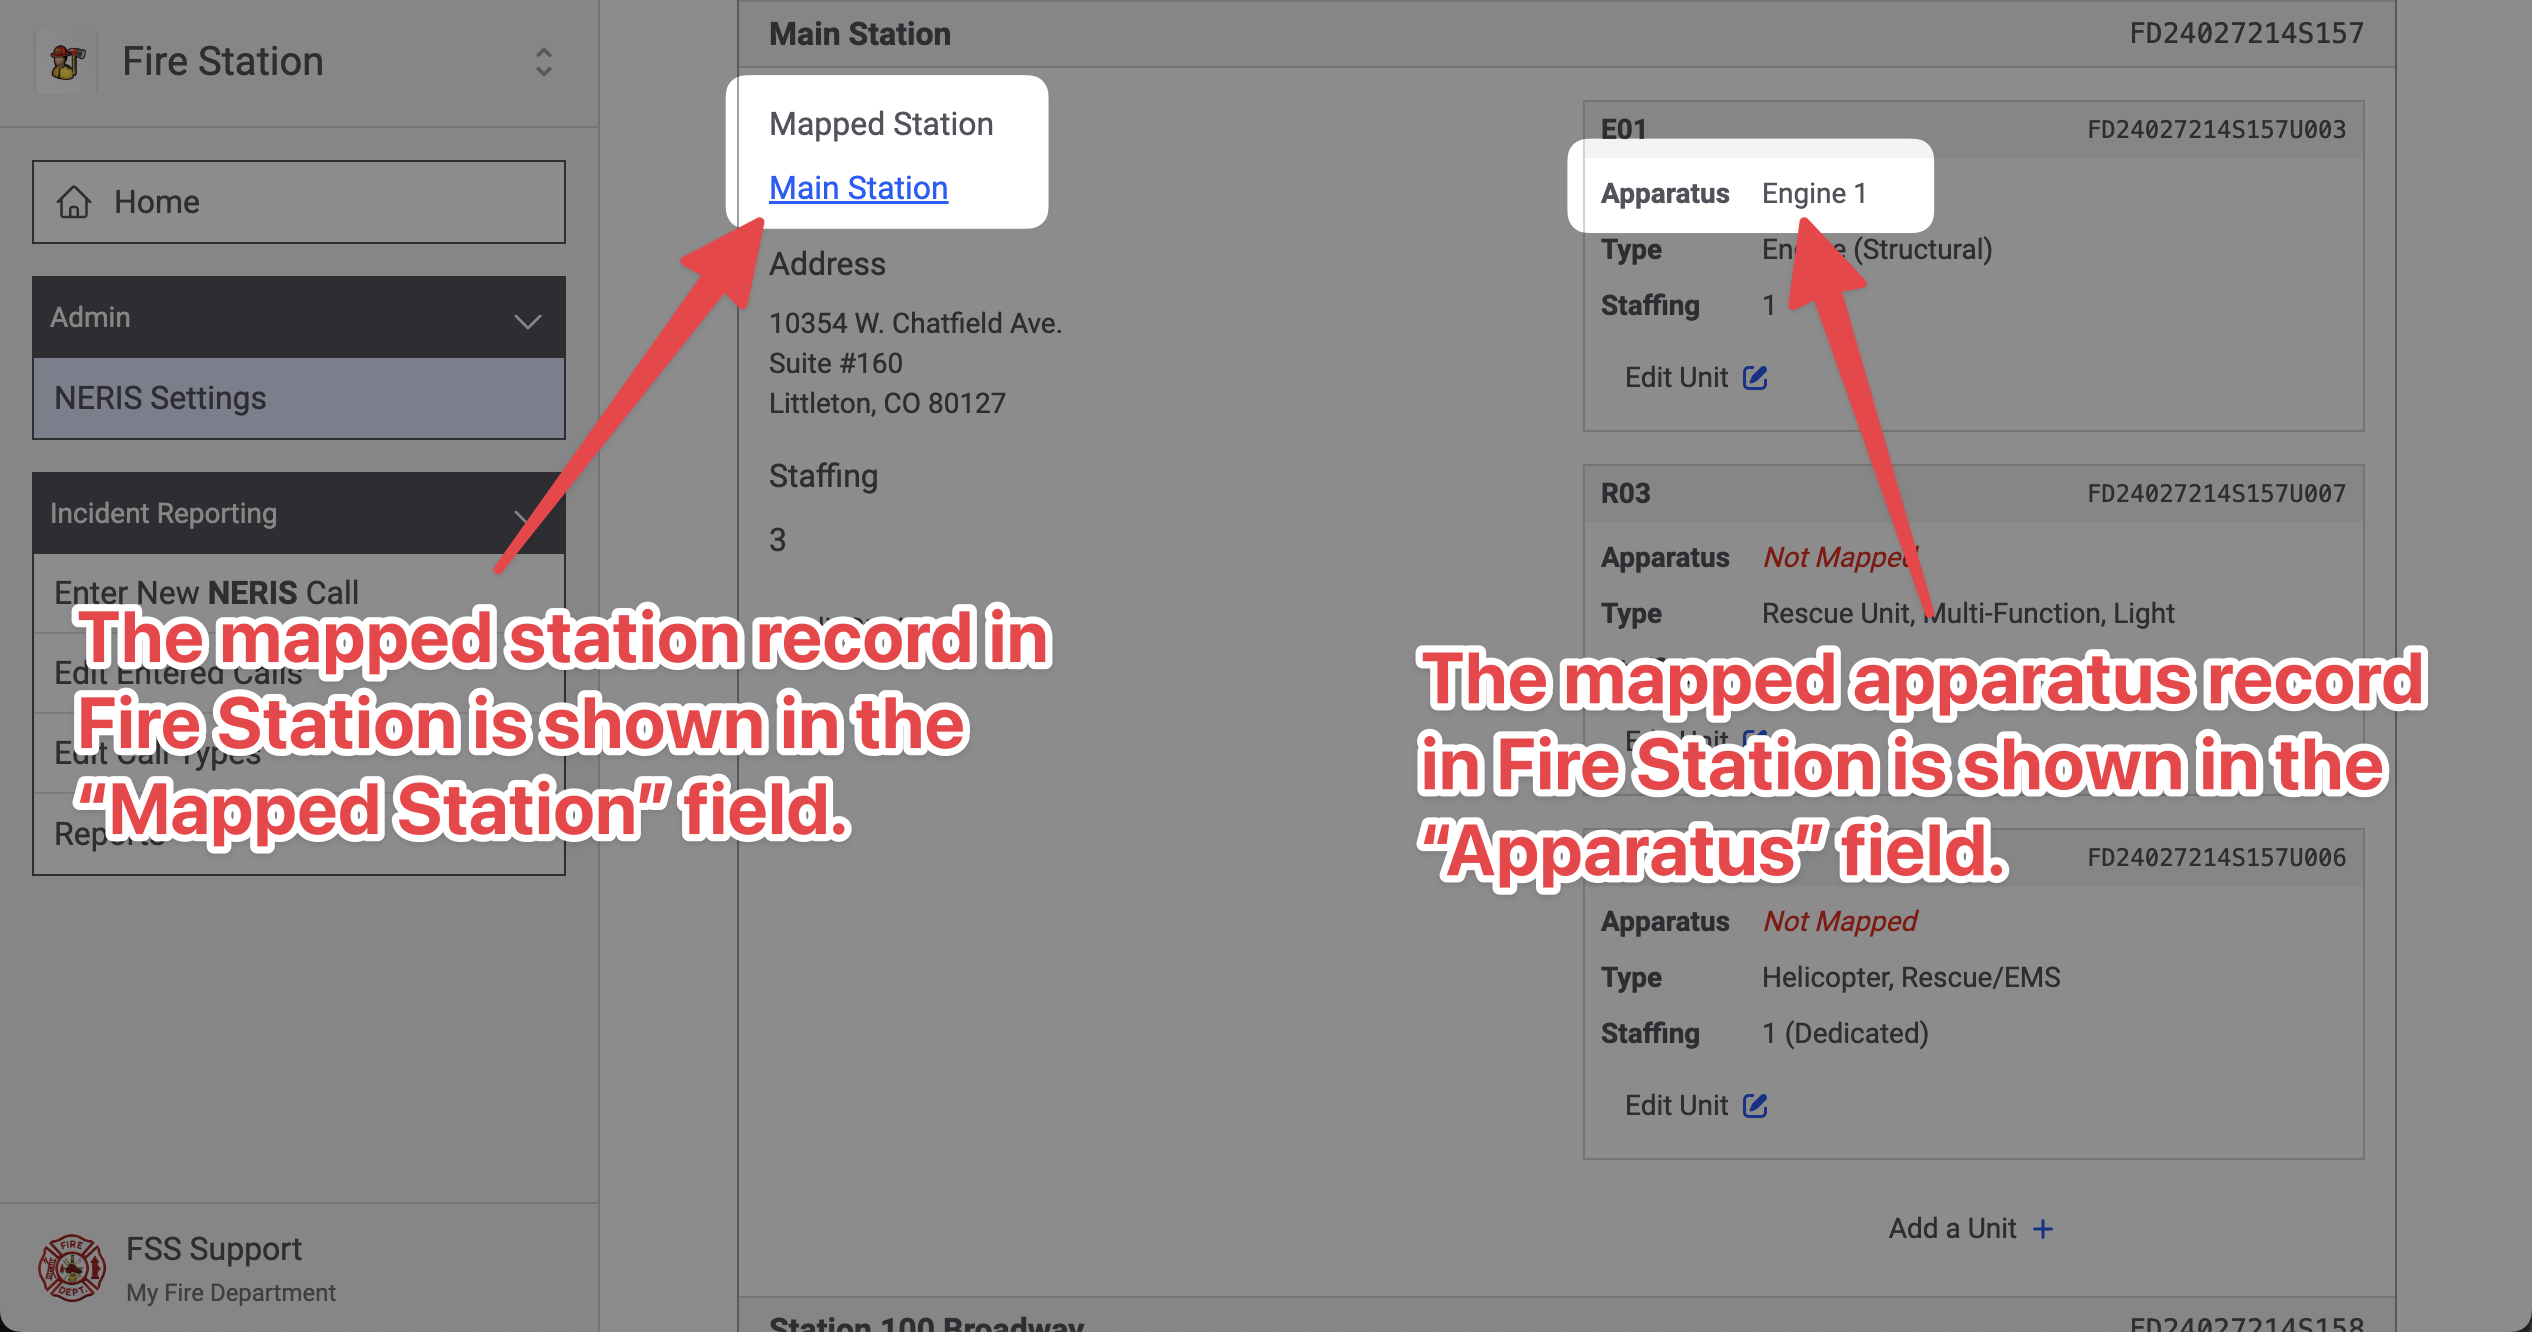
Once your NERIS department has been connected you can match up NERIS Stations and Units to station and apparatus records in Fire Station. This mapping can be created and modified from the Station & Units tab of the NERIS Settings page.

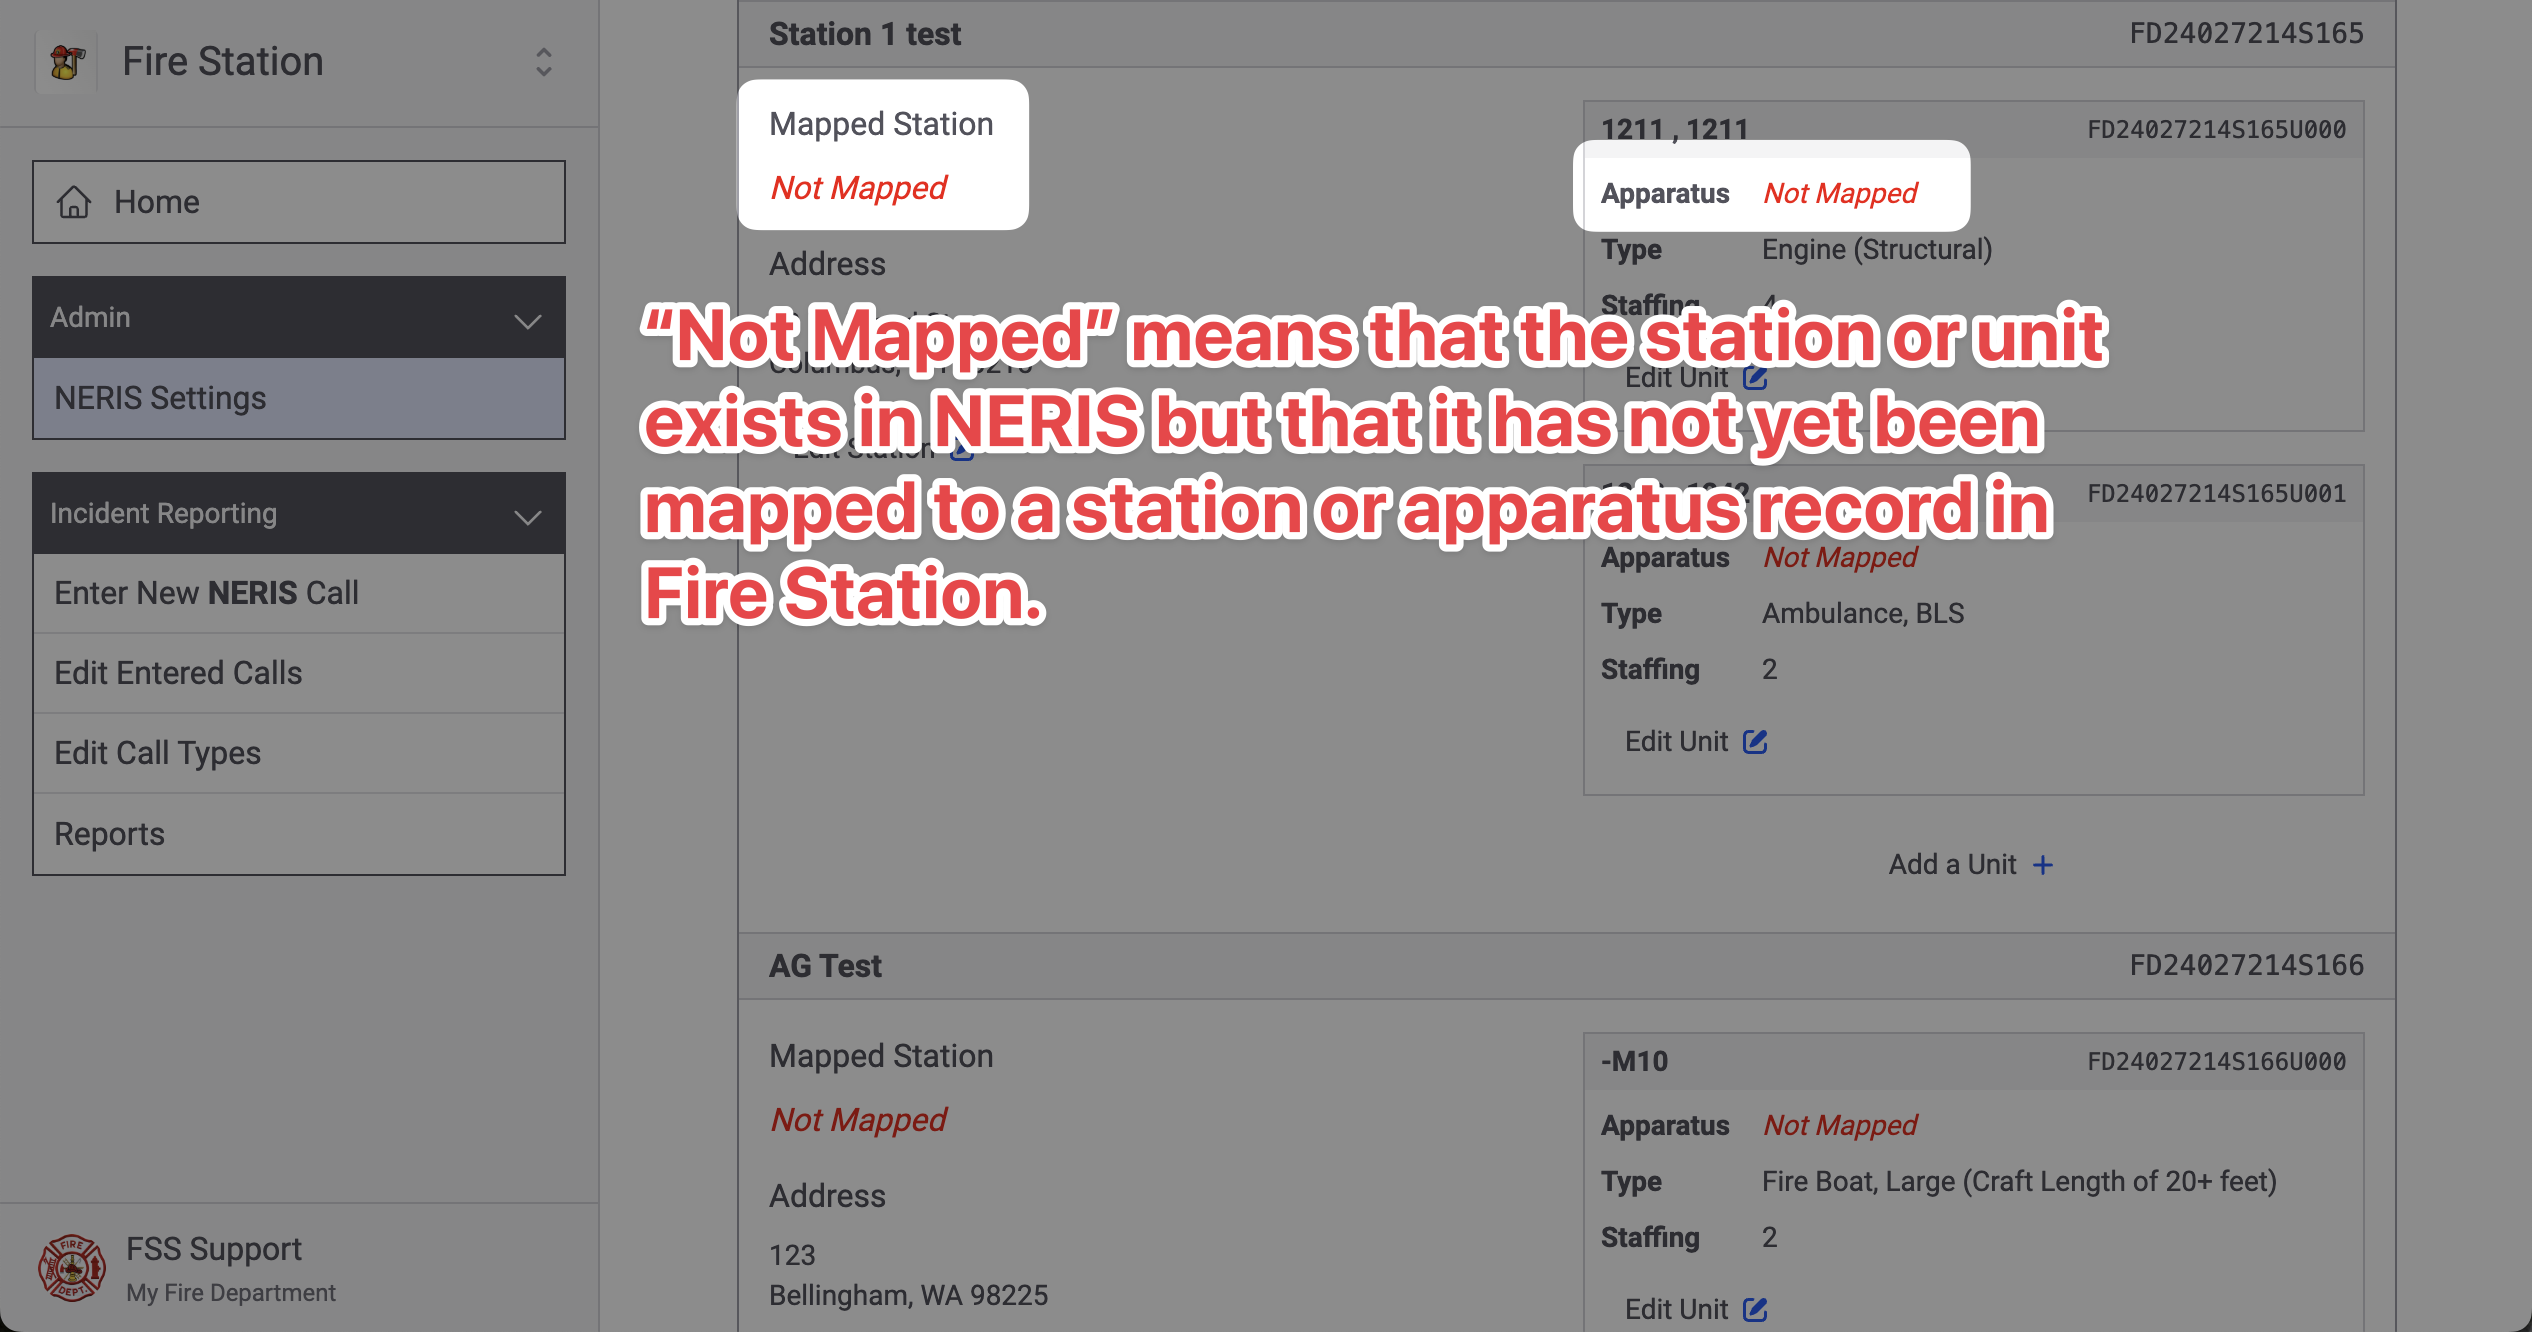
This page lists out all of the stations and units you have created in NERIS. For each station and unit, the station and apparatus record it is mapped to in Fire Station is displayed in the "Mapped Station" and "Apparatus" fields.
If a station or unit exists in NERIS and it has not been mapped to a station or apparatus record in Fire Station, the text "Not Mapped" will appear in red.
You can edit a NERIS station's mapping by clicking the "Edit Station" button in the station's section. You can also edit a NERIS unit's mapping by clicking the "Edit Unit" button in the unit's section.
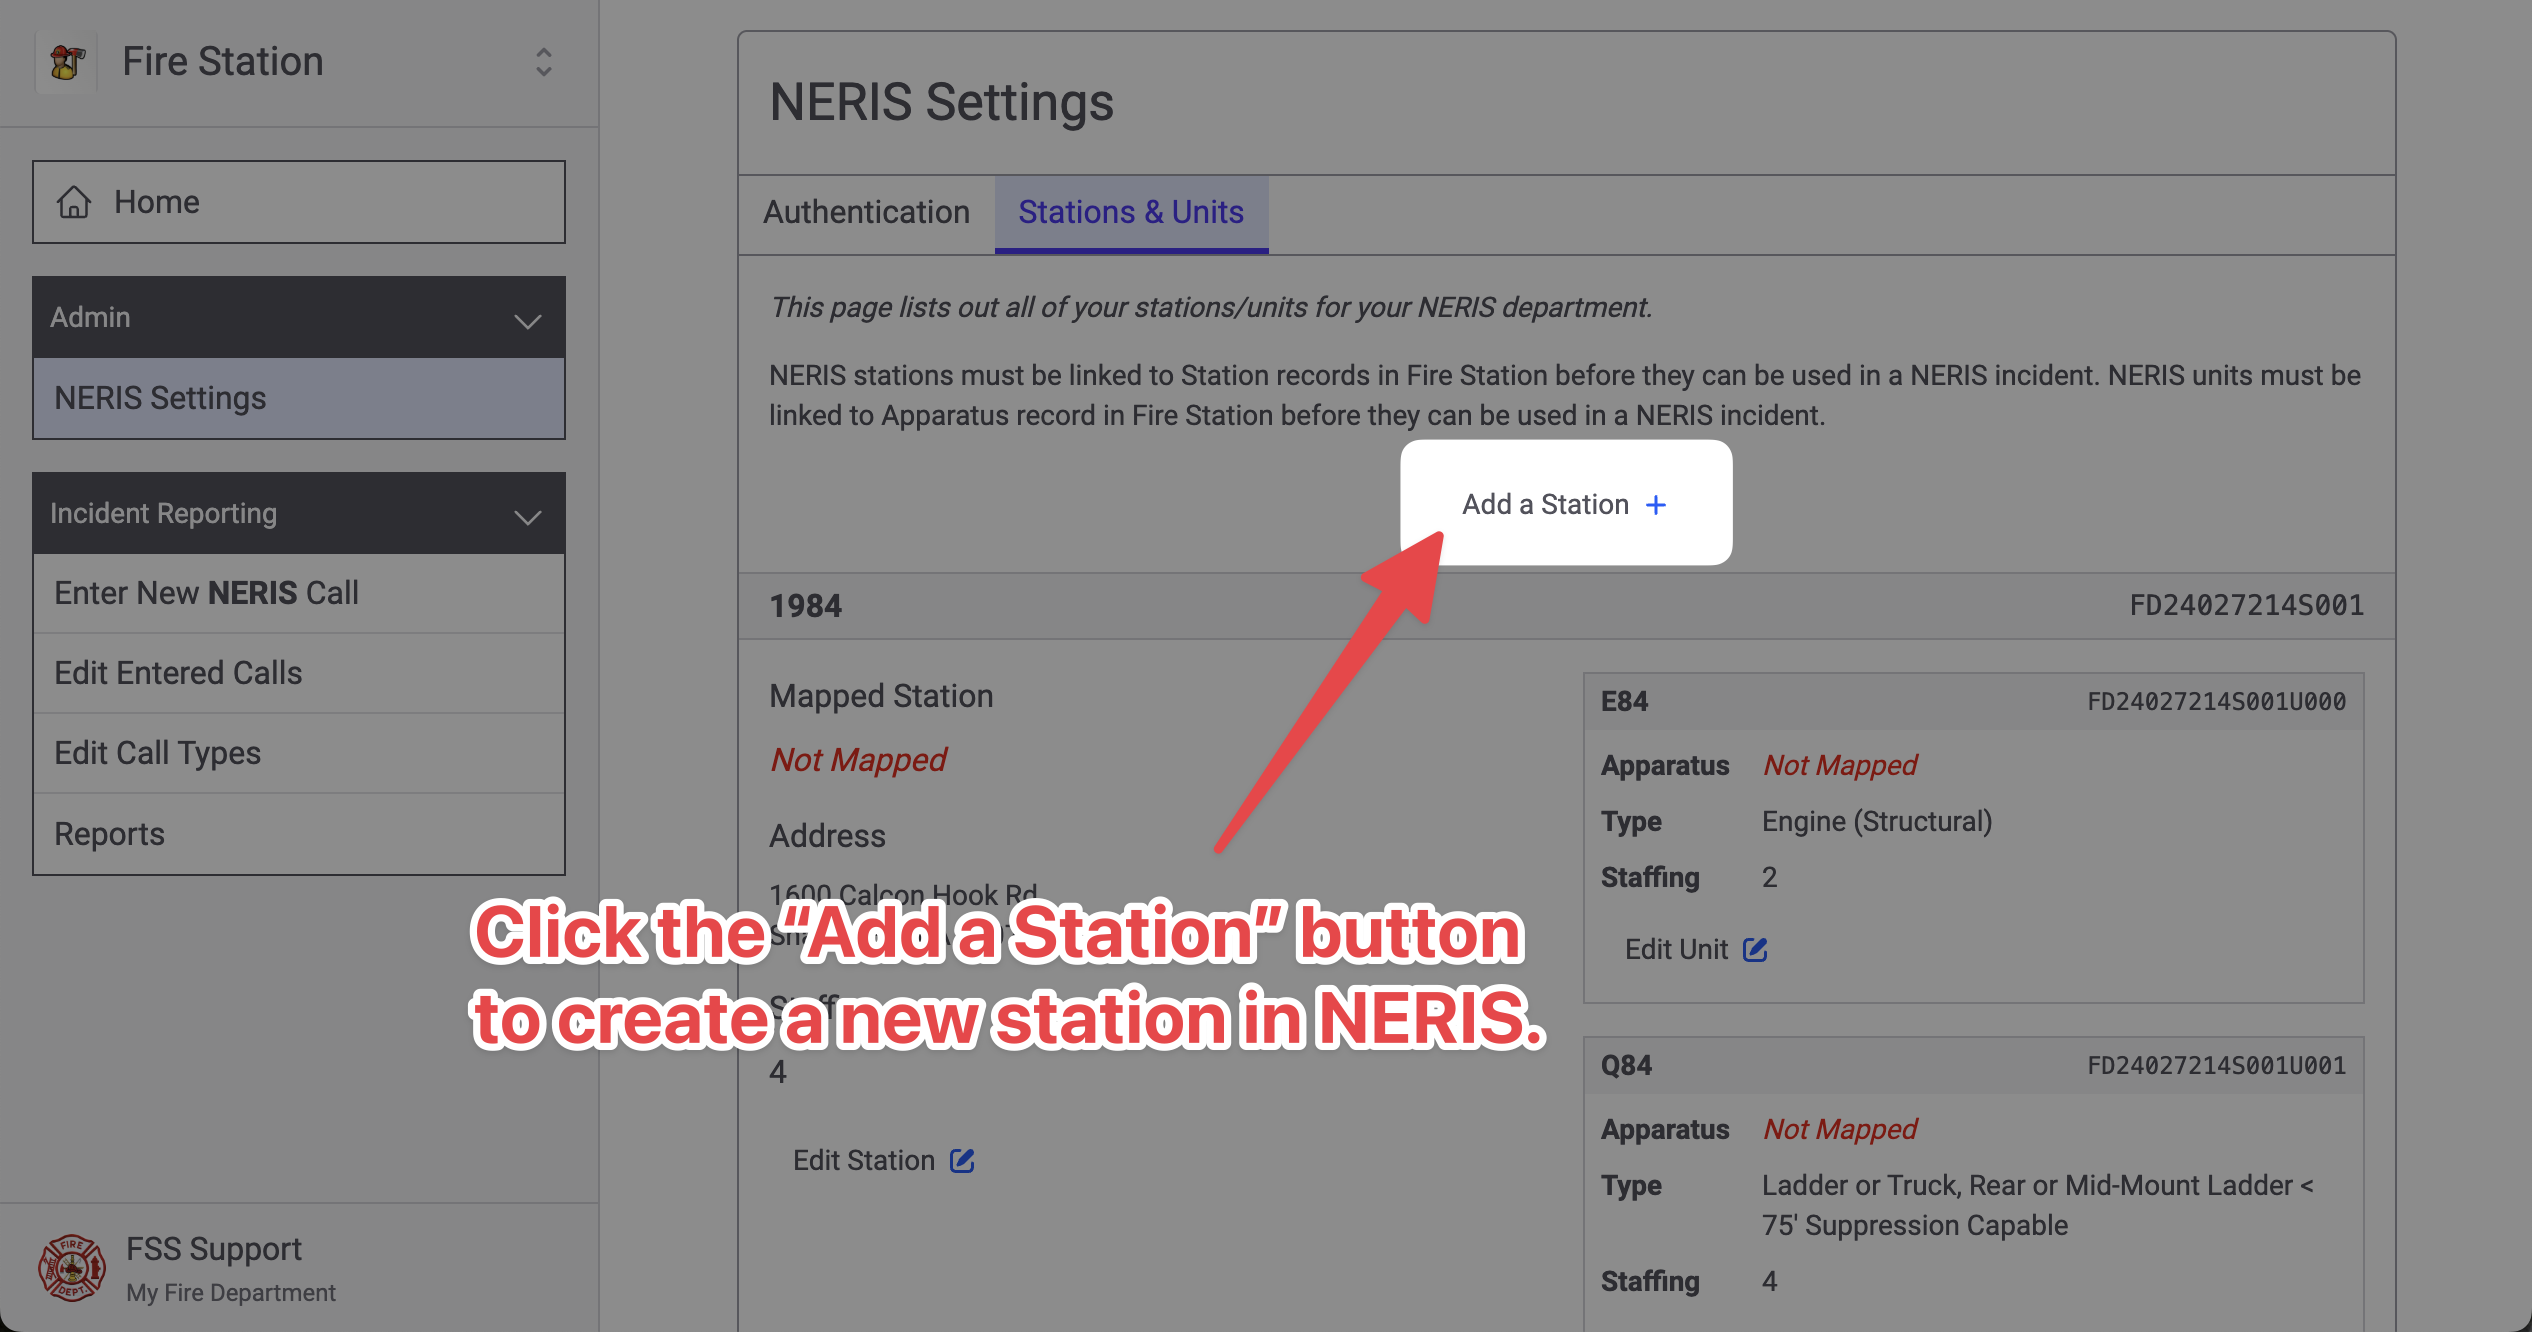
To create an additional NERIS station that maps to existing station records in Fire Station, click the "Add a Station" button at the top of the page.
Mapping NERIS Stations
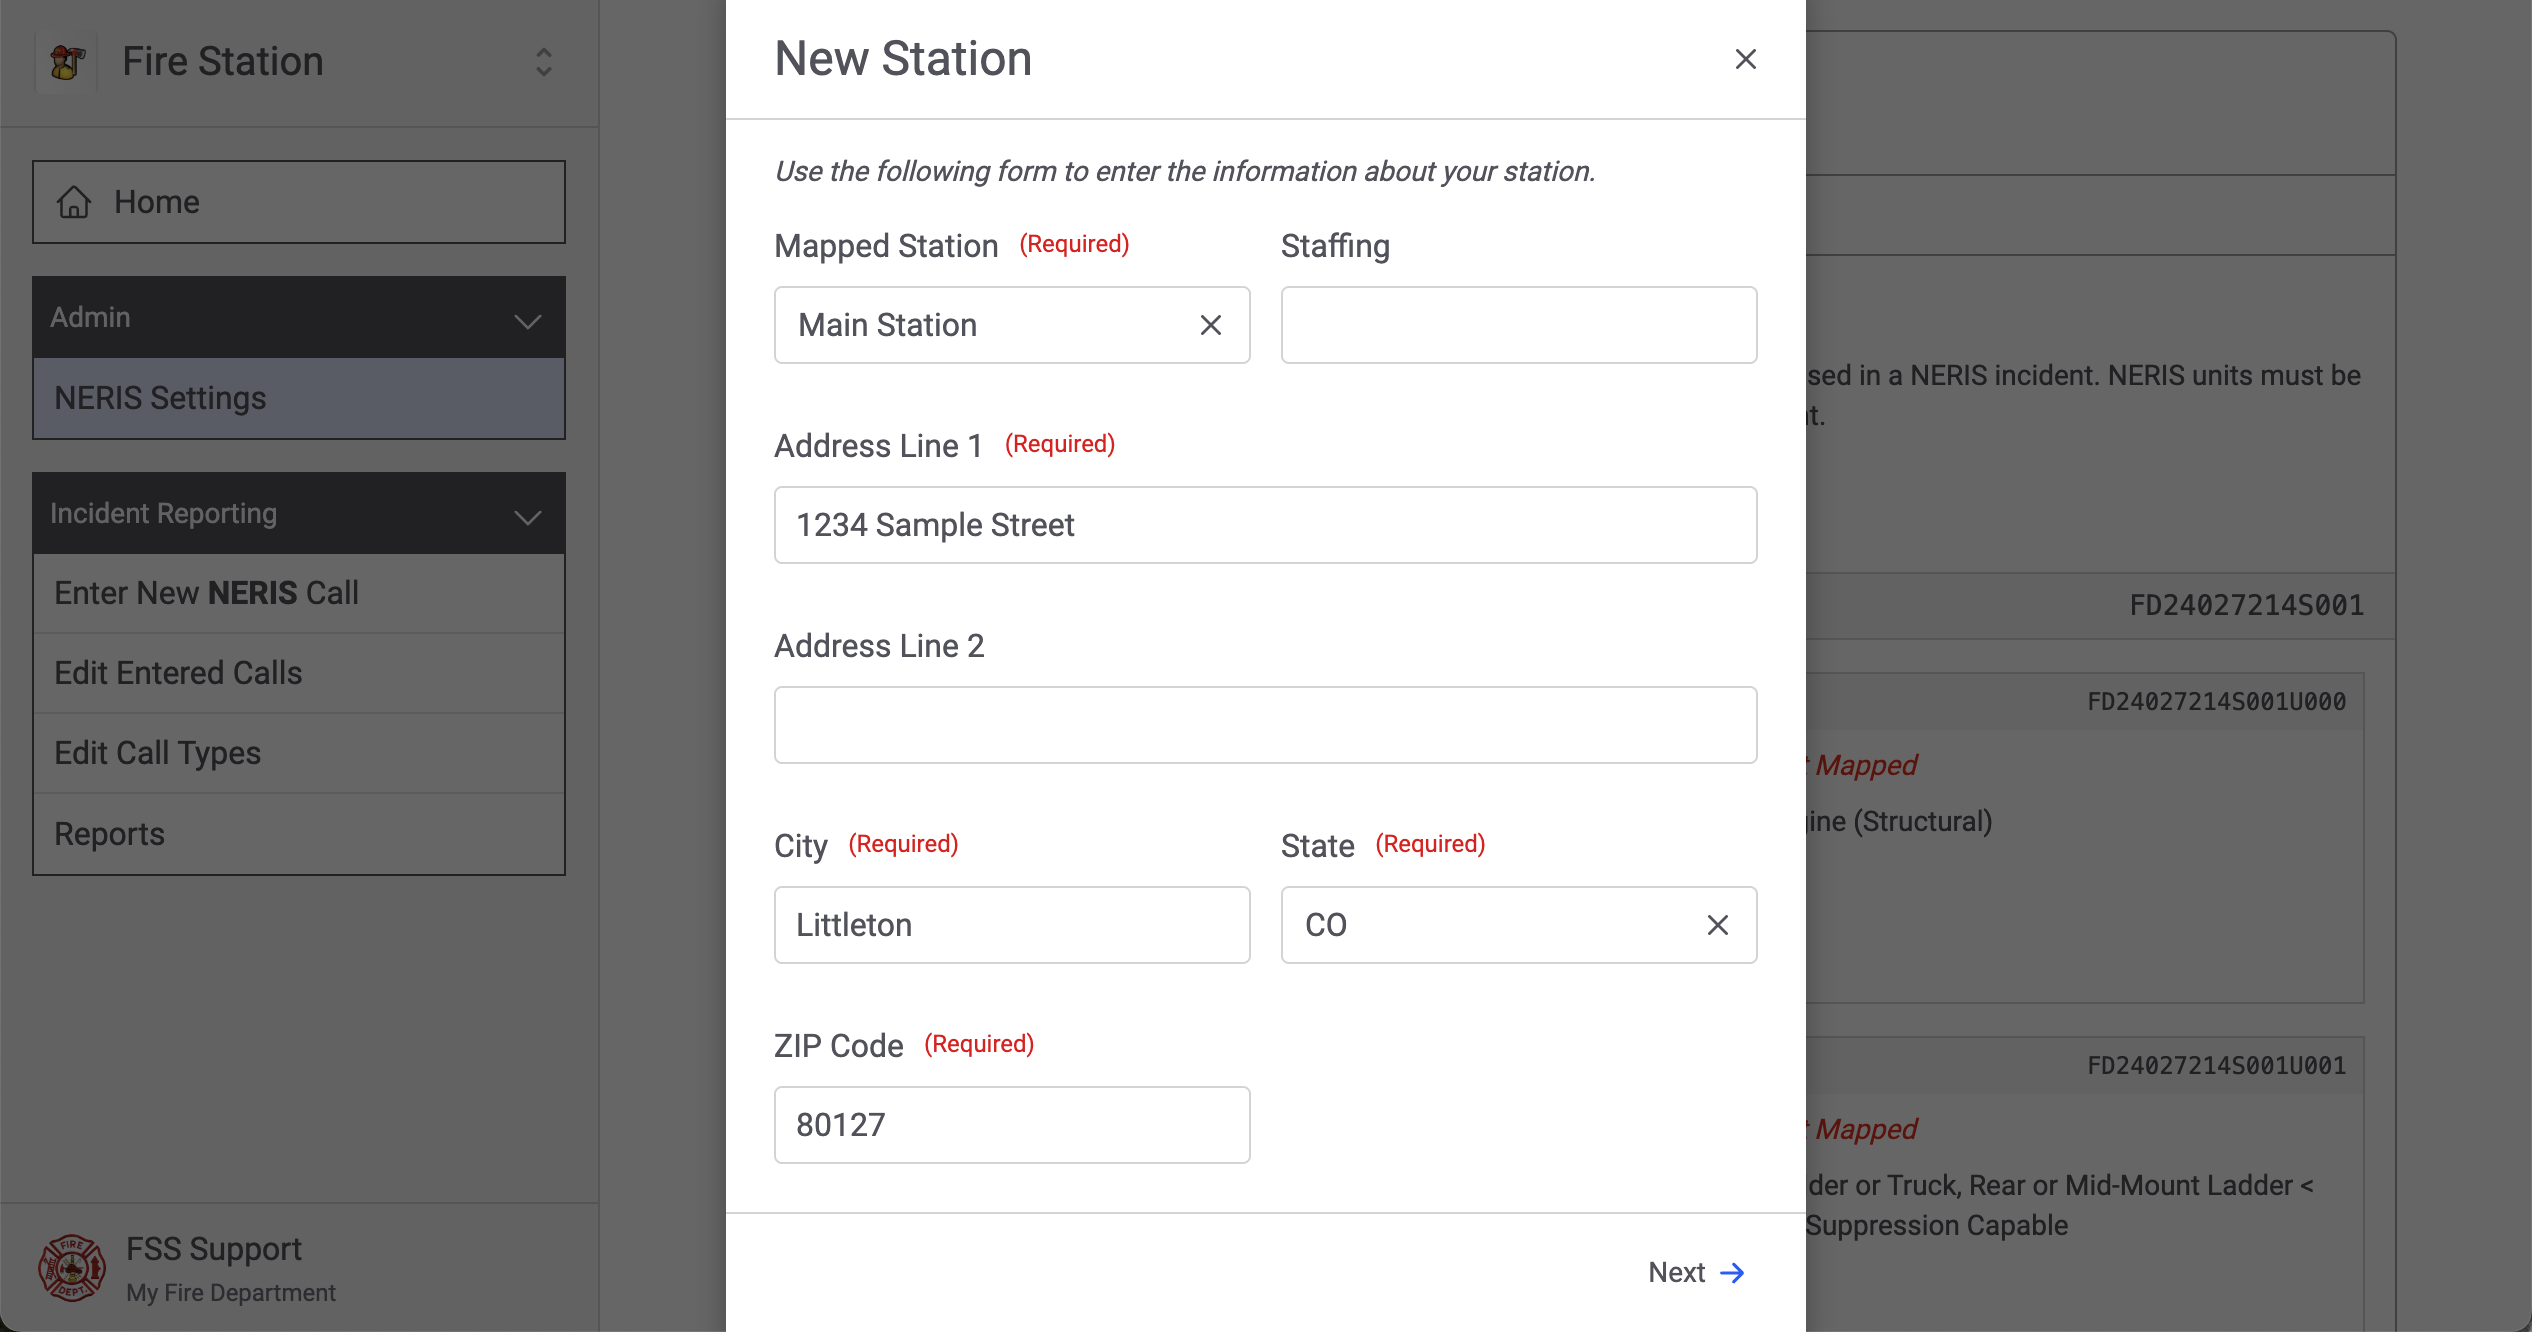
When you create a new NERIS Station (by clicking the "Add a Station" button) or when you edit a NERIS Station (by clicking the "Edit Station" button), you will see the NERIS station modal appear. Fill out the station information and click the "Next" button to continue.
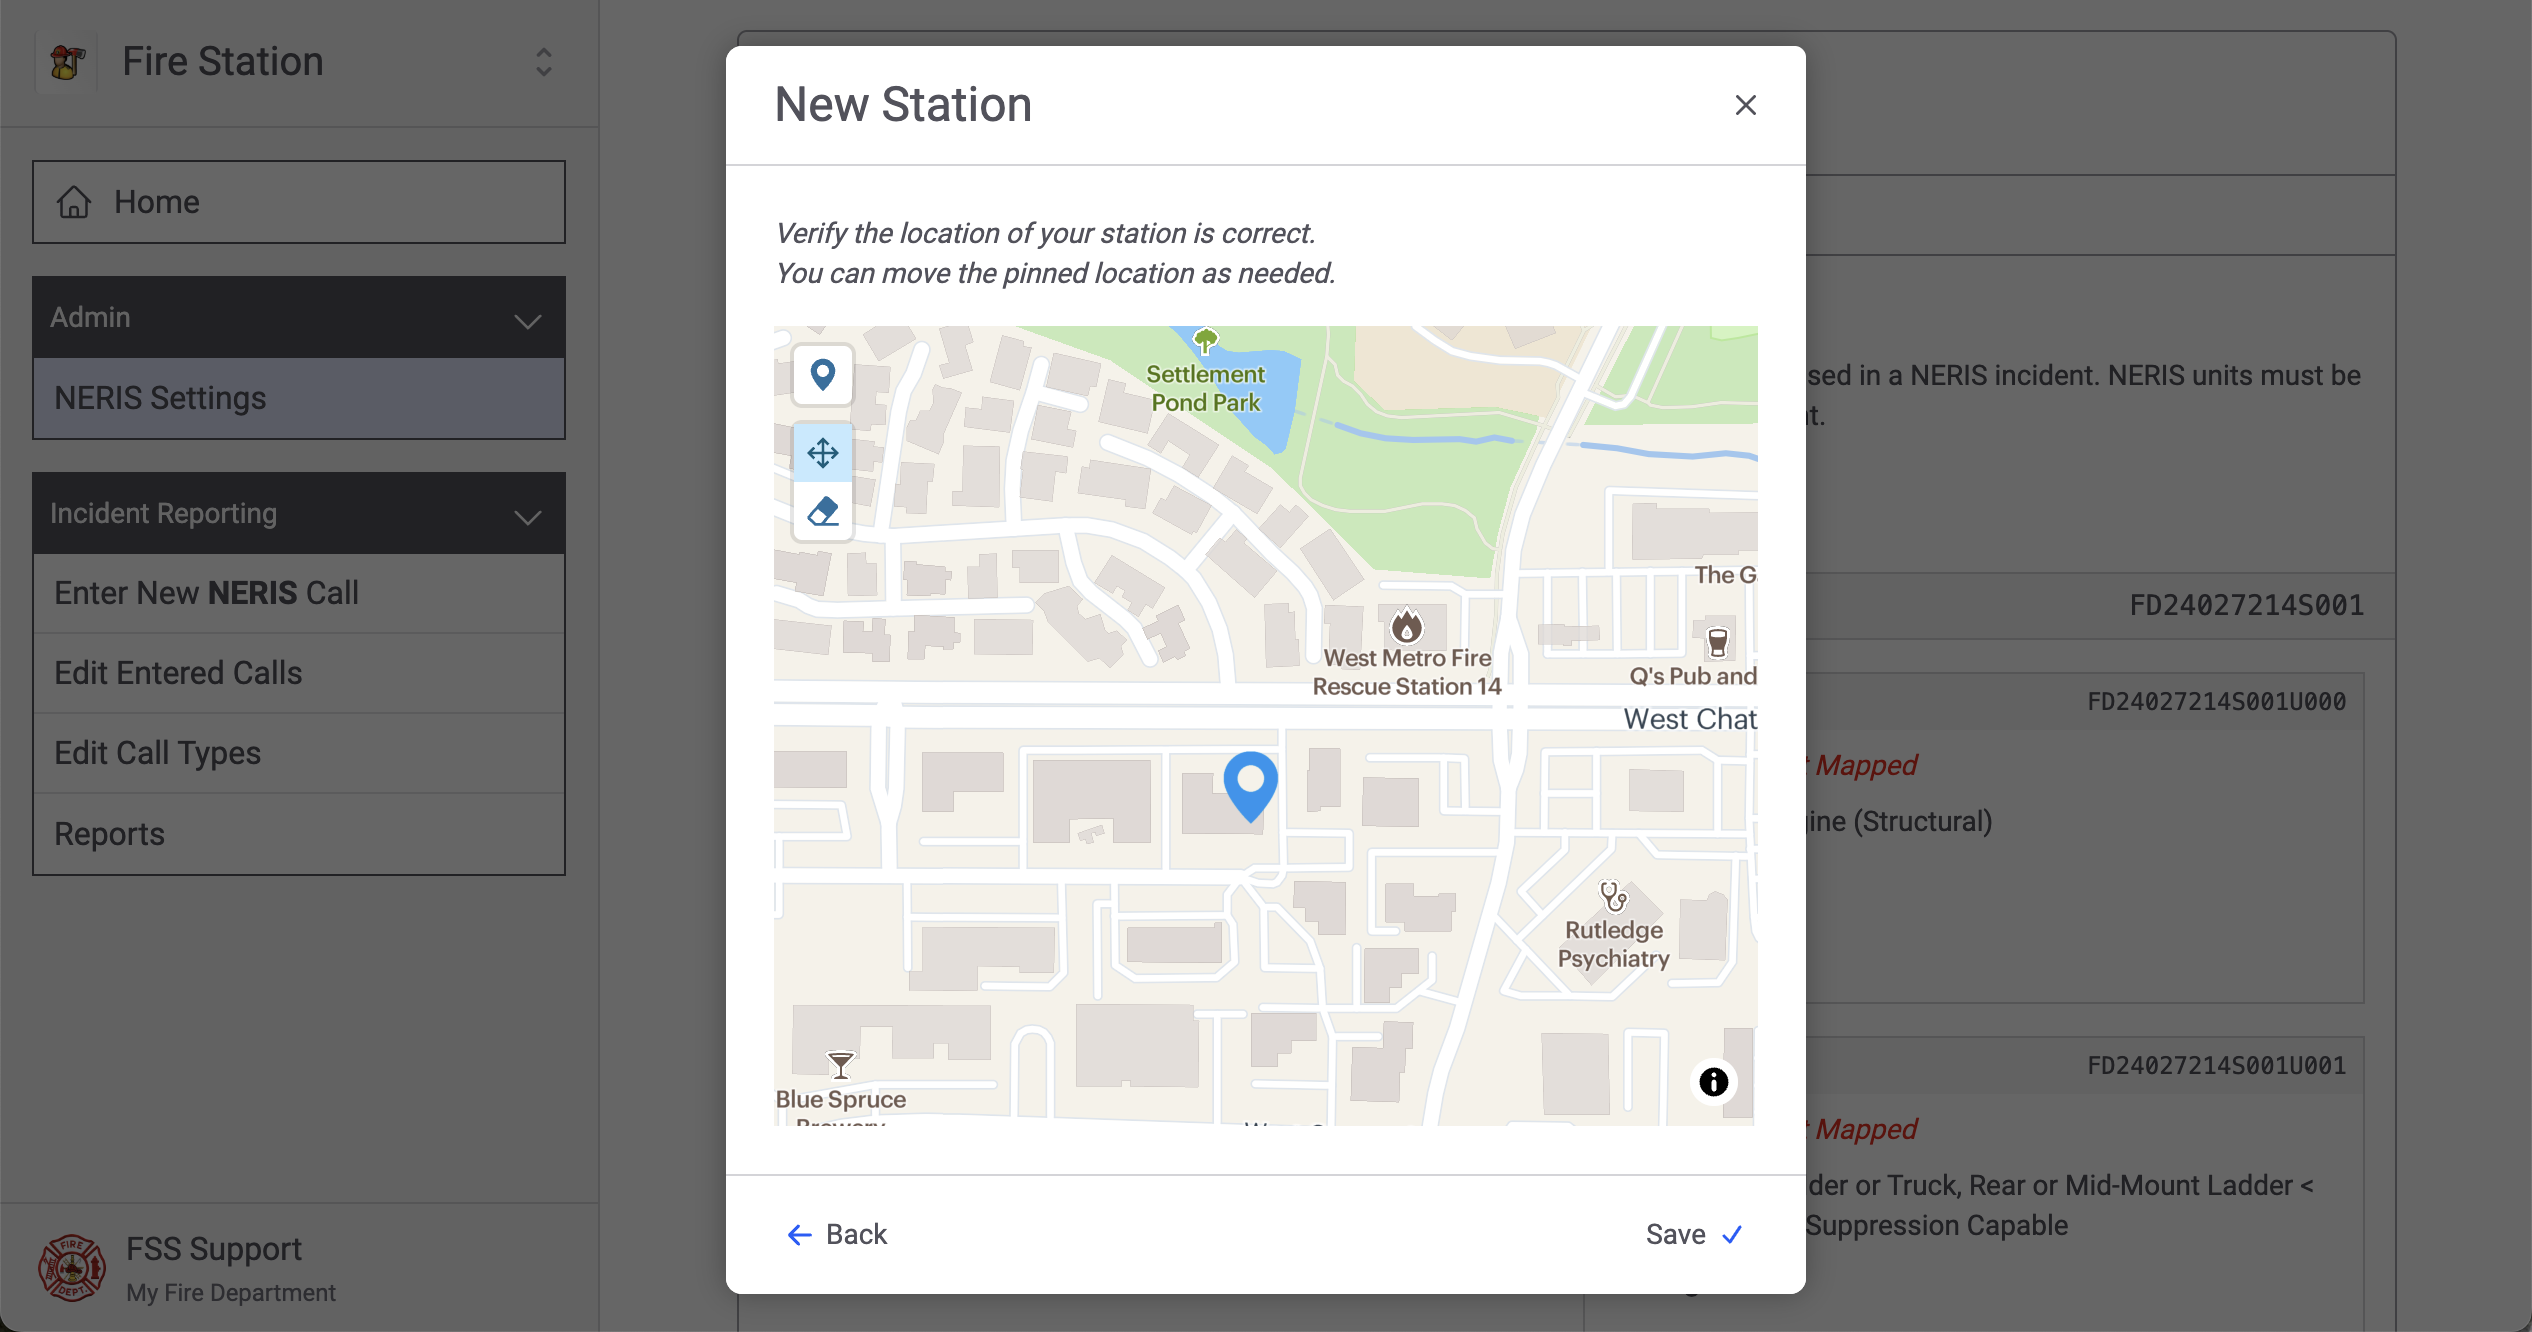
The next screen will show you the station's location on a map. You can move the pin by clicking and dragging it to a new location. Click the "Save" button to when you are finished.
Mapping NERIS Units
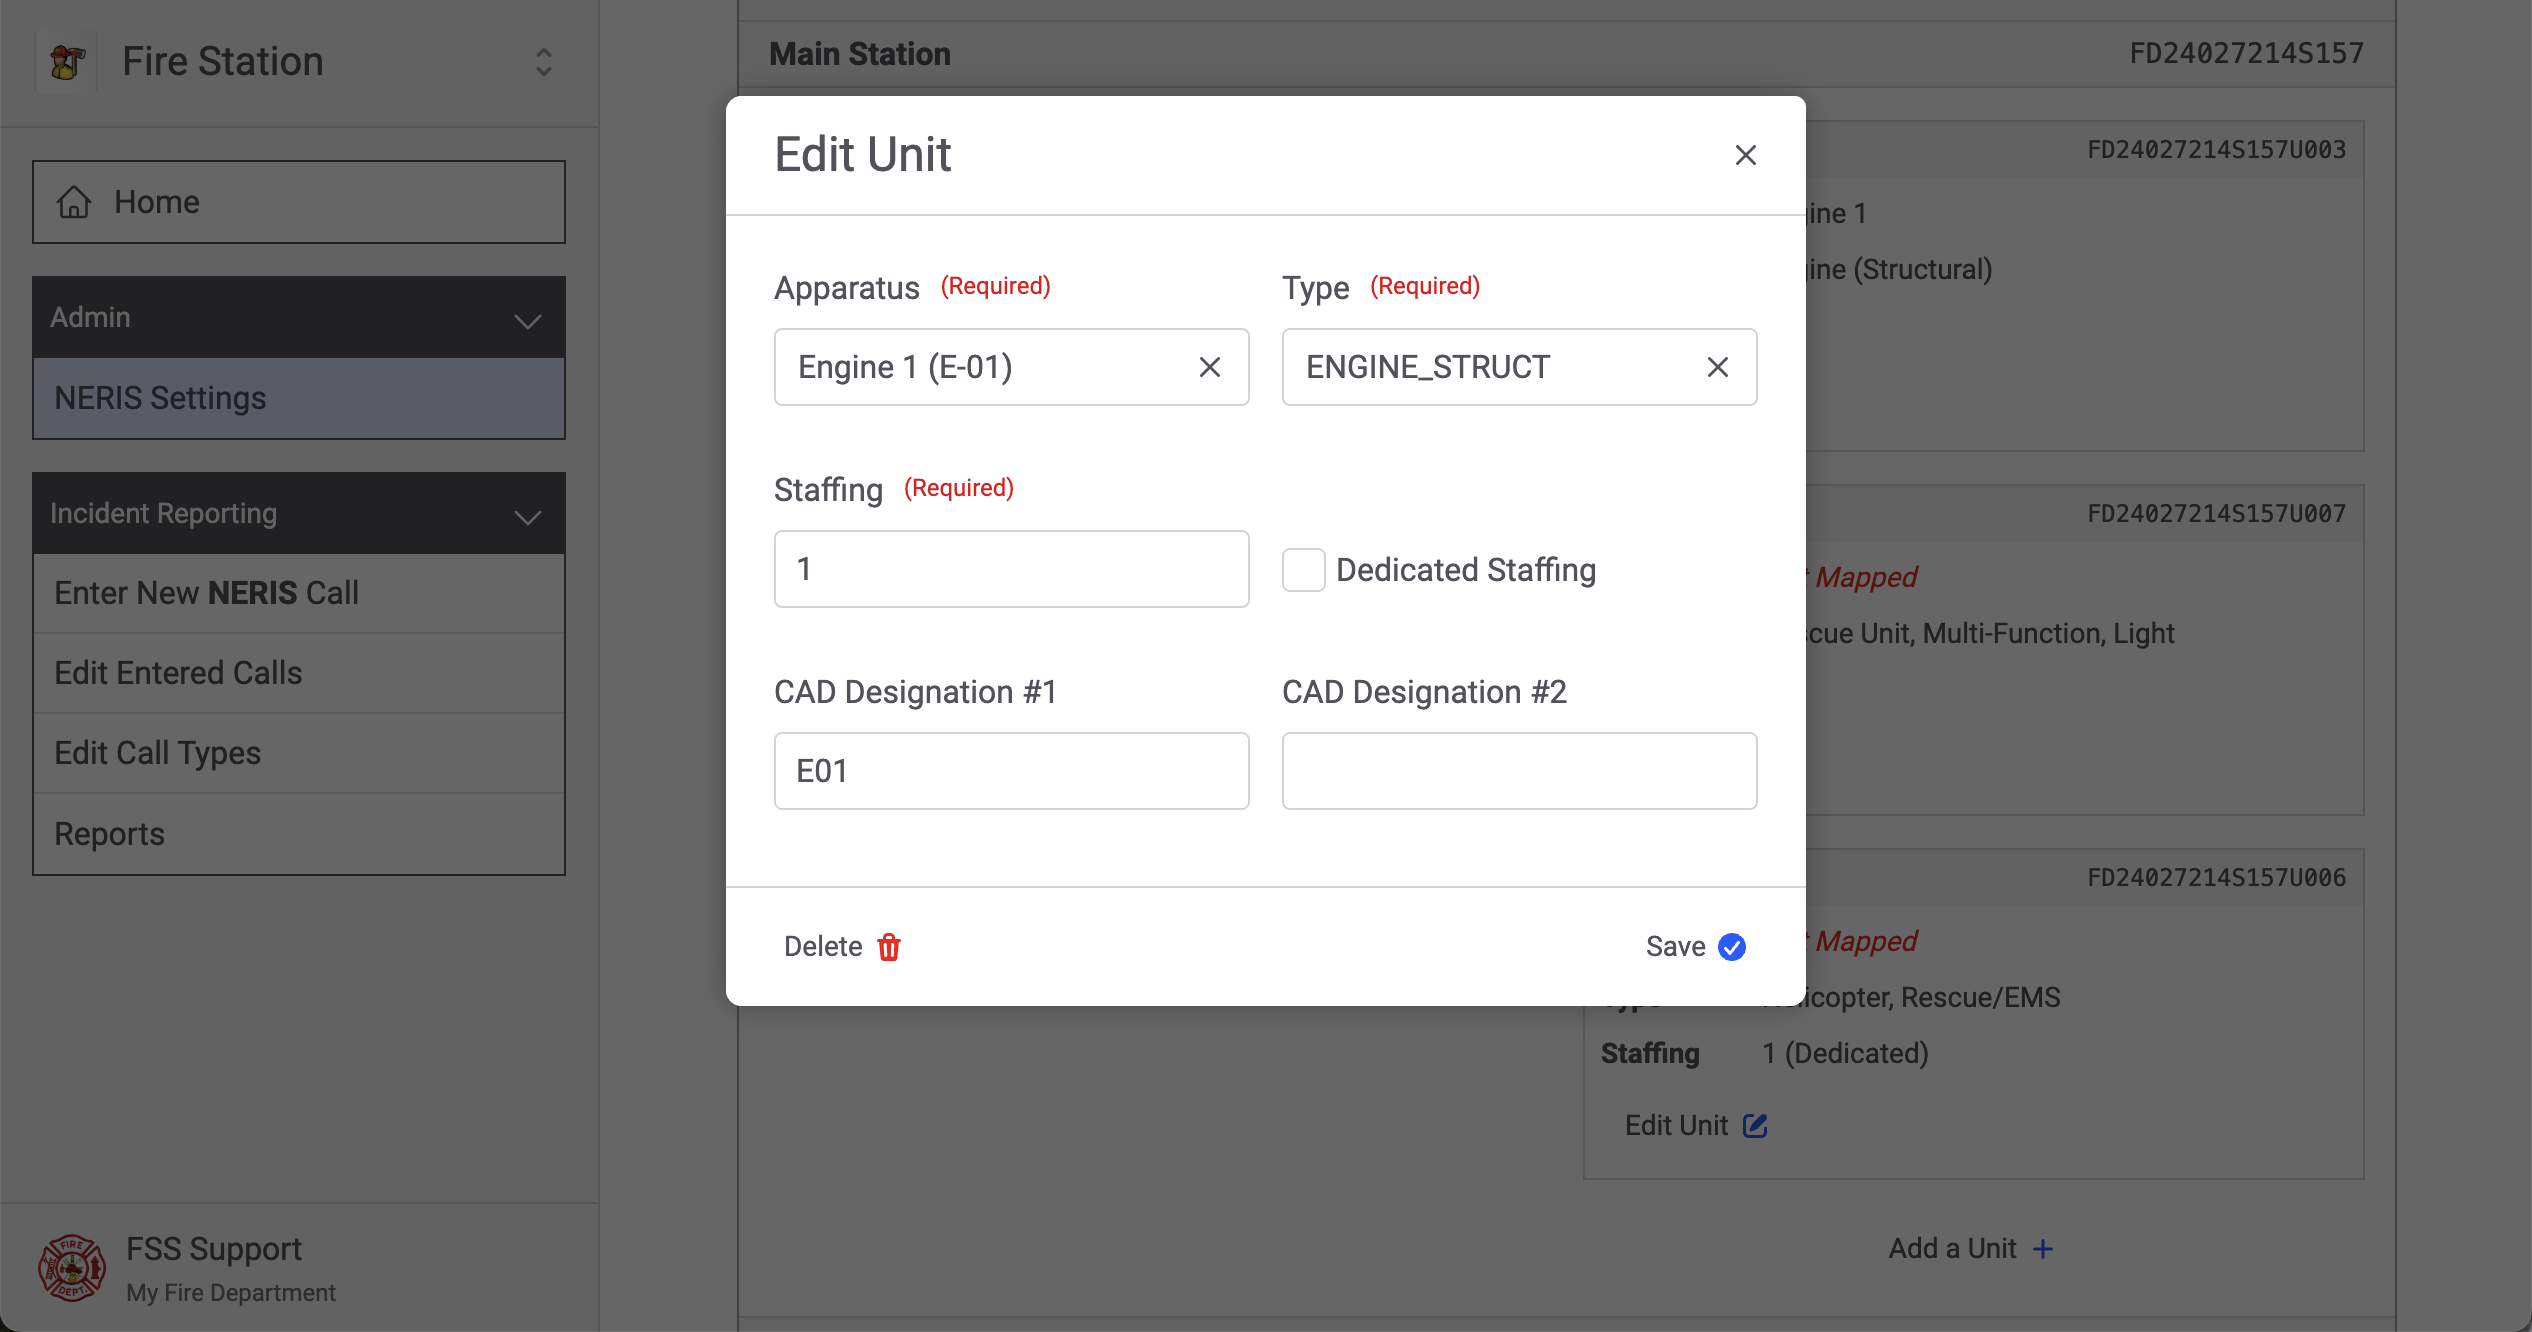
When you create a new NERIS Unit (by clicking the "Add a Unit" button) or when you edit an existing unit (by clicking the "Edit Unit" button), you will see the NERIS Unit details in a modal. Fill out the unit's information and click the "Save" button to create or update the unit.
Next Steps
Once you have connected Fire Station to your NERIS department, and your station & apparatus records have been mapped, you are ready to start entering NERIS incidents.
Entering NERIS Incidents from Fire Station Online
Follow these instructions to learn how to enter NERIS incidents from Fire Station's online platform. NERIS incidents are entered into Fire Station as call records. Then the NERIS call record is validated with NERIS and submitted to create the incident in NERIS. Calls that have been submitted to NERIS then updated in Fire Station may be re-submitted to NERIS.
You must complete the initial NERIS setup before you can enter NERIS calls in Fire Station
Your FSSID must have the NERIS Incident Reporting
Creating New NERIS Calls
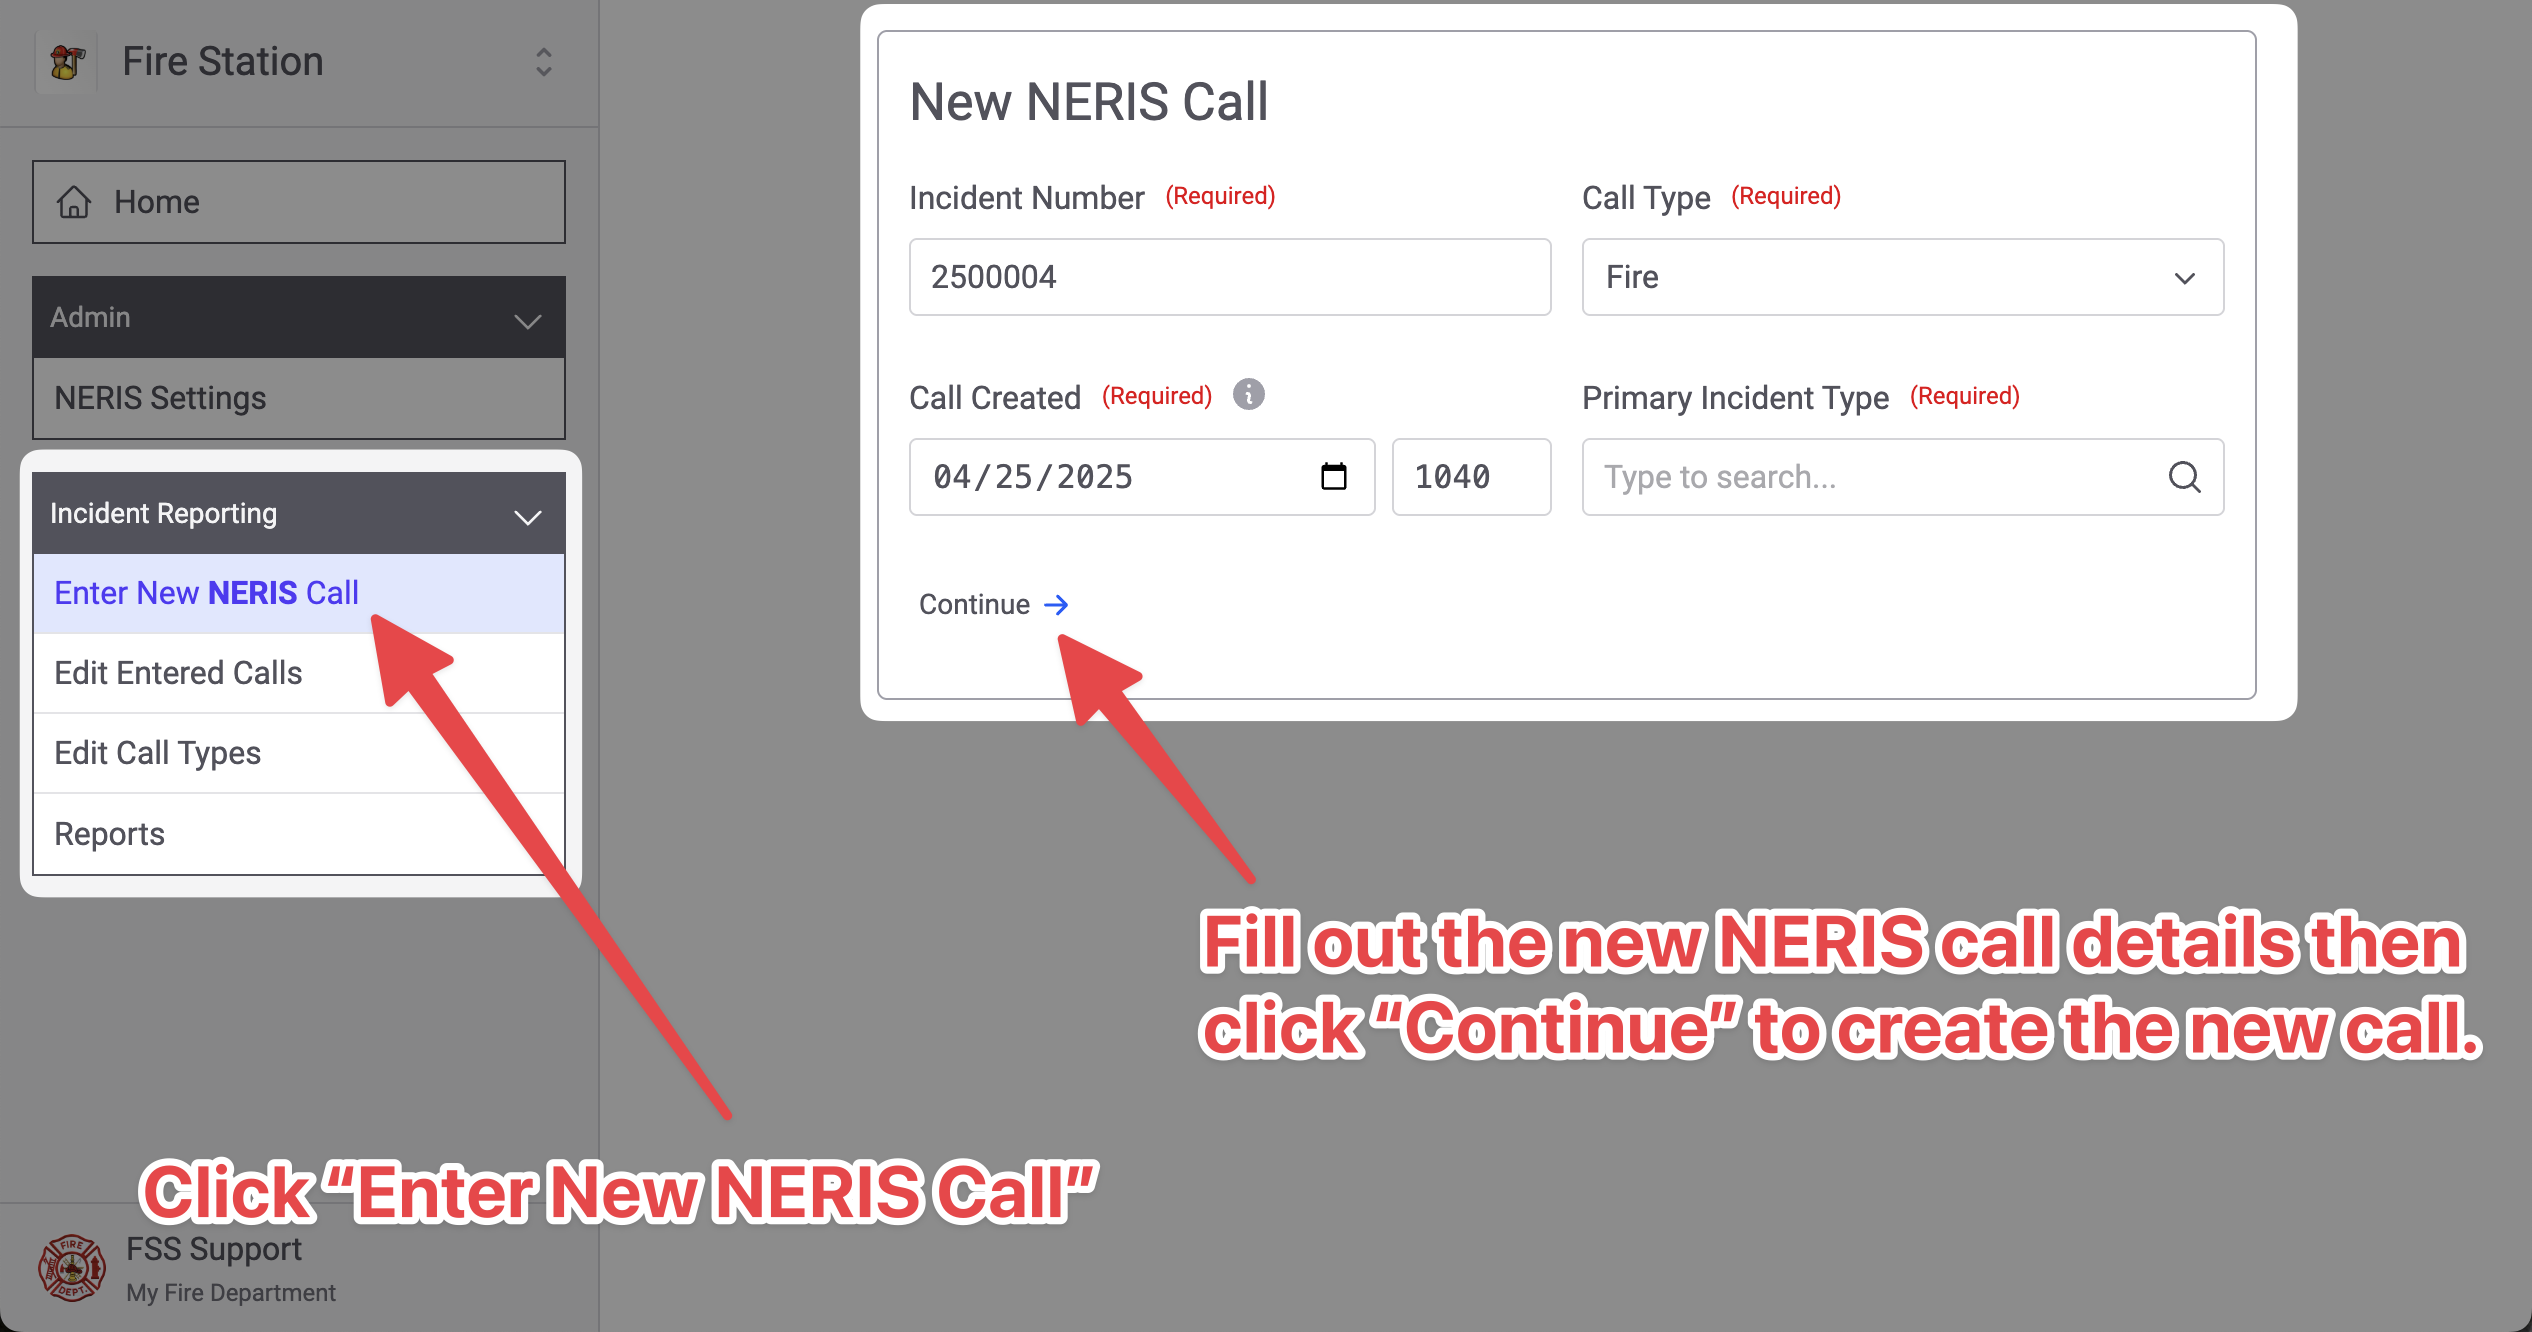
To create a new NERIS call, click the "Enter New NERIS Call" from the "Incident Reporting" section of the menu.
Enter the new NERIS call details then click "Continue" to save the call.
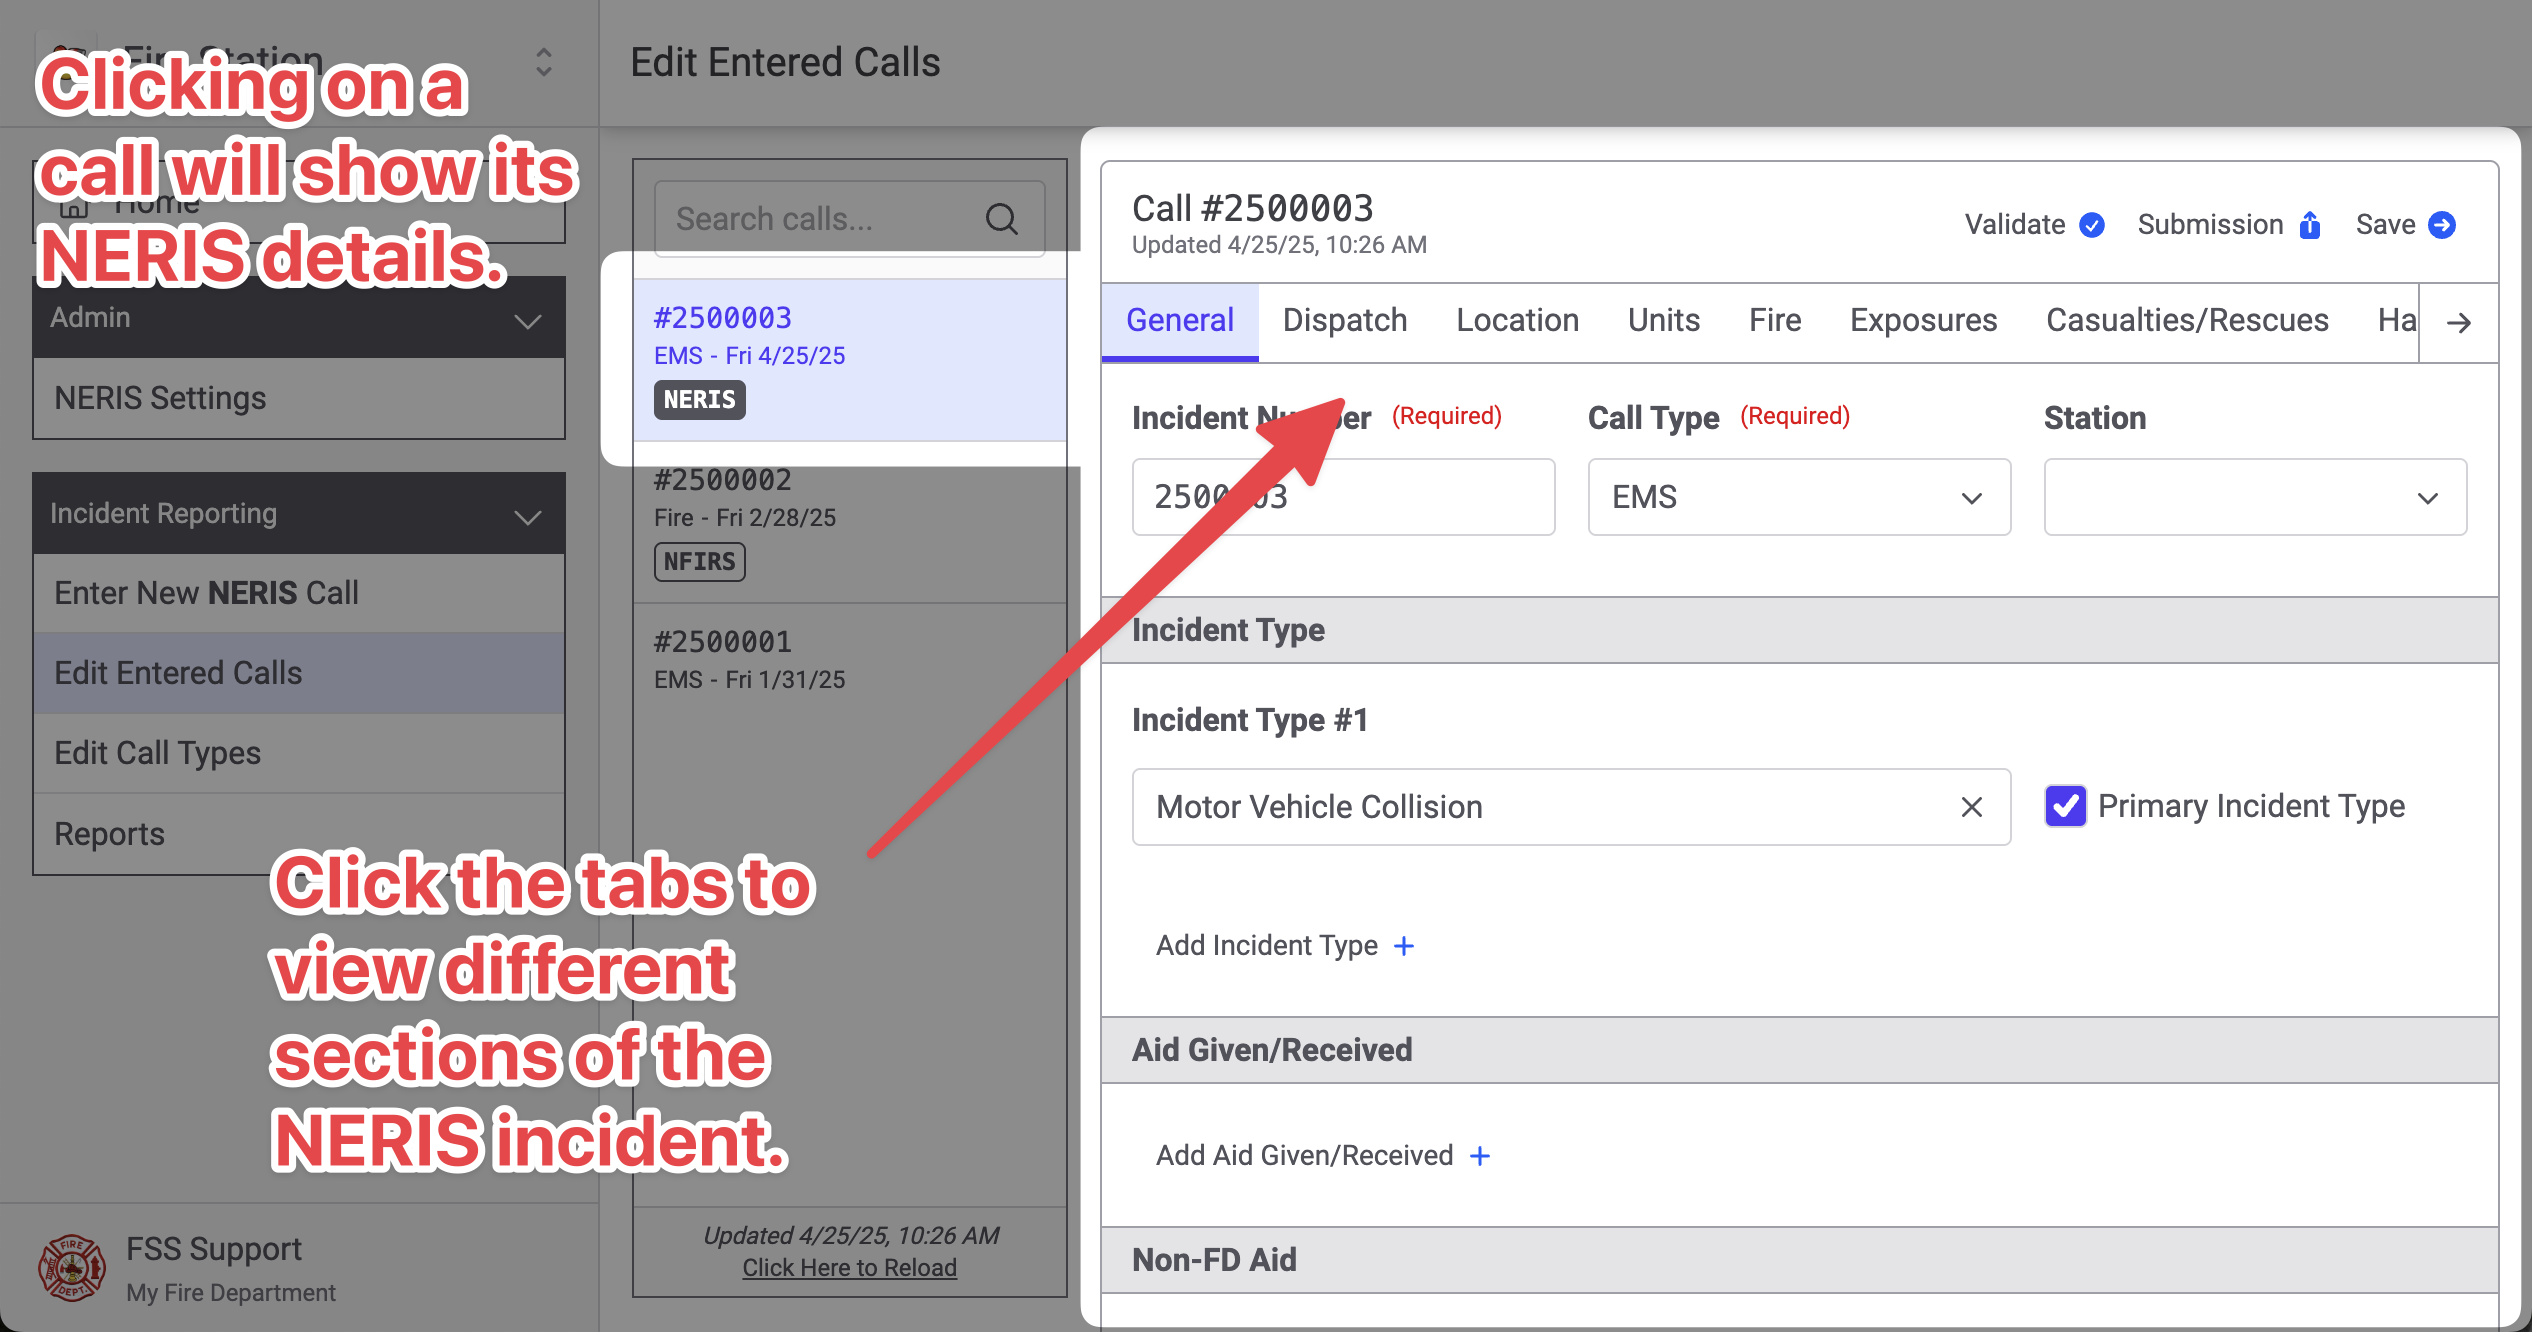
Editing NERIS Calls
Click on the tabs to view different sections of the NERIS incident.
The NERIS incident is automatically saved as you enter data. There is no need to click the save button. You will see this saving indicator in the top right while the call is being saved. It is ok to close the window or reload the page while the call is being saved, the changes will not be lost.
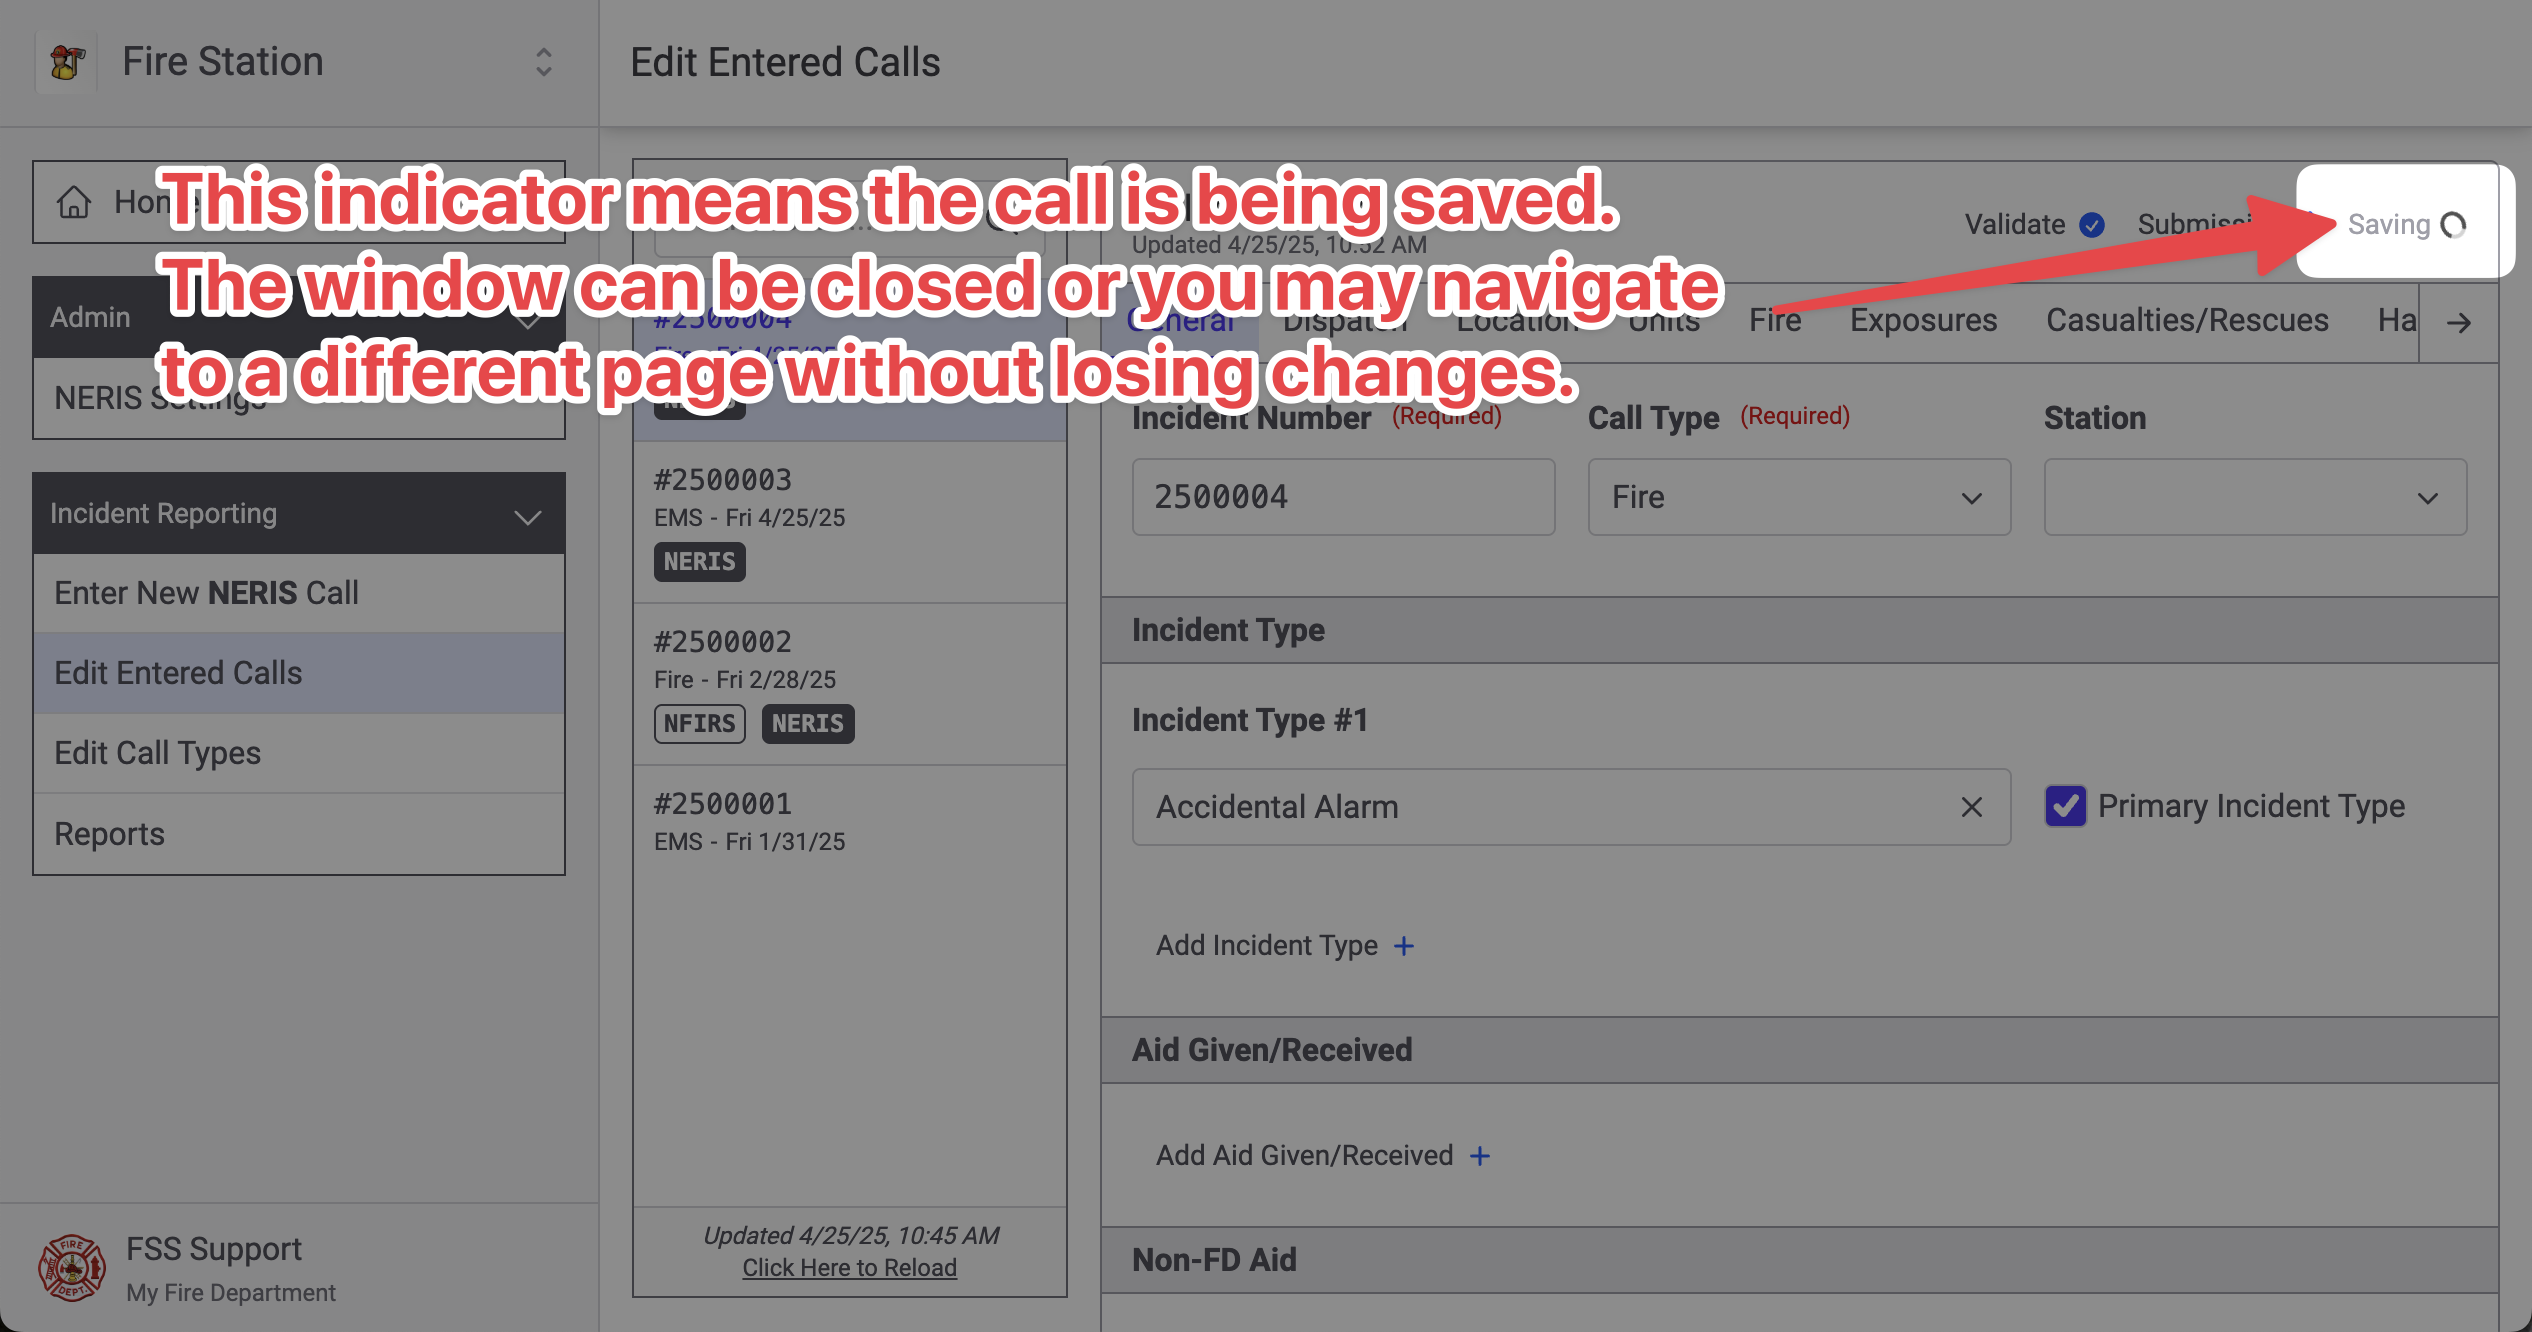
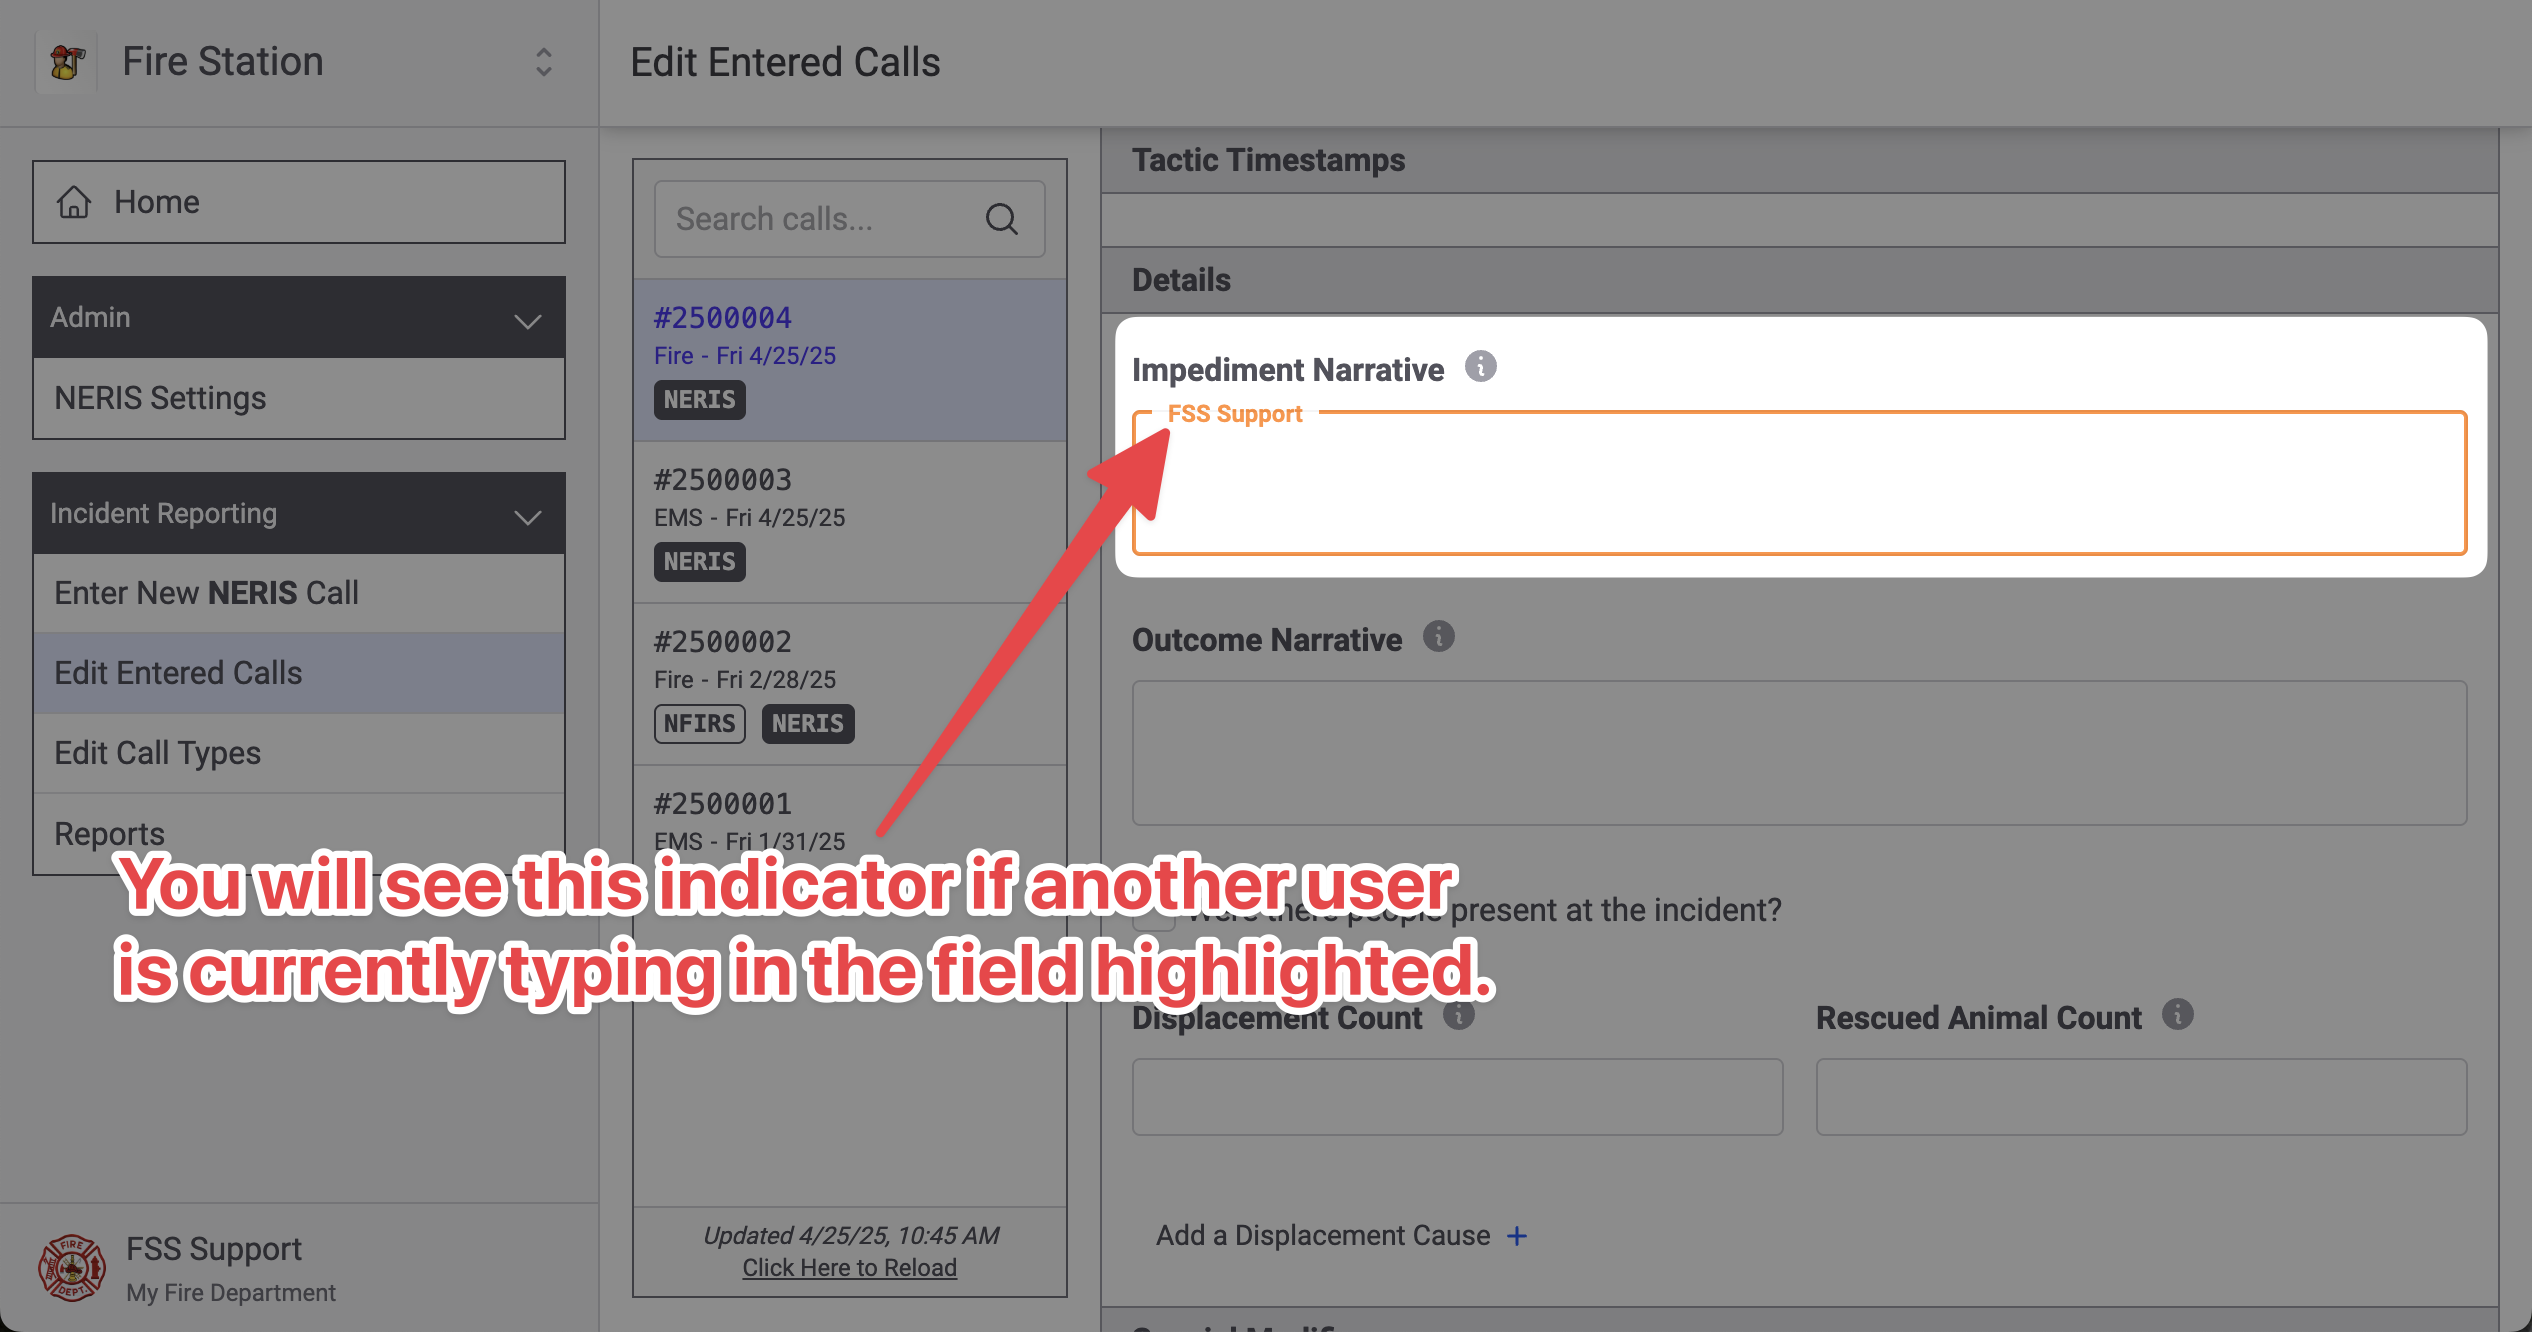
If multiple people are editing the same call, you will see an indicator as they make changes.
Validating NERIS Calls
While editing a NERIS call, you can validate the incident by clicking the "Validate" button at the top of the screen. This will validate the call and list out all the validation errors that have been found.
Validation issues are returned directly from NERIS as soon as you click the "Validate" button
This screen will say "There are no validation errors" when the call is ready to be submitted to NERIS
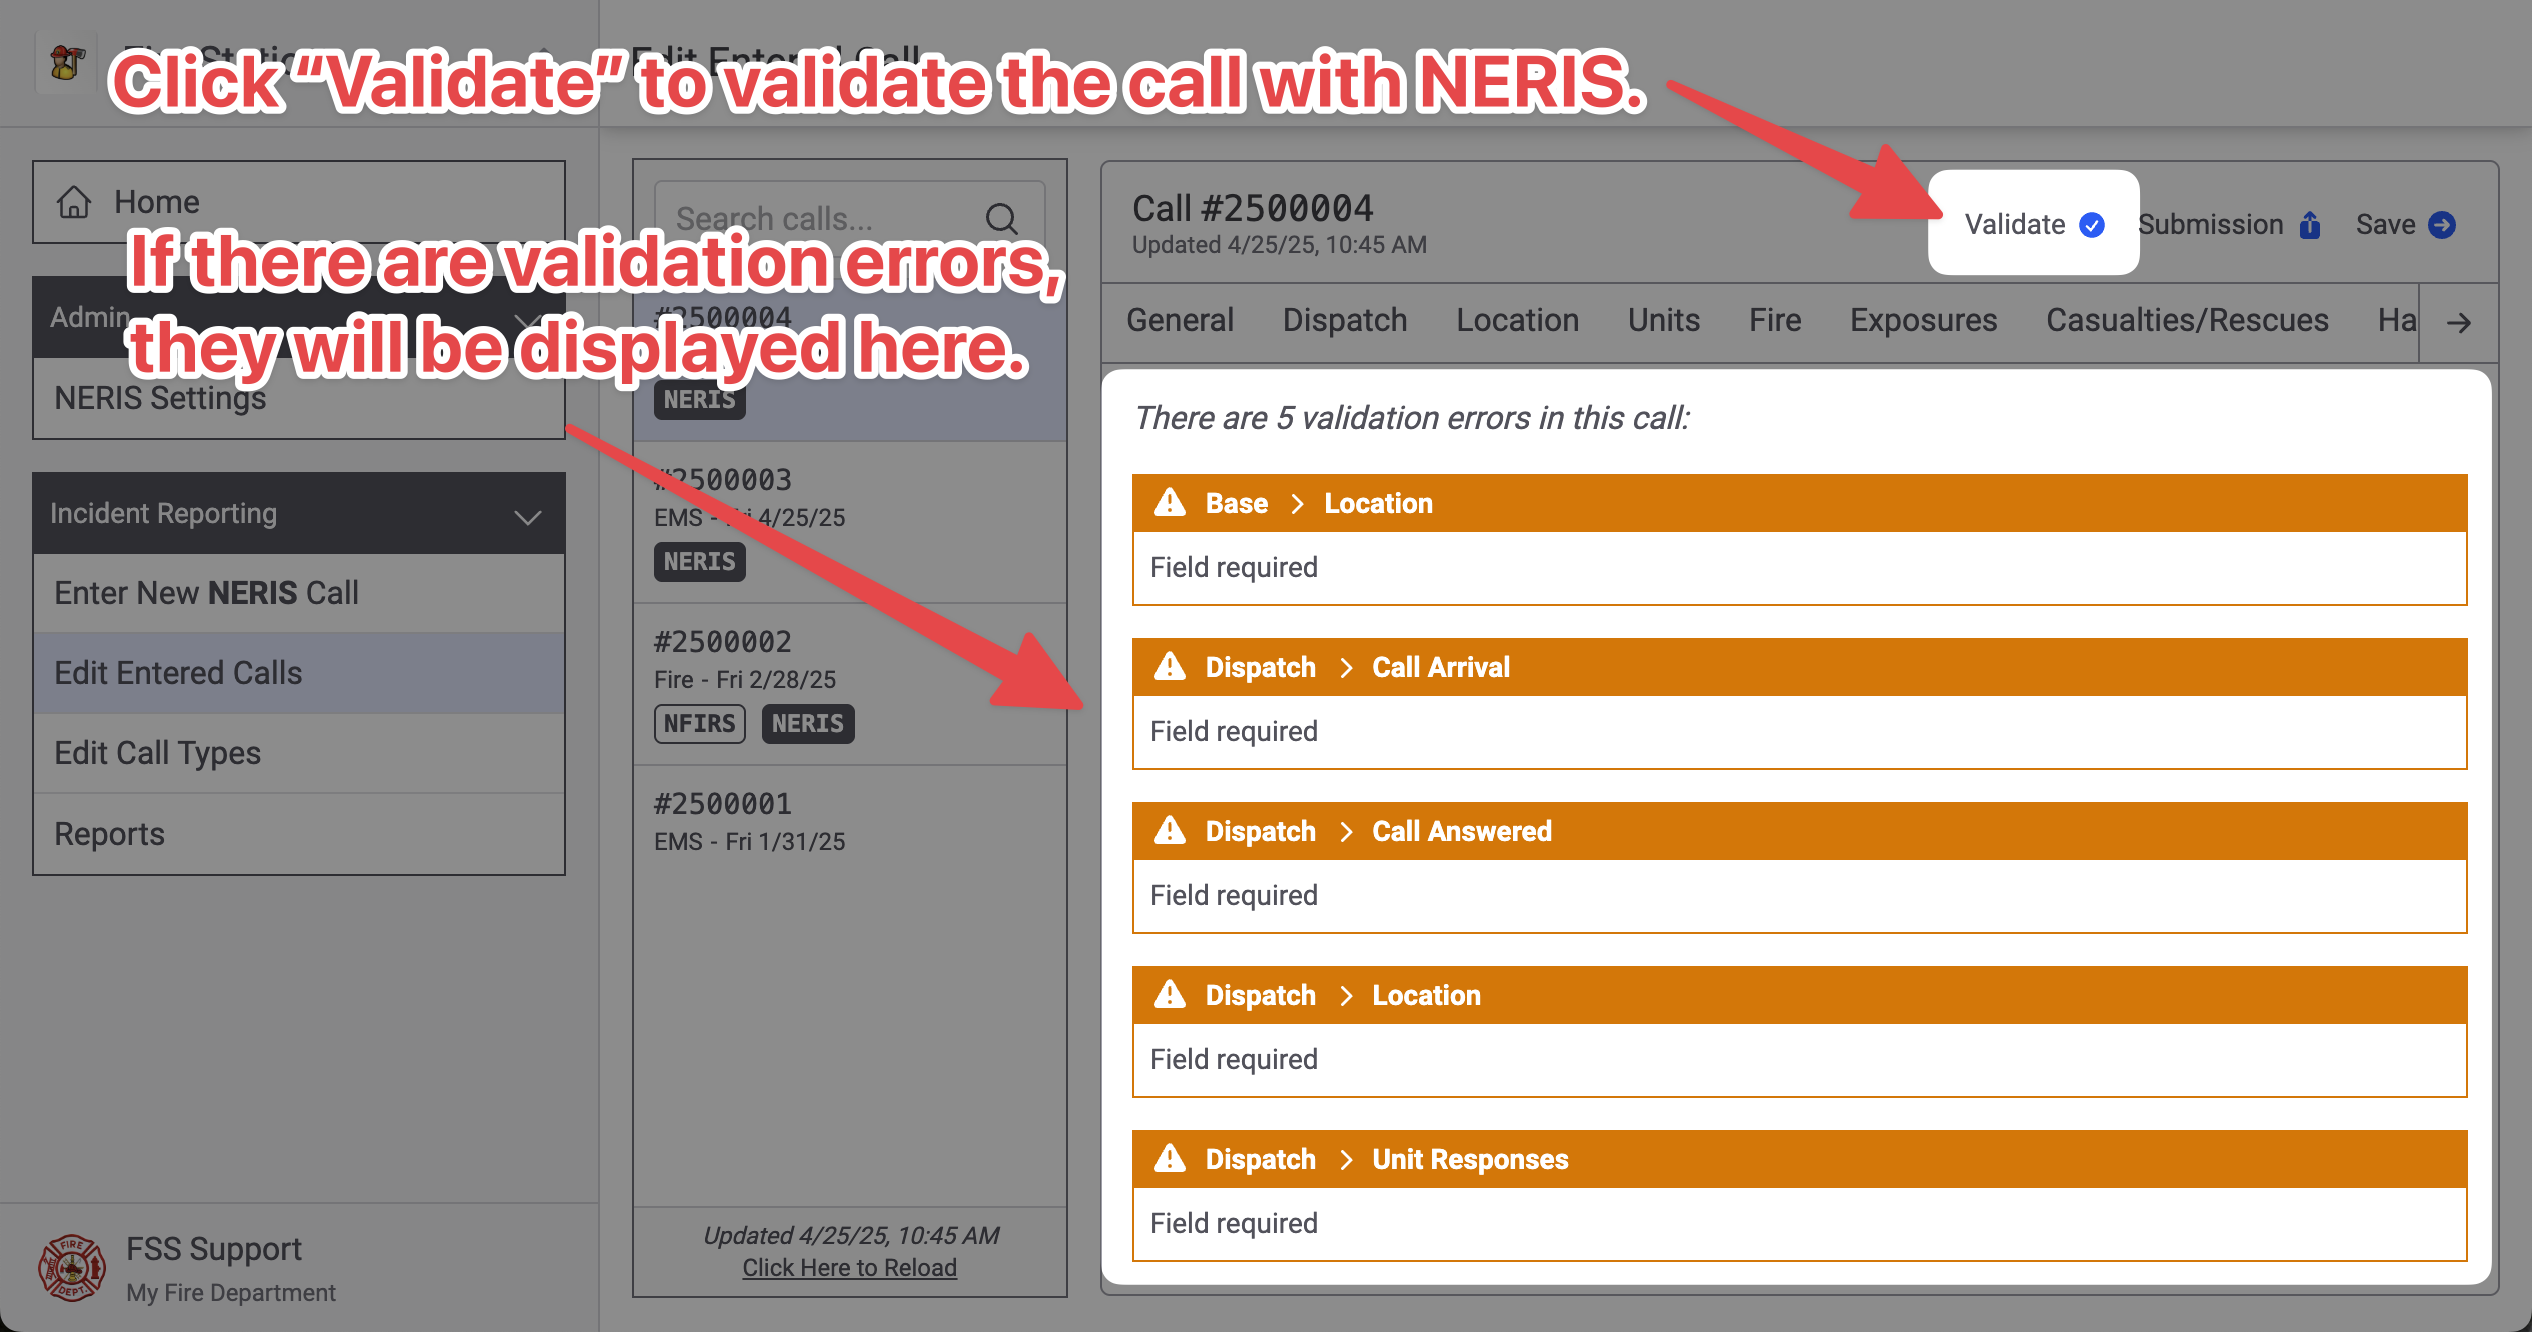
After validating a call, validation errors may also be displayed in applicable sections of the NERIS incident.
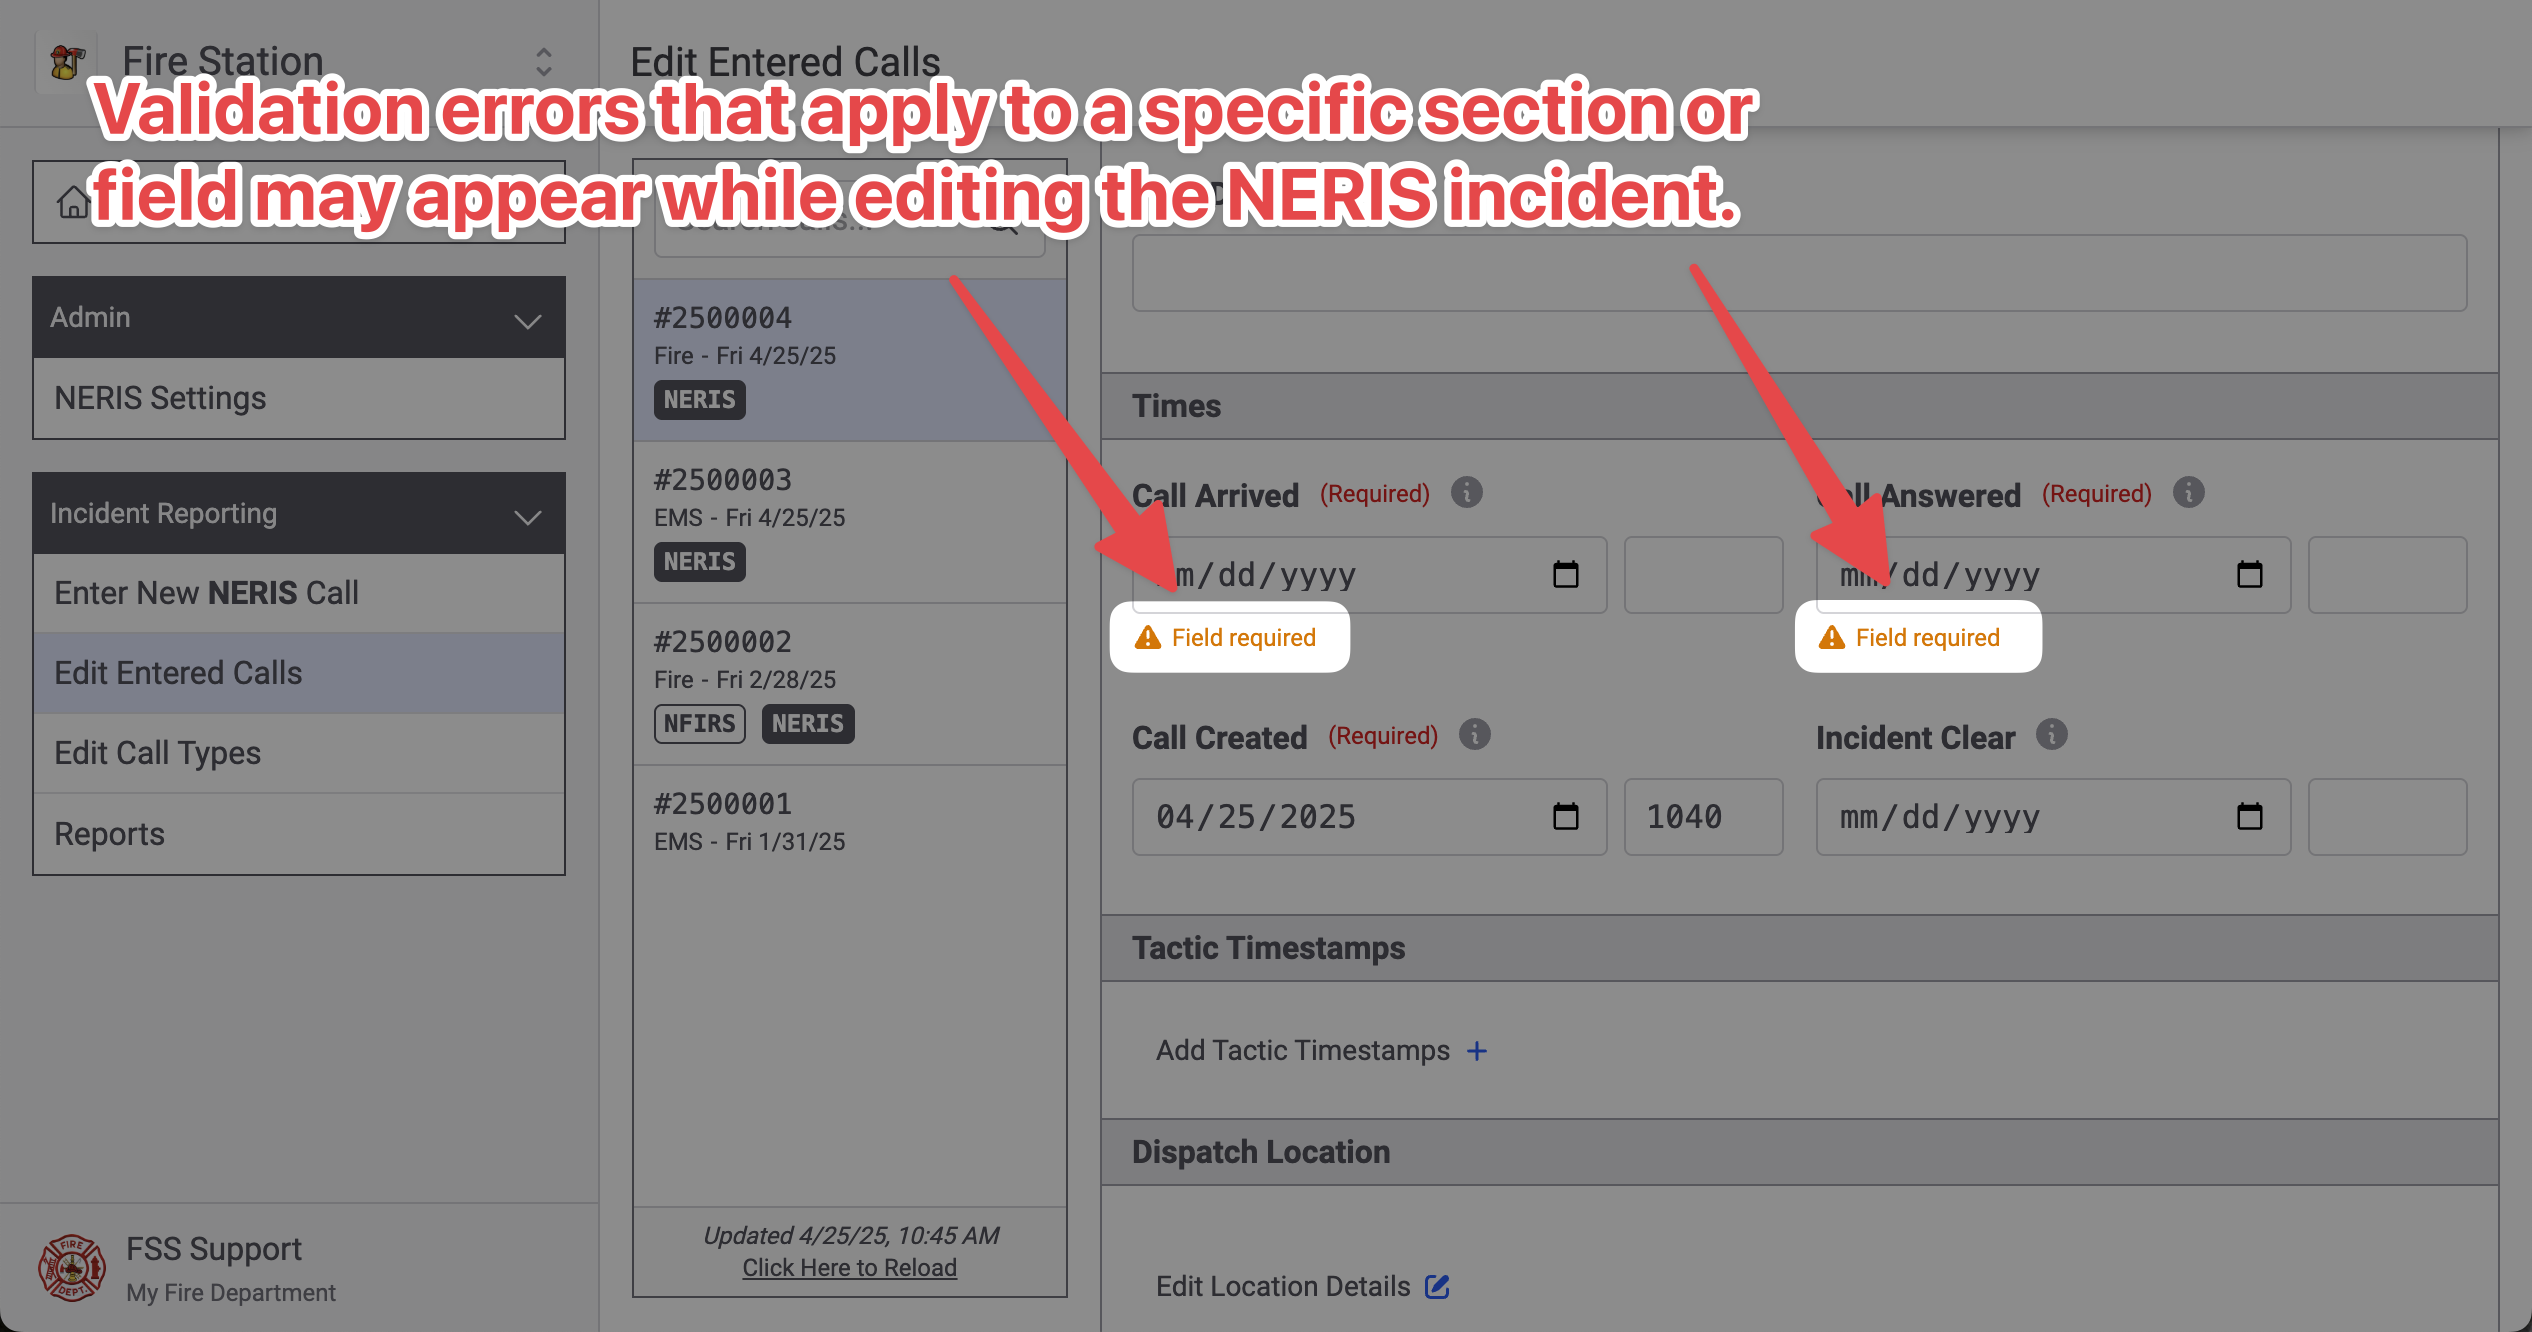
Note that validation errors do not disappear until the error has been corrected and the validate button has been clicked again, re-validating the call with NERIS.
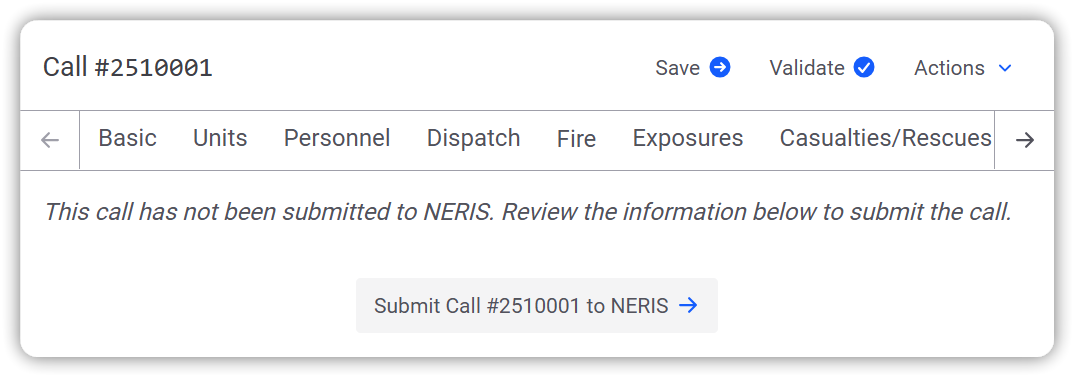
Submitting NERIS Calls
Once a NERIS call has been validated, the call can be submitted to NERIS. This will create the NERIS incident in NERIS.
You must have the NERIS Submission permission to submit calls to NERIS
To submit a call, click the "Actions" button in the top-right, then click the "Submit" option.
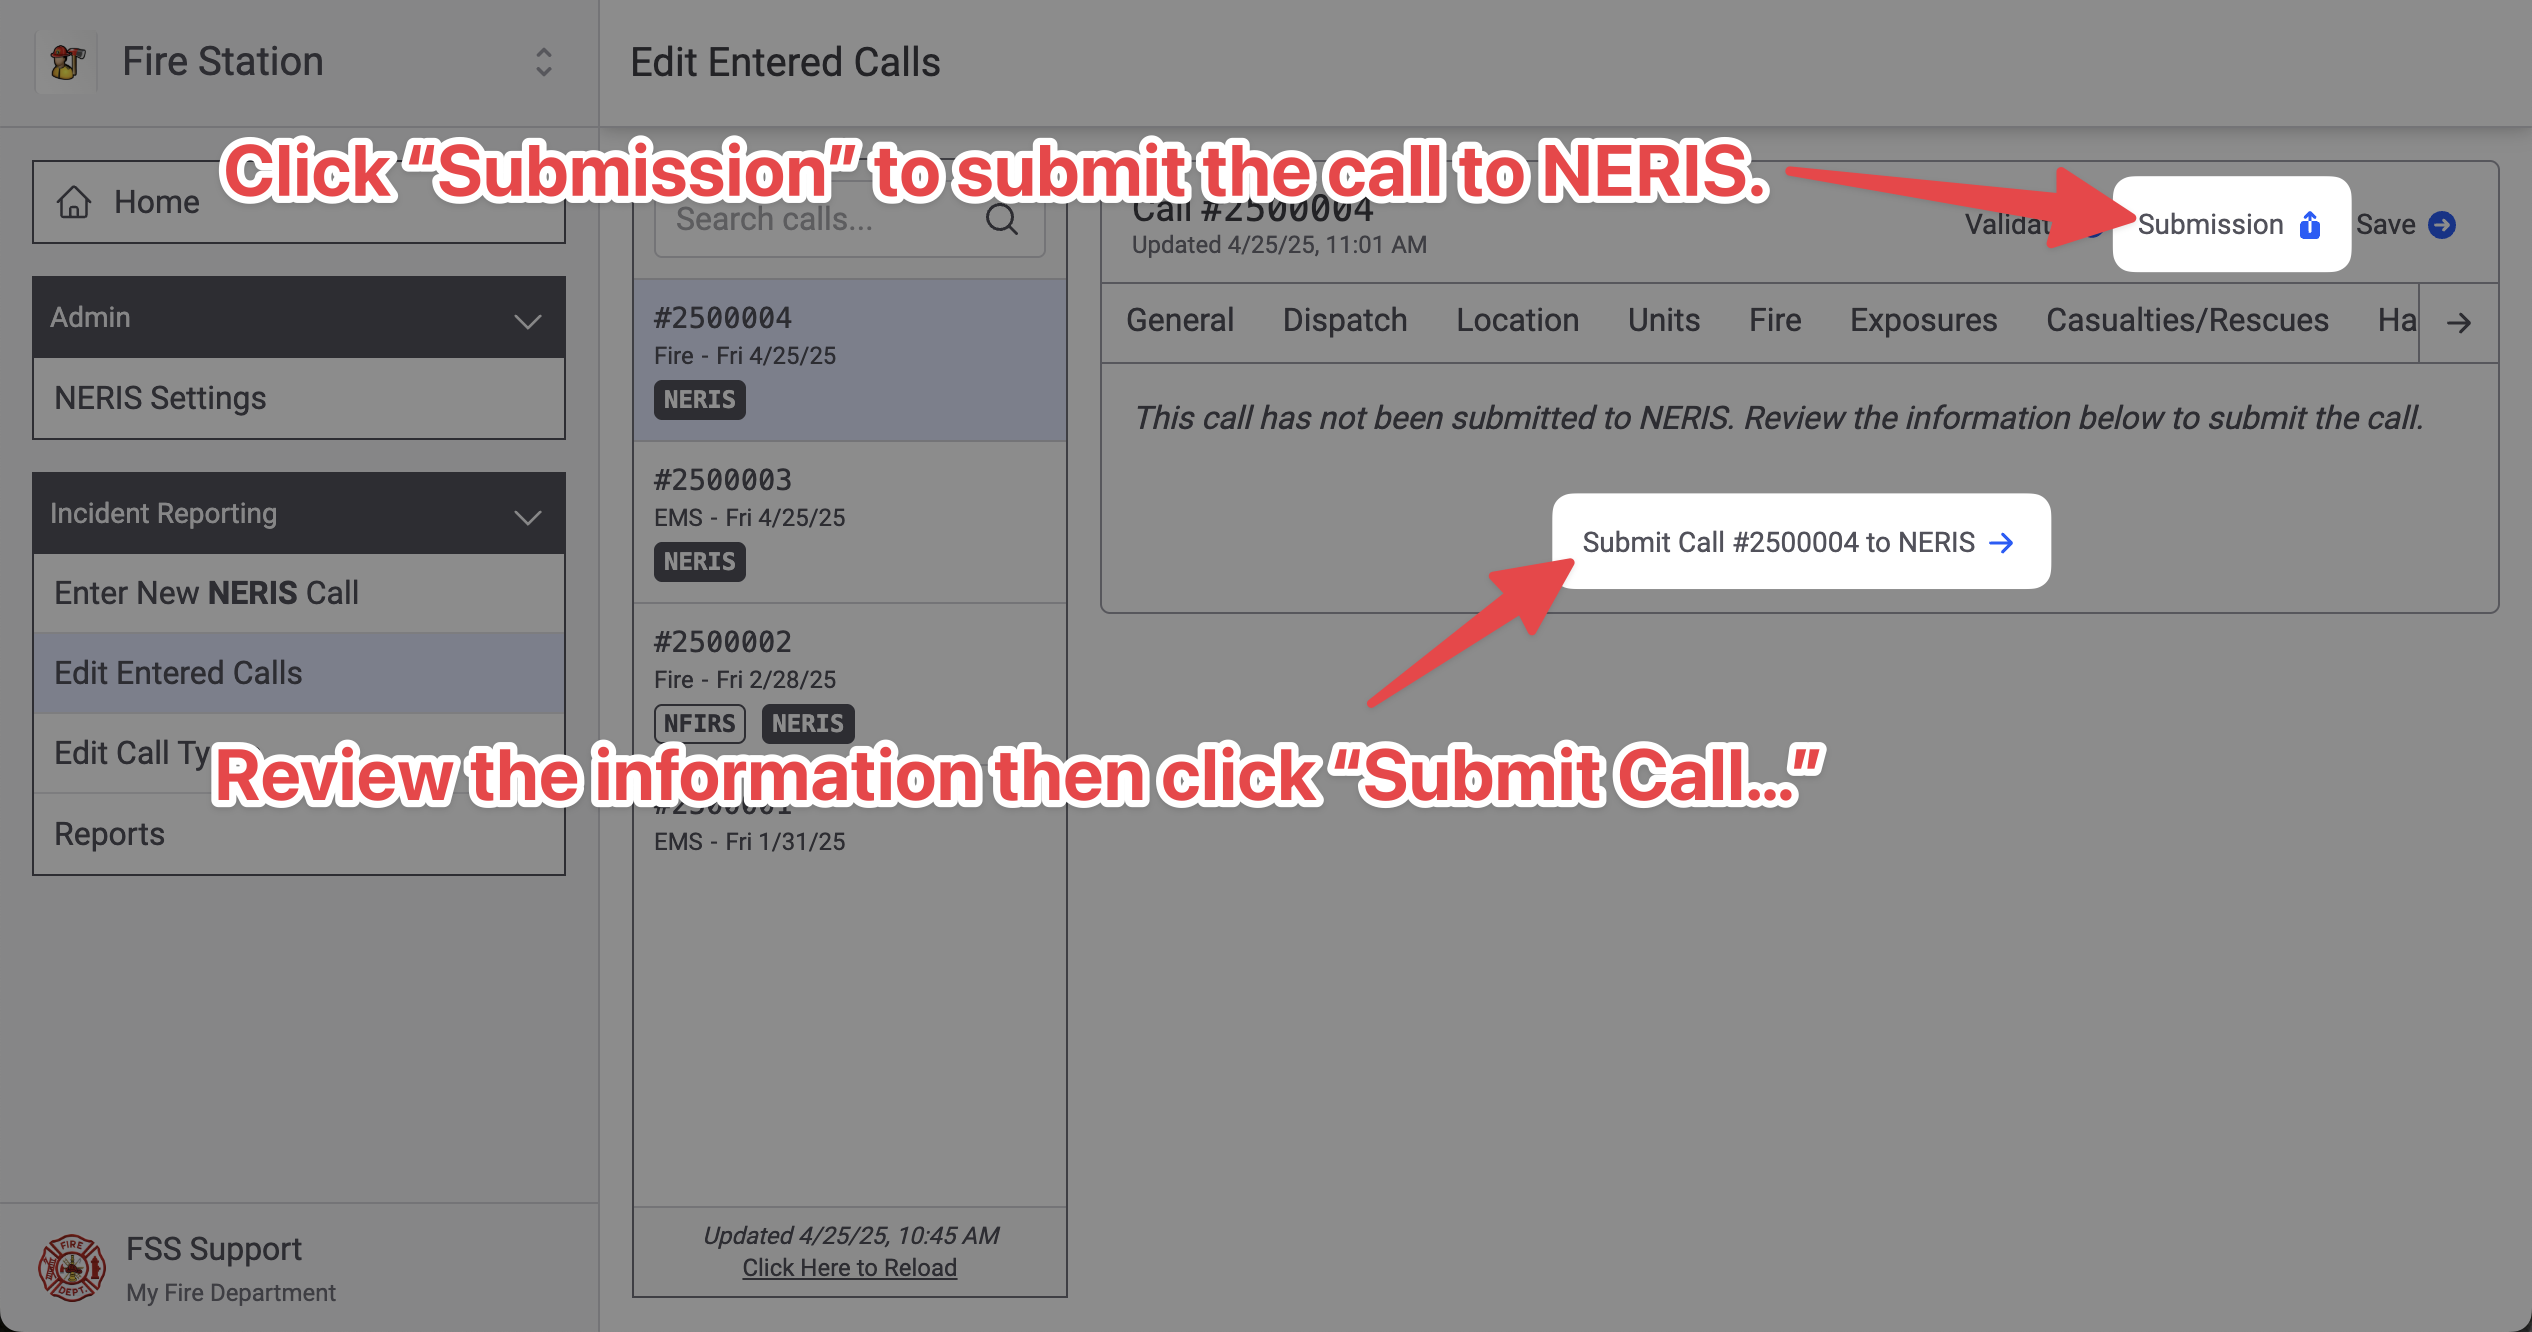
The next page re-validates the incident with NERIS. Click the "Submit Call..." to submit the call to NERIS.
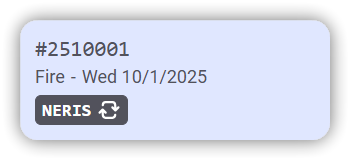
The call will be submitted and the status will be updated. Calls that have been submitted to NERIS show a checkmark in the call list.
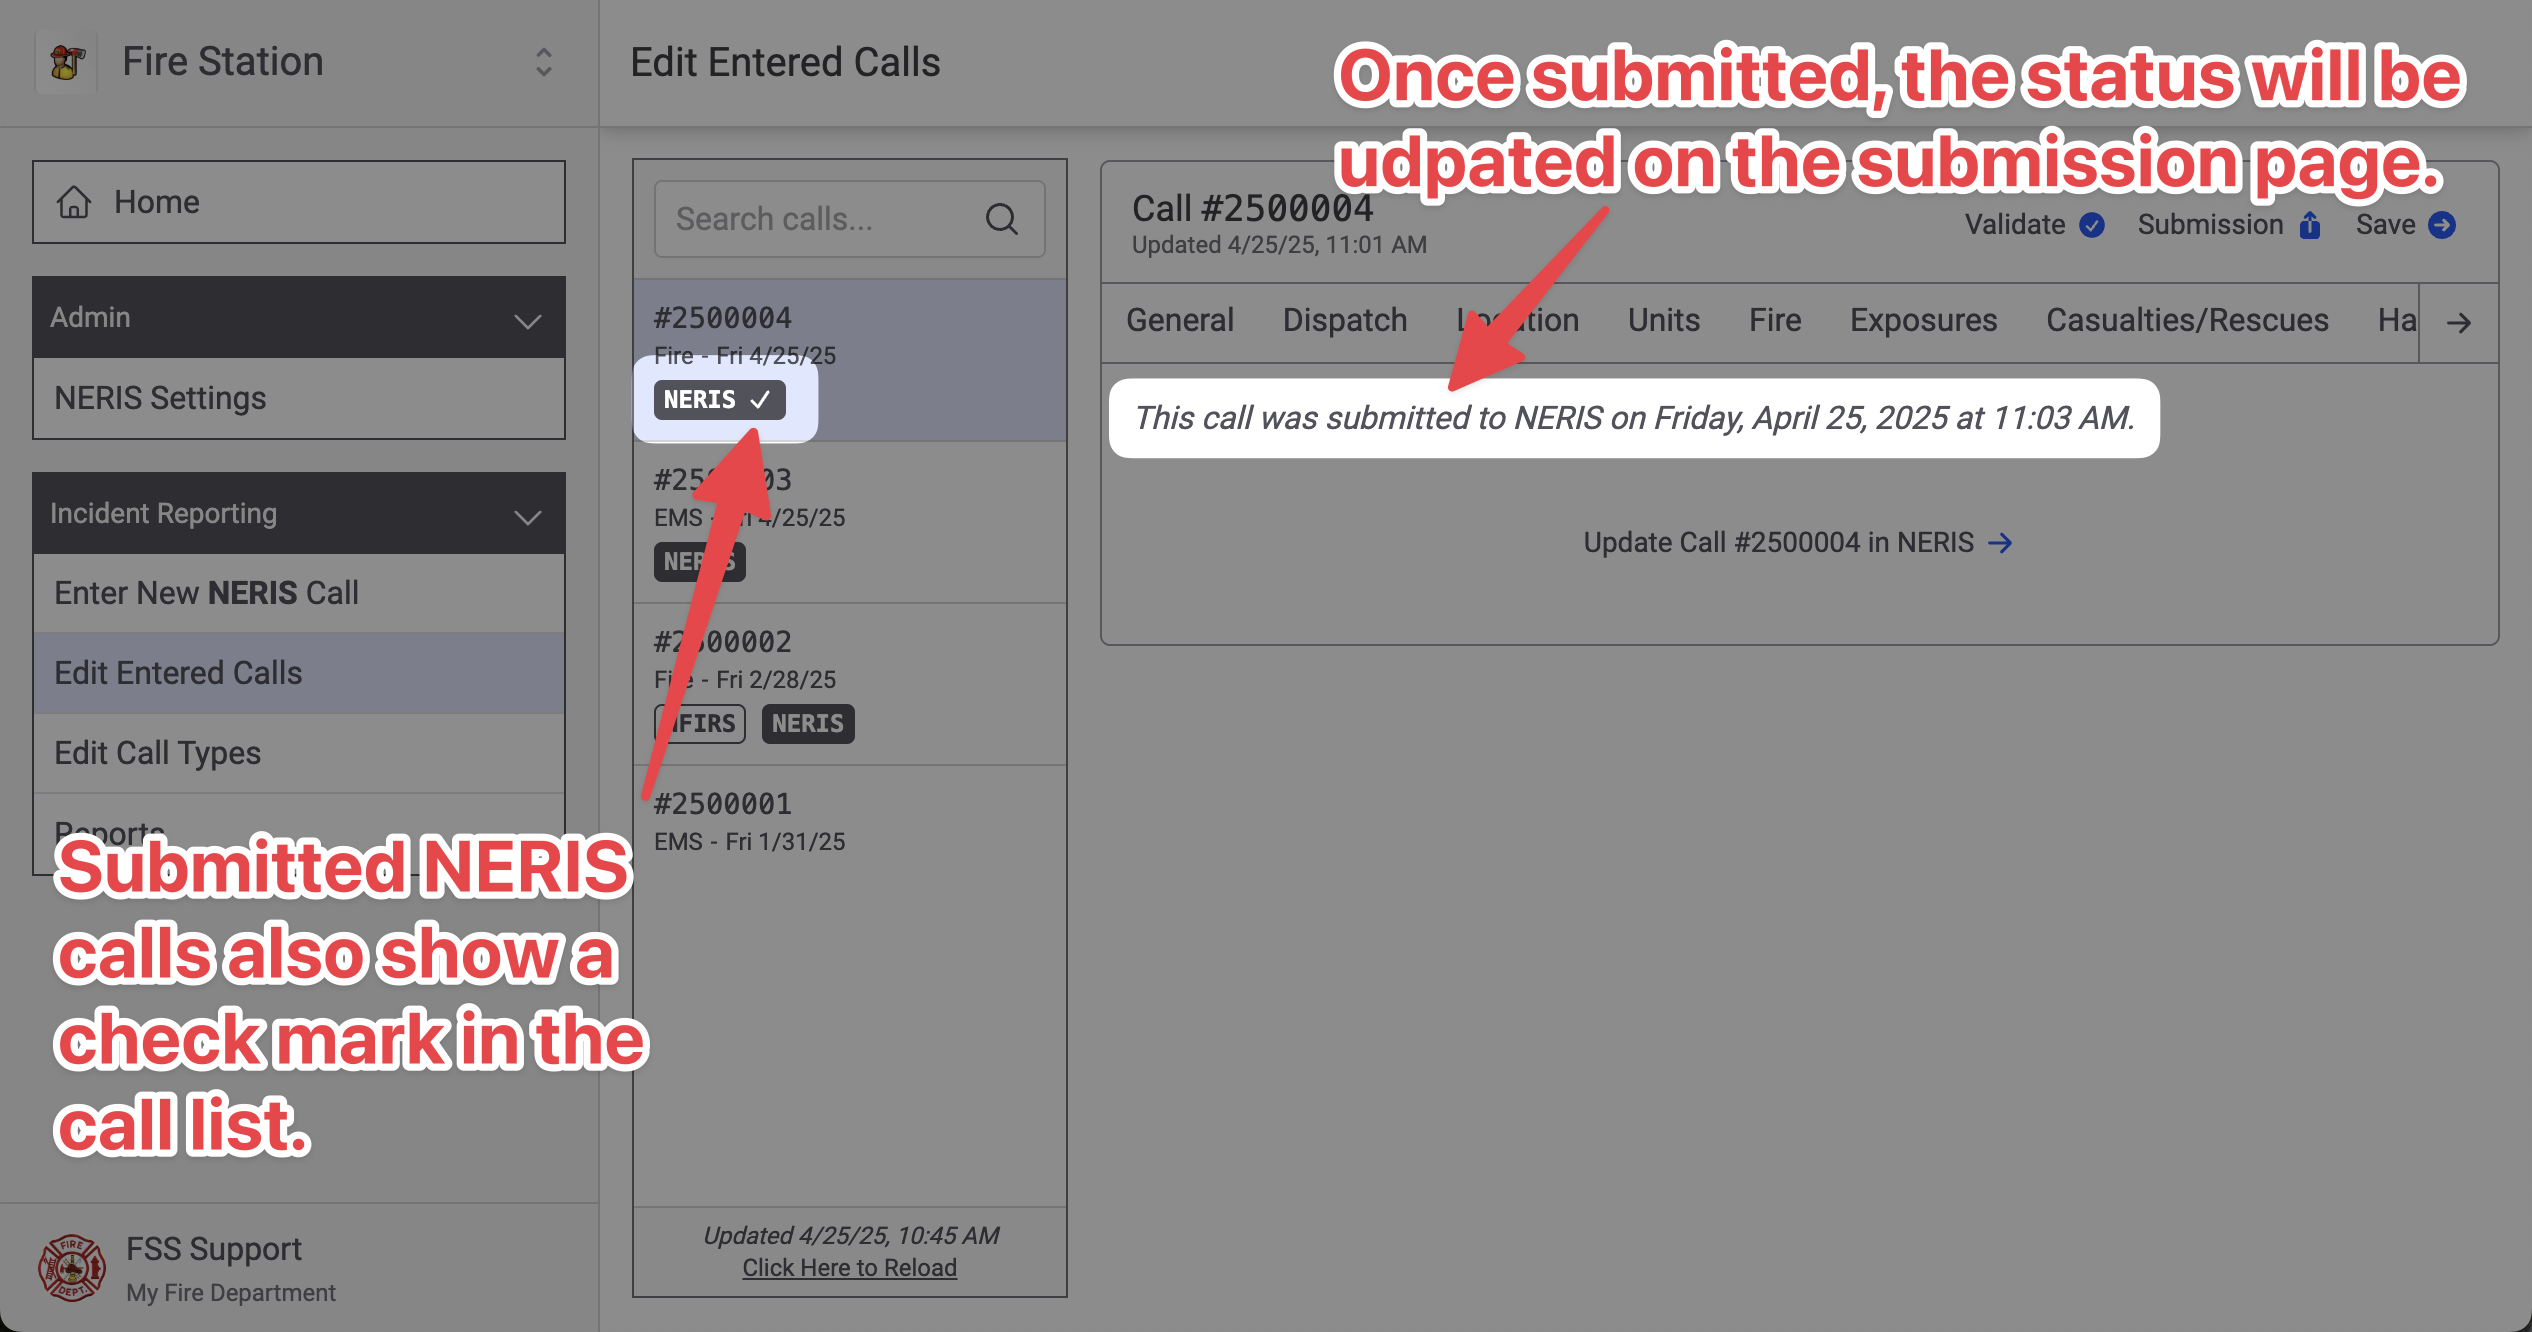
If you make changes to the call in Fire Station after submitting it to NERIS, the checkmark changes to an update in progress icon. This indicates that there are changes that need to be re-submitted to NERIS.
Appendix
Security Requirements
This article provides a summary of the security requirements necessary when using any of the Fire Station+ products (such as the Department Hub).
Domains and IP Addresses
The following domains used by Fire Station+
- hub.firestationsoftware.com
- id.firestationsoftware.com
- apparatus-checks.platform.firestationsoftware.com
- field-reports.firestationsoftware.com
The following IP addresses are used by Fire Station+
- 159.89.244.89
- 45.55.64.197
- 45.55.69.140
- 45.55.66.17
- 159.203.150.119
- 159.65.33.78
This list is subject to change.
Certificate Trust
Fire Station+ uses HTTPS to encrypt data sent over the internet. The SSL certificate used to establish a trusted connection is distributed by Let's Encrypt. Your computer must include the ISRG Root X1 certificate as a trusted root CA certificate. This should be included automatically, under most circumstances.
If you need to install this certificate, it can be downloaded using the following link:
https://letsencrypt.org/certs/isrgrootx1.pem
The SHA-1 fingerprint of this certificate is:
CA:BD:2A:79:A1:07:6A:31:F2:1D:25:36:35:CB:03:9D:43:29:A5:E8If this certificate is not trusted you may see an error stating that "The SSL Connection could not be established".

TLS/HTTPS Requirements
Fire Station+ is compatible with TLS 1.2 or TLS 1.3 and supports the following ciphers.
- ECDHE-ECDSA-AES128-GCM-SHA256
- ECDHE-RSA-AES128-GCM-SHA256
- ECDHE-ECDSA-AES256-GCM-SHA384
- ECDHE-RSA-AES256-GCM-SHA384
- ECDHE-ECDSA-CHACHA20-POLY1305
- ECDHE-RSA-CHACHA20-POLY1305
- DHE-RSA-AES128-GCM-SHA256
- DHE-RSA-AES256-GCM-SHA384
- ECDHE-RSA-AES256-SHA384